Lesson 20 - Collaboration
In this lesson, we'll explore how to implement multi-user collaborative editing functionality.
- Classification and implementation of CRDTs
- Using Loro / Yjs and BroadcastChannel to simulate collaboration on localhost
- Using liveblocks to implement collaborative editing between servers and multiple clients
- End-to-end encrypted CRDTs
- Awareness and presence, including multiplayer cursors and comments
CRDT
What is CRDT? The following introduction comes from What are CRDTs. The collaborative features of Google Docs / Figma / Tiptap are all implemented based on it. This article also compares the characteristics of CRDT and OT in detail:
CRDT (conflict-free replicated data type) is a data structure that can be replicated across multiple computers in a network, where replicas can be updated independently and in parallel, without the need for coordination between replicas, and with a guarantee that no conflicts will occur.
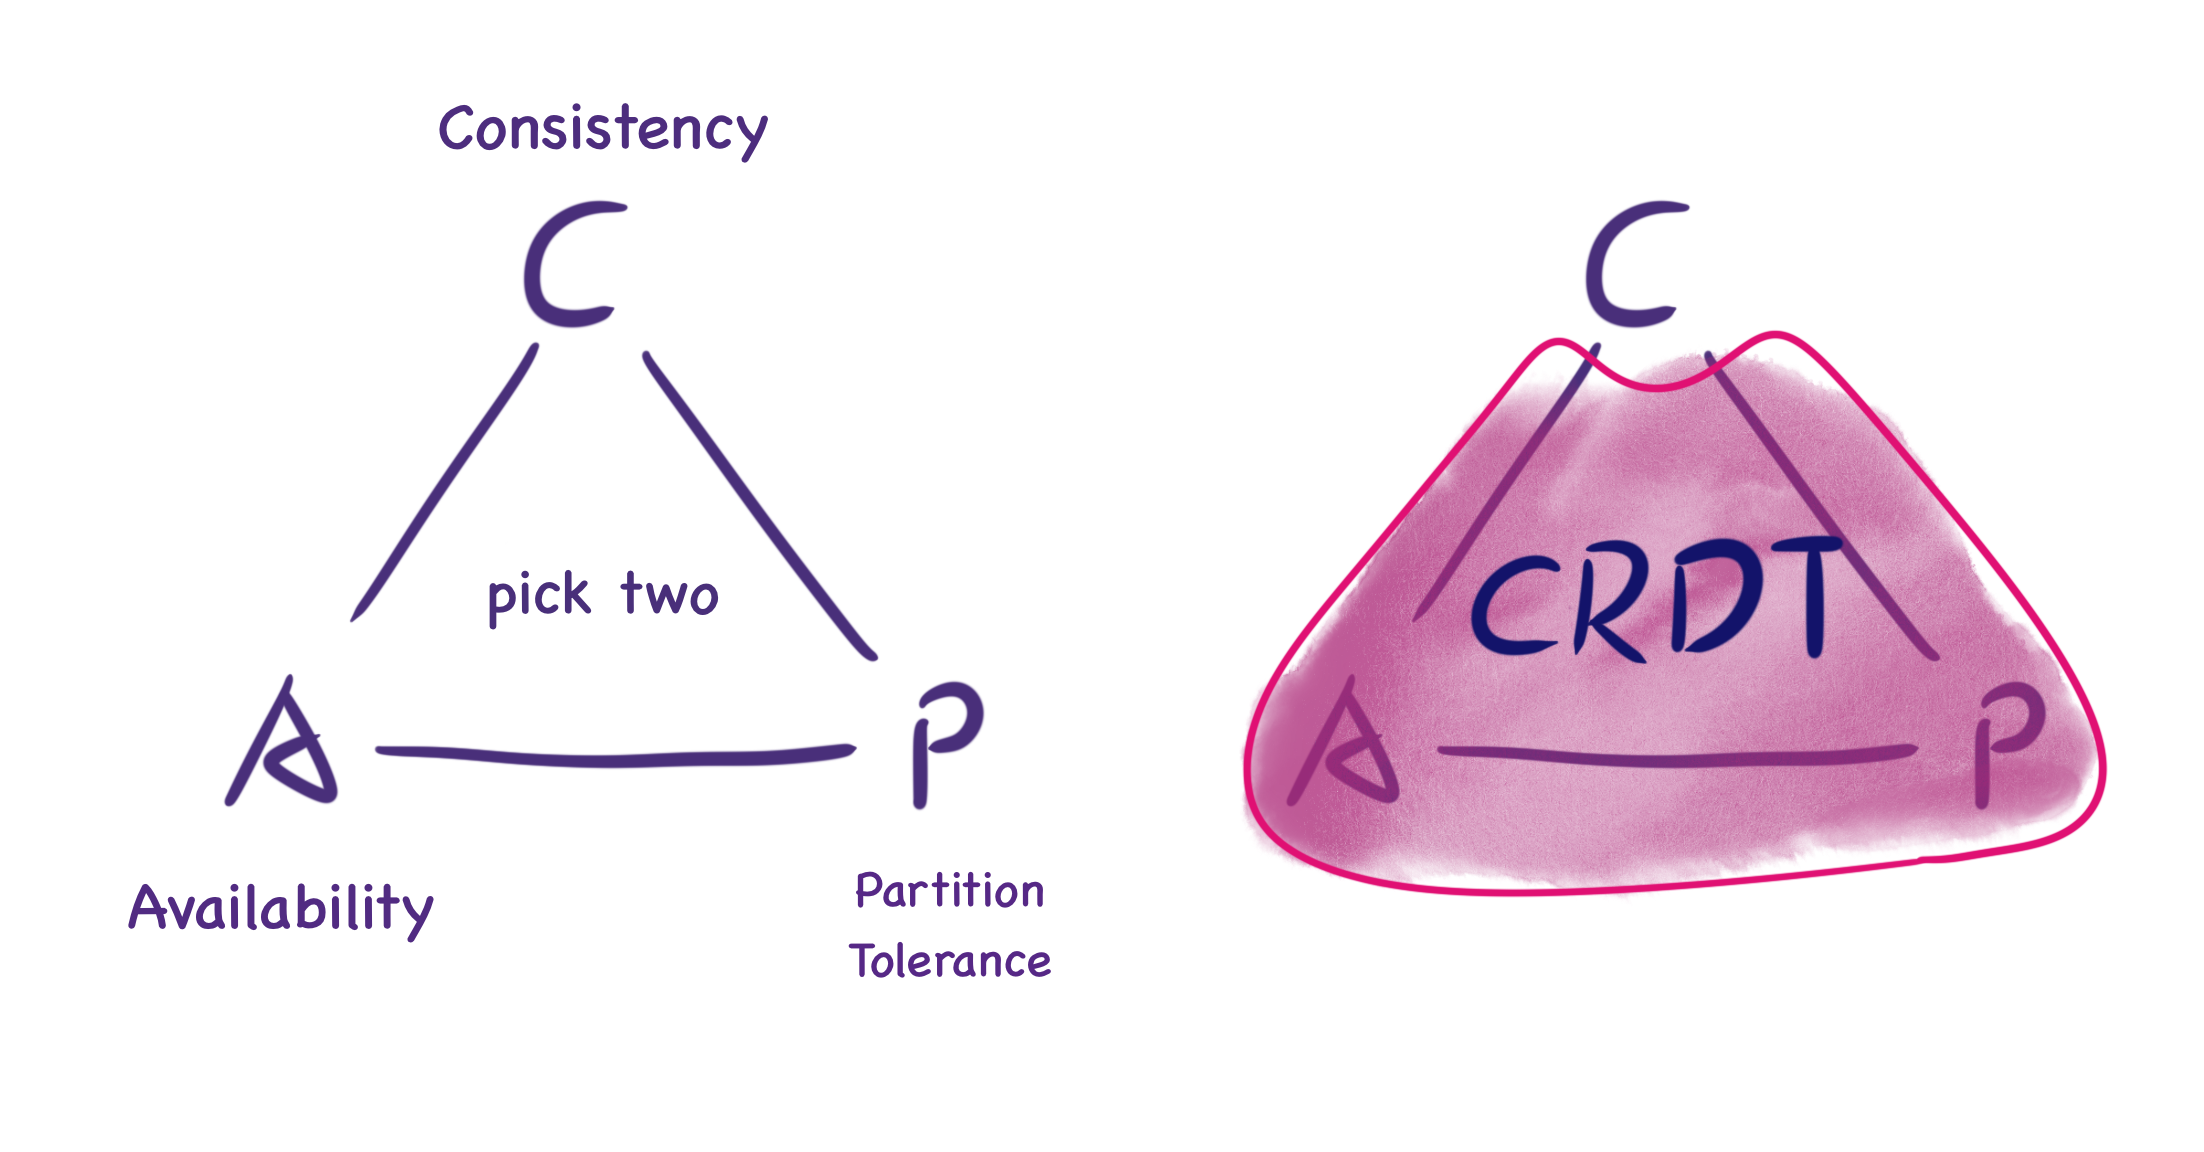
The following image from What are CRDTs shows that under the CAP theorem, CRDT doesn't provide "perfect consistency" but eventual consistency. Although real-time consistency cannot be guaranteed, when two nodes synchronize messages, they will return to a consistent state.
How Figma's multiplayer technology works explains why Figma didn't choose OT like Google Docs.
It's also worth noting that Figma's data structure isn't a single CRDT. Instead it's inspired by multiple separate CRDTs and uses them in combination to create the final data structure that represents a Figma document (described below).
Two Types of CRDTs
There are two types of CRDTs: Op-based and State-based. The principle of the former is that if two users execute the same sequence of operations, the final state of the document should also be the same. To achieve this, each user maintains all operations executed on the data and synchronizes these operations with other users to ensure the final state. The latter requires transferring the entire state between nodes. While the former appears to require less bandwidth as it only transmits operation descriptions, it requires complex implementation to ensure idempotent operations and handle operation order issues. Comparatively, the latter's implementation is simpler.
Now let's understand State-based CRDT through this tutorial series:
- An Interactive Intro to CRDTs
- Building a Collaborative Pixel Art Editor with CRDTs
- Making CRDTs 98% More Efficient
The tutorial provides a generic data structure for CRDT that includes a merge function that must satisfy associativity, commutativity, and idempotency. This merge function can be a Last-Writer Wins(LWW) Register, which compares its own timestamp with the input data's timestamp each time, and updates its own data if the input data's timestamp is larger:
interface CRDT<T, S> {
    value: T;
    state: S;
    merge(state: S): void;
}
Key-value style sheets are well-suited for using LWW Register. Designing Data Structures for Collaborative Apps introduces the {bold: true} style used by the Quill editor.
More helpful for our scenario is How Figma's multiplayer technology works, where Figma's CTO introduces the DOM-like tree structure (scene graph) used internally. Each object has an ID and a set of property values, which can be seen as a two-level mapping: Map<ObjectID, Map<Property, Value>>. Different merge strategies are adopted when handling object properties, object addition/deletion, order, and other issues:
- Modifying the same property of an object. For example, when two users modify the property value of the same text object to AB and BC respectively, Figma won't use a merge algorithm to get ABC as the result, but depends on when the server receives the messages.
- Object addition/deletion. Creating objects directly uses LWW Register. The difference from the CRDT model is in the behavior when deleting objects - Figma's server doesn't save the properties of deleted objects but lets the client handle storage for potential undo operations.
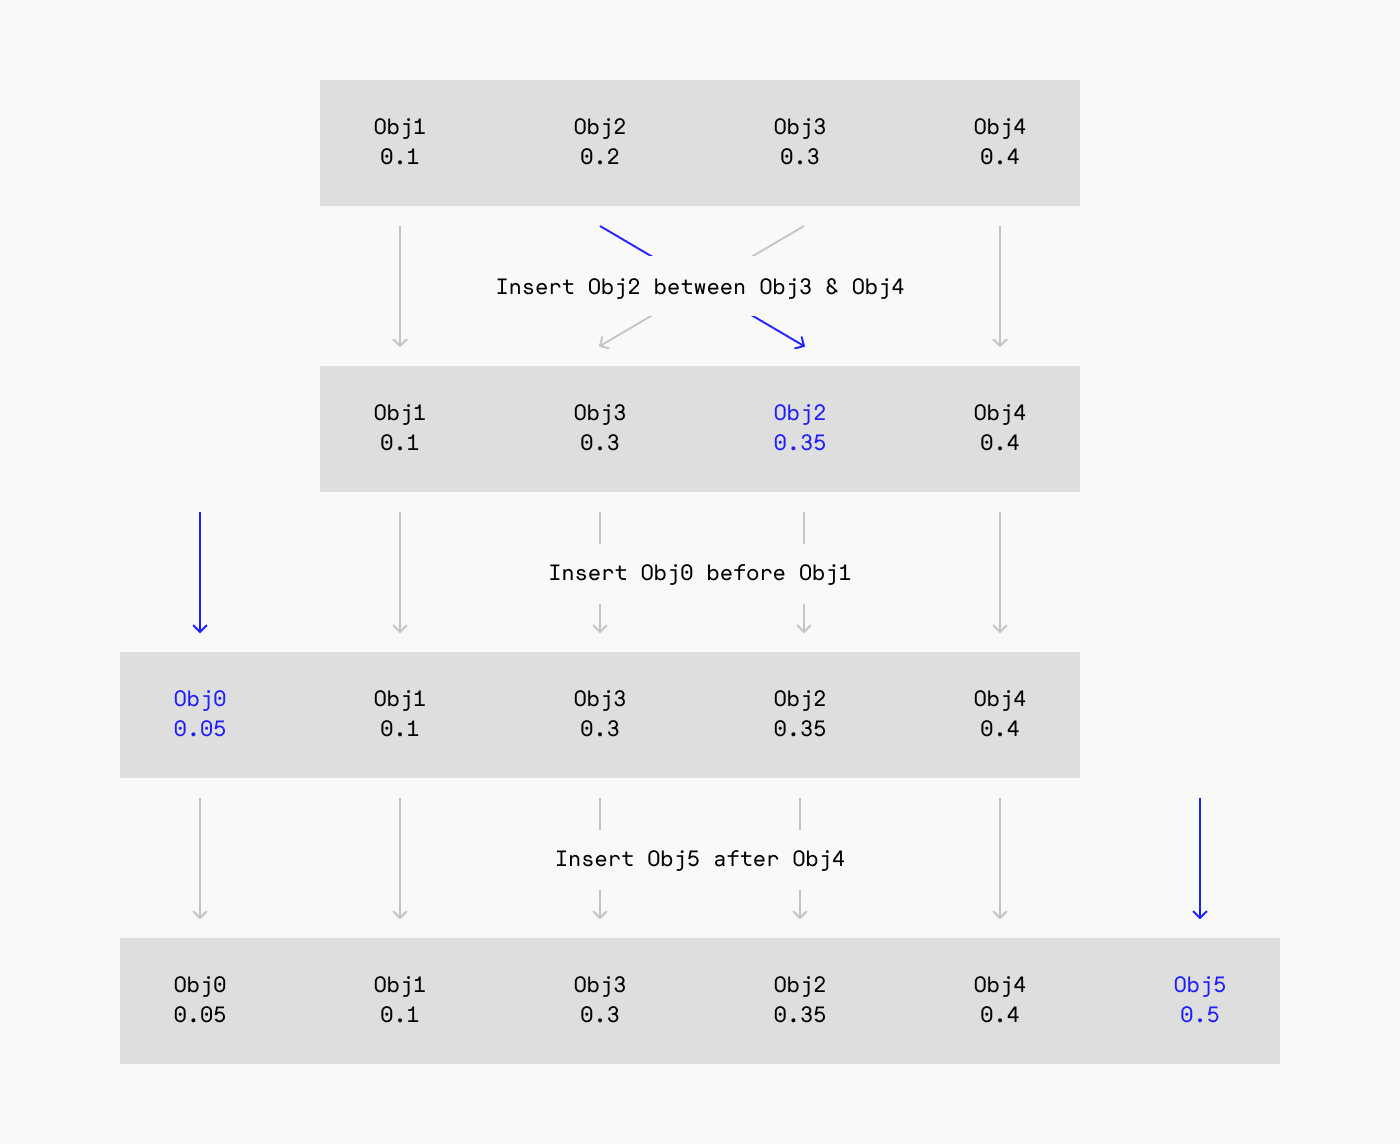
- Scene graph structure changes. Child nodes reference parent node IDs through properties, and positions in the node list are implemented using Fractional indexing. The advantage is that changing position only requires updating one value, see: Realtime editing of ordered sequences. One defect of this solution, interleaving, is also not considered.
Local-first Software
Local-first software - You own your data, in spite of the cloud
In this article we propose "local-first software": a set of principles for software that enables both collaboration and ownership for users. Local-first ideals include the ability to work offline and collaborate across multiple devices, while also improving the security, privacy, long-term preservation, and user control of data.
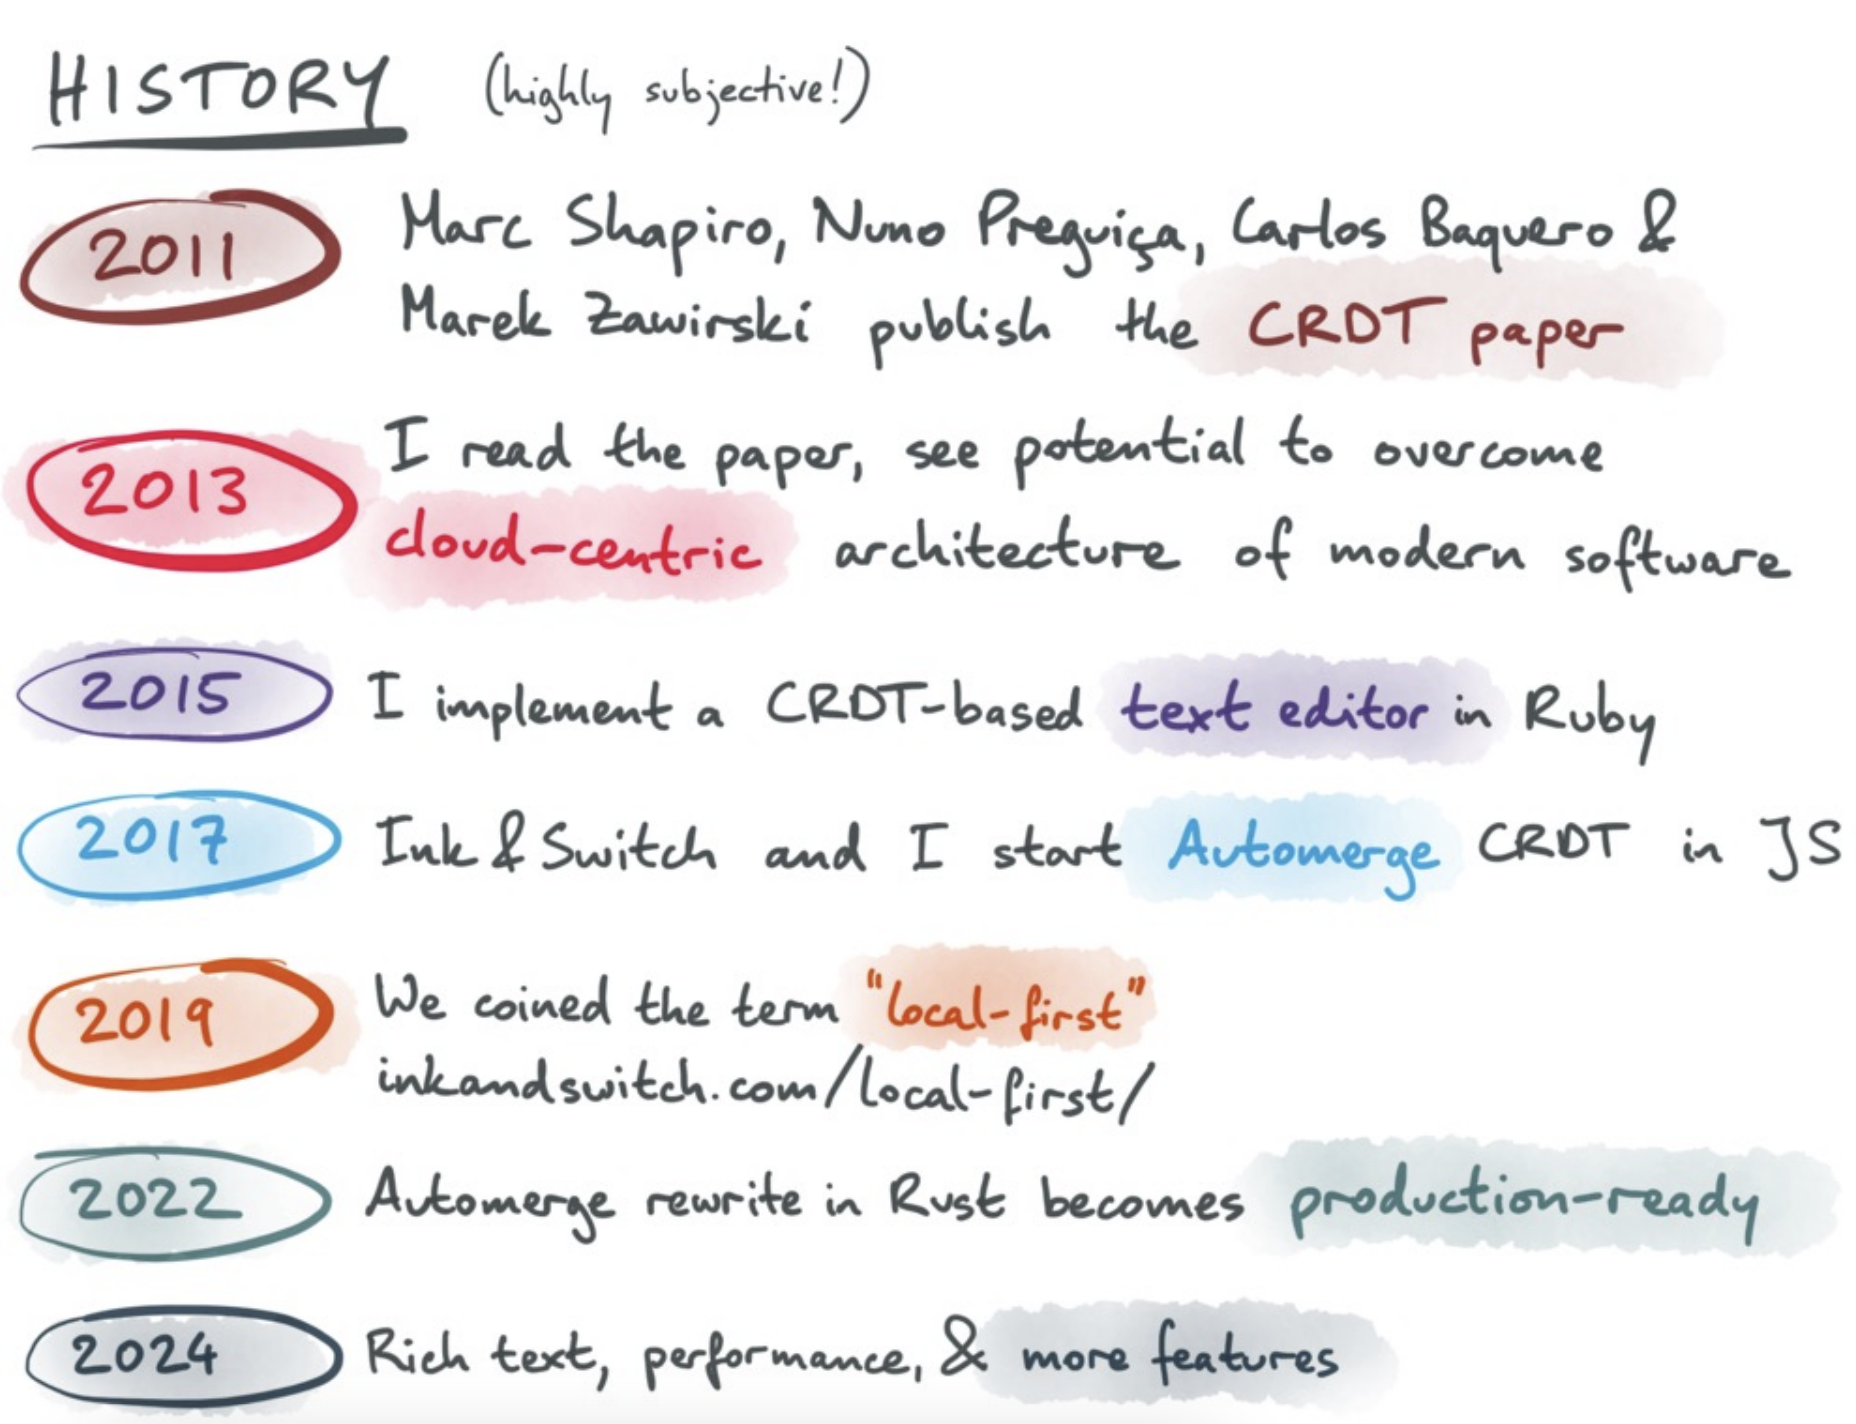
The following image from The past, present, and future of local-first shows that this software development and data management philosophy of Local first can also be implemented based on CRDT.
How Figma's multiplayer technology works
Figma lets you go offline for an arbitrary amount of time and continue editing. When you come back online, the client downloads a fresh copy of the document, reapplies any offline edits on top of this latest state, and then continues syncing updates over a new WebSocket connection.
Rich text editors and code editors also support this, see TipTap offline support and The Full Spectrum of Collaboration.
Implementation of CRDTs
Y.js and its ports to other languages are undoubtedly the most famous CRDT implementations. The following text is from https://tiptap.dev/docs/collaboration/getting-started/overview#about-yjs
As a CRDT, Y.js ensures that the sequence of changes does not impact the final state of the document, similar to how Git operates with commits. This guarantees that all copies of the data remain consistent across different environments.
Since we don't need to deal with merging text or rich text in collaborative states, we only need simple data structures to store the canvas state, such as Y.Map. Other CRDT implementations also provide similar APIs, for example:
- Liveblocks provides
LiveObject/List/Map, see: Data Structures in Liveblocks - Automerge provides Simple Values, supporting all legal types in JSON, even including
Date - Loro also provides Map
Simulate with BroadcastChannel
Now let's refer to Loro Excalidraw Example and dgmjs-plugin-yjs, using BroadcastChannel's feature of supporting communication between multiple tabs under the same origin to simulate the effect of multiple users collaborating.
Example with Loro
In Excalidraw, you can use the onChange hook to monitor changes to all shapes in the scene:
<Excalidraw
    onChange={(elements) => {
        const v = getVersion(elements);
    }}
/>
When the history records changed, we invoke this hook:
export class API {
    onchange: (snapshot: {
        appState: AppState;
        nodes: SerializedNode[];
    }) => void;
}

api.onchange = (snapshot) => {
    const { appState, nodes } = snapshot;
};
Referring to Excalidraw updateScene, we can also provide an updateNodes method to update the scene graph.
api.updateNodes(nodes);Below, we use Loro as an example to simulate the effect of multiple users collaborating on editing. We leverage the BroadcastChannel feature to enable communication between multiple tabs within the same origin. Whenever the canvas content changes, a message is sent to other pages. Upon receiving a message from another page, synchronization is completed. Therefore, each page must simultaneously act as both a message sender and receiver.
First, let's examine the code implementation for the message receiver: First, create a LoroDoc instance. Use a List structure to store the graphic list. Upon receiving a message, import the data into the LoroDoc. For reference, see Exporting and Importing.
import { LoroDoc } from 'loro-crdt';

const channel = new BroadcastChannel('loro-crdt');
const doc = new LoroDoc();
const docNodes = doc.getList('nodes');

channel.onmessage = (e) => {
    const bytes = new Uint8Array(e.data);
    doc.import(bytes);
};
Furthermore, after converting docNodes into a JavaScript object, call the canvas API updateNodes to complete the scene update:
doc.subscribe((e) => {
    if (e.by !== 'local') {
        api.updateNodes(docNodes.toJSON());
    }
});
Now let's examine the implementation on the message-sending side. By subscribing to changes in the canvas scene graph via the onchange hook, changes are recorded to the document and submitted. This triggers the previous scene update in other windows:
api.onchange = (snapshot) => {
    const { appState, nodes } = snapshot;
    if (recordLocalOps(docElements, nodes)) {
        doc.commit();
    }
};
During the submission of local changes:
function recordLocalOps(
    loroList: LoroList,
    nodes: readonly { version?: number; isDeleted?: boolean }[],
): boolean {
    nodes = nodes.filter((e) => !e.isDeleted); // 首先排除掉被删除的图形
}
In the example below, you can freely drag, resize, or change the color of the rectangle in either the left or right window, and the other window will synchronize these modifications: Example with Loro
Example with Yjs
First, monitor changes to the local canvas and synchronize the list of shapes and their property objects to the local Y.Doc:
api.onchange = (snapshot) => {
    const { appState, nodes } = snapshot;
    doc.transact(() => {
        // 写入 Y.Doc
    }, local);
};
Then listen for changes to Y.Doc, distinguishing between local and remote changes via origin. If the change originates locally, send a synchronization message; if it originates remotely, update the canvas content.
doc.on('update', (update, origin) => {
    if (origin === local) {
        channel.postMessage(update);
    }

    if (origin !== local) {
        const nodes = yArray.toArray().map((node) => node.toJSON());
        api.updateNodes(nodes);
    }
});Use Liveblocks as backend
The implementation based on BroadcastChannel above is, after all, just a simple example. Next we will implement a more practical example with liveblocks and Yjs.
import { createClient } from '@liveblocks/client';
import { getYjsProviderForRoom } from '@liveblocks/yjs';

const client = createClient({});
const { room, leave } = client.enterRoom('my-room-id', {});

const yProvider = getYjsProviderForRoom(room, {
    // Enable V2 encoding for better performance with LiveMaps
    // https://liveblocks.io/docs/guides/yjs-best-practices-and-tips#Enable-experimental-V2-encoding-for-Y.Maps
    useV2Encoding_experimental: true,
});
const yDoc = yProvider.getYDoc();
You can open this example in multiple browser windows: Example with Liveblocks
Offline support with IndexedDB
When creating a room, liveblocks also provides the offlineSupport_experimental configuration option to conveniently enable offline functionality:
Enable offline support using IndexedDB. This means the after the first load, documents will be stored locally and load instantly.
import { getYjsProviderForRoom } from '@liveblocks/yjs';

const yProvider = getYjsProviderForRoom(room, {
    offlineSupport_experimental: true,
});
End to end encryption
Now we can store documents as CRDTs and use some kind of synchronization server to merge updates and forward them, while ensuring this file remains private.
In the paper End-to-End Encryption in the Browser, Excalidraw introduces a simple end-to-end encryption approach that enables communication between various clients while preventing the server from reading the content. The encrypted data is placed in the link hash portion, which the server cannot read, and is decoded only on the client side: https://excalidraw.com/#json=5645858175451136,8w-G0ZXiOfRYAn7VWpANxw
Next, we'll analyze how Excalidraw utilizes the Web Crypto API to implement its functionality.
Generate key
Use the generateKey API to select the AES-GCM algorithm and generate a random key. The extractable parameter indicates that the key can later be exported in an externally portable format via the exportKey API. For example, here we select the JSON Web Key ‘jwk’ format:
// @see https://github.com/excalidraw/excalidraw/blob/7f66e1fe897873713ba04410534be2d97b9139af/packages/excalidraw/data/encryption.ts#L17
export const generateEncryptionKey = async <
    T extends 'string' | 'cryptoKey' = 'string',
>(
    returnAs?: T,
): Promise<T extends 'cryptoKey' ? CryptoKey : string> => {
    const key = await window.crypto.subtle.generateKey(
        {
            name: 'AES-GCM',
            length: ENCRYPTION_KEY_BITS,
        },
        true, // extractable
        ['encrypt', 'decrypt'],
    );
    return (
        returnAs === 'cryptoKey'
            ? key
            : (await window.crypto.subtle.exportKey('jwk', key)).k
    ) as T extends 'cryptoKey' ? CryptoKey : string;
};
Encrypt decrypt data
First, generate cryptographically secure random numbers:
export const createIV = () => {
    const arr = new Uint8Array(IV_LENGTH_BYTES);
    return window.crypto.getRandomValues(arr);
};
Then use this private key to encrypt the serialized scene data, and upload it from the client to cloud storage such as firestore or AWS S3:
// @see https://github.com/excalidraw/excalidraw/blob/7f66e1fe897873713ba04410534be2d97b9139af/excalidraw-app/components/ExportToExcalidrawPlus.tsx#L42
const encryptionKey = (await generateEncryptionKey())!;
const encryptedData = await encryptData(
    // 使用 iv 加密
    encryptionKey,
    serializeAsJSON(elements, appState, files, 'database'), // 序列化数据
);
const blob = new Blob(
    [encryptedData.iv, new Uint8Array(encryptedData.encryptedBuffer)],
    {
        type: MIME_TYPES.binary,
    },
);

// Upload blob to Firebase / AWS S3
Homomorphically Encrypting CRDT
Homomorphically Encrypting CRDTs
Awareness & Presence
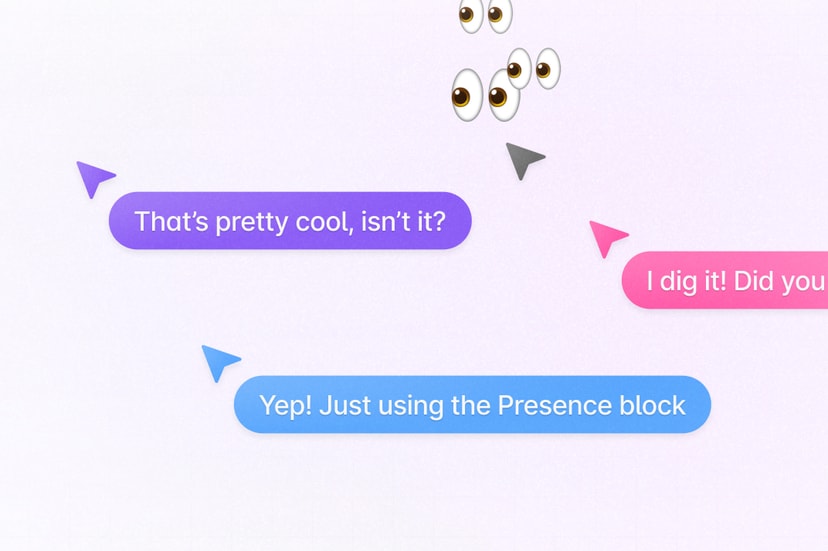
Yjs provides an Awareness & Presence feature to share cursor position and status information, enabling users to perceive the presence of other collaborative participants. This information is not stored within Yjs documents, as it does not require cross-session persistence. However, it can be propagated to all users as a JSON object, and users will remove their own status when offline.
Use Liveblocks as backend
As a Provider implementation for Yjs, liveblocks also provides the Presence feature in the Room API. We can listen for pointermove events on the canvas and broadcast them using updatePresence. It is important to note that you must convert to the world coordinate system before saving. For details, see Lesson 6 - Coordinates::
function onPointerMove(event) {
    const { x, y } = api.viewport2Canvas({
        x: event.offsetX,
        y: event.offsetY,
    });
    room.updatePresence({
        cursor: {
            x
            y,
        },
    });
}
This allows clients to subscribe to other users' status changes, which are used to render their mouse positions. Here, the mouse position needs to be converted from the world coordinate system to the viewport coordinate system:
room.subscribe('others', (others) => {
    others.forEach((other) => {
        // [{ cursor: {} }, { cursor: {} }, ...]
        const { x, y } = api.canvas2Viewport({
            x: other.presence.cursor.x,
            y: other.presence.cursor.y,
        });
        // Render cursor with [x, y]
    });
});
Of course, we can reduce the update frequency through throttling—after all, there's no real need to display others' mouse positions in “real time.” But this raises the next issue.
const client = createClient({
    throttle: 16,
    publicApiKey:
        'pk_dev_MYcFNShiwPwRDvuvhklopMg6SAkdASzz6QrOMQIlu86NkcuXVNxP06aXrxi9qo7M',
});
Smoothly rendering cursors
How to animate multiplayer cursors demonstrates how other users experience mouse cursor stuttering after throttling reduces the update frequency, similar to dropping the refresh rate from 60FPS to 20FPS.
The solution is to make the mouse move smoothly between adjacent positions rather than in steps. Fortunately, tldraw provides the perfect-cursors feature that handles all of this for us.
Additionally, we can use framer-motion, which supports declarative syntax (compatible with React/Vue) and employs its built-in Spring easing function to achieve similar effects. For details, see: Example with framer-motion.
// Cursor.vue
<script lang="ts" setup>
import { motion } from 'motion-v';
</script>
<template>
    <motion.div
        class="Cursor"
        aria-hidden="true"
        :initial="{ x, y }"
        :animate="{ x, y }"
        :transition="{
            type: 'spring',
            damping: 20,
            mass: 0.4,
            stiffness: 400,
        }"
    >
        <svg path="..."></svg>
    </motion.div>
</template>
Comments overlay
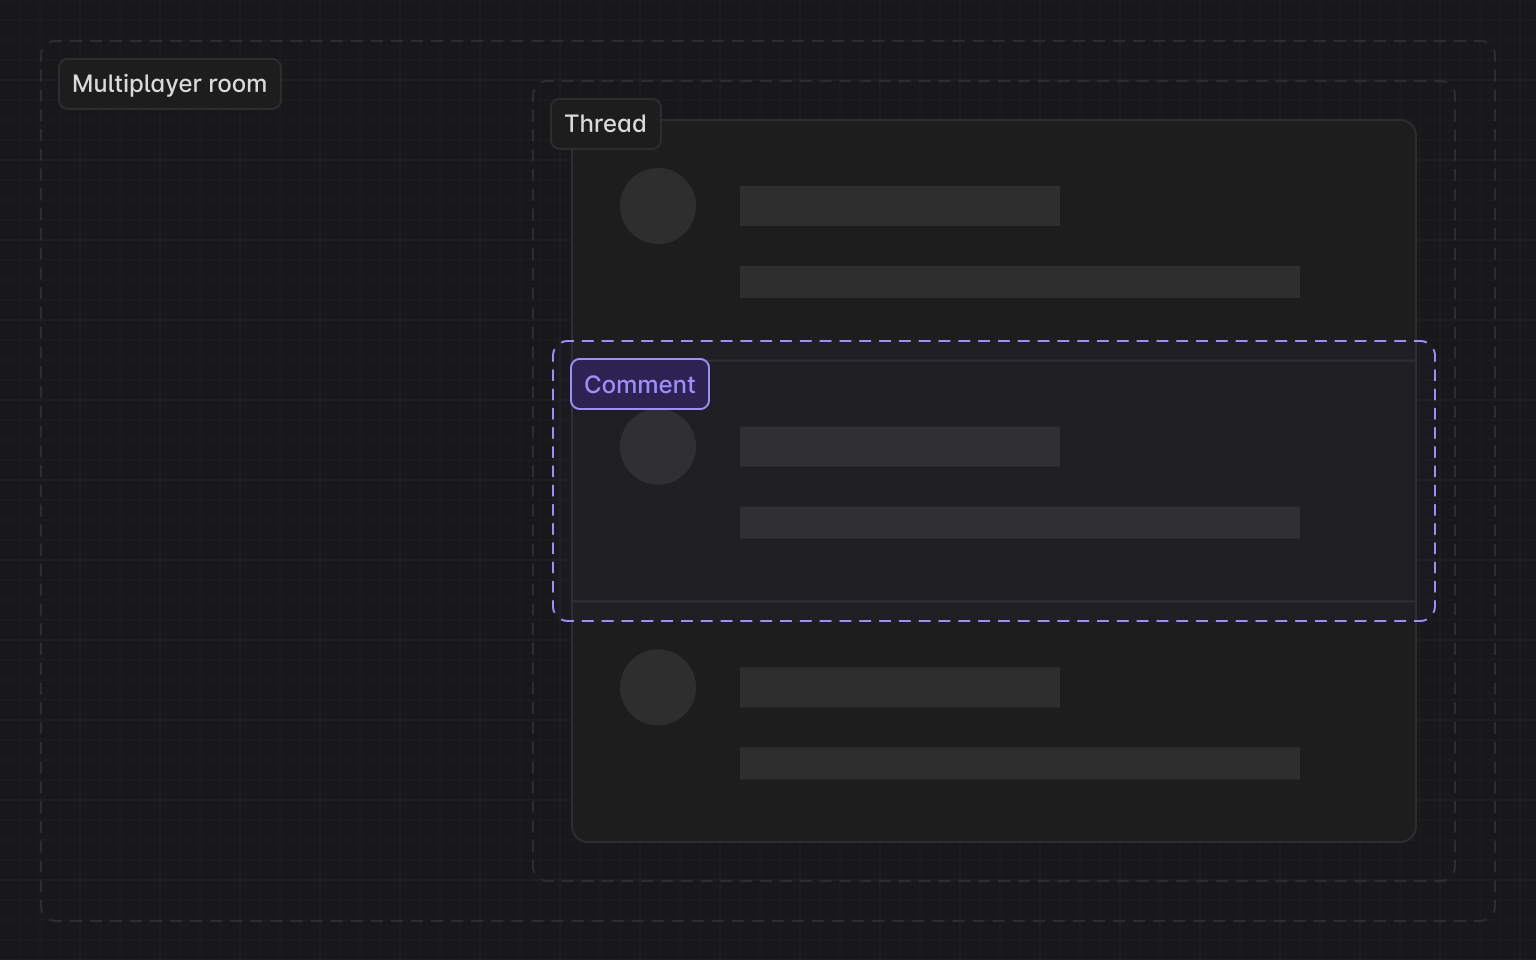
In collaborative editing scenarios, real-time chat and comments are crucial. Within Figma, comment bubbles can be placed anywhere on the canvas. Additionally, at low zoom levels, comments are aggregated to provide an overview of the comment cluster. As the zoom level increases, more granular clusters appear, ultimately revealing the distribution of each individual comment bubble. For details, see: Guide to comments in Figma.
Data structure
Next, we'll implement similar functionality based on Liveblocks Comments. First, let's examine the data structure: Thread and Comment maintain a one-to-many relationship.
interface Thread {
    id: string;
    roomId: string; // liveblocks room
    createdAt: Date;
    comments: Comment[];
    metadata: {
        x: number; // x position in canvas coordinates
        y: number;
    };
}
Cluster
In the above point aggregation scenarios, we need to address two key challenges:
- How to aggregate? Given a point, how do we find all points within a specified radius centered on that point?
- After aggregation, given a bounding box (e.g., the current viewport), how do we locate all aggregated features contained within it?
For these two problems (radius & range queries), brute-force traversal of every point is inherently inefficient when dealing with massive point datasets. To achieve efficient search, we must employ spatial indexes like kdbush. Although we are not in a GIS context, we can still draw inspiration from the implementation of supercluster.
In point aggregation scenarios, k-d tree nodes contain not only the original Point features but also aggregated point sets. The latter require an aggregated center point, whose data structure is as follows:
// createPointCluster
data.push(
    x,
    y, // projected point coordinates
    Infinity, // the last zoom the point was processed at
    i, // index of the source feature in the original input array
    -1, // parent cluster id
    1, // number of points in a cluster
);
During the index creation phase, we need to construct a k-d tree for each zoom level:
// supercluster/index.js

// maxZoom
// minZoom
let clusters = [];
for (let i = 0; i < points.length; i++) {
    clusters.push(createPointCluster(points[i], i));
}
// Create root k-d tree
this.trees[maxZoom + 1] = new KDBush(
    clusters,
    getX,
    getY,
    nodeSize,
    Float32Array,
);
for (let z = maxZoom; z >= minZoom; z--) {
    clusters = this._cluster(clusters, z);
    this.trees[z] = new KDBush(clusters, getX, getY, nodeSize, Float32Array);
}
Aggregating points within a specified range requires addressing two issues:
- Querying all neighbors within a given radius using the radius of a k-d tree. The
withinmethod provided in kdbush serves this purpose. - Generating the coordinates of the aggregated point using the coordinates of points within the range, weighted by the number of points contained in each subset.
getClusters(bbox, zoom) {
// Get k-d tree on current zoom level
    const tree = this.trees[this._limitZoom(zoom)];
// Query the index array of features contained within the bounding box
    const ids = tree.range(minX, minY, maxX, maxY);
    const clusters = [];
    for (const id of ids) {
// Locate a k-d tree node via index
        const c = tree.points[id];
// If the node is a point set, create the corresponding GeoJSON feature; if it is a single point, return it directly.
        clusters.push(c.numPoints ? getClusterJSON(c) : this.points[c.index]);
    }
    return clusters;
}
Display clusters
Query aggregated points within the viewport range:
const { cameraZoom } = this.api.getAppState();
const { minX, minY, maxX, maxY } = this.api.getViewportBounds();
this.clusters = this.cluster.getClusters([minX, minY, maxX, maxY], cameraZoom);
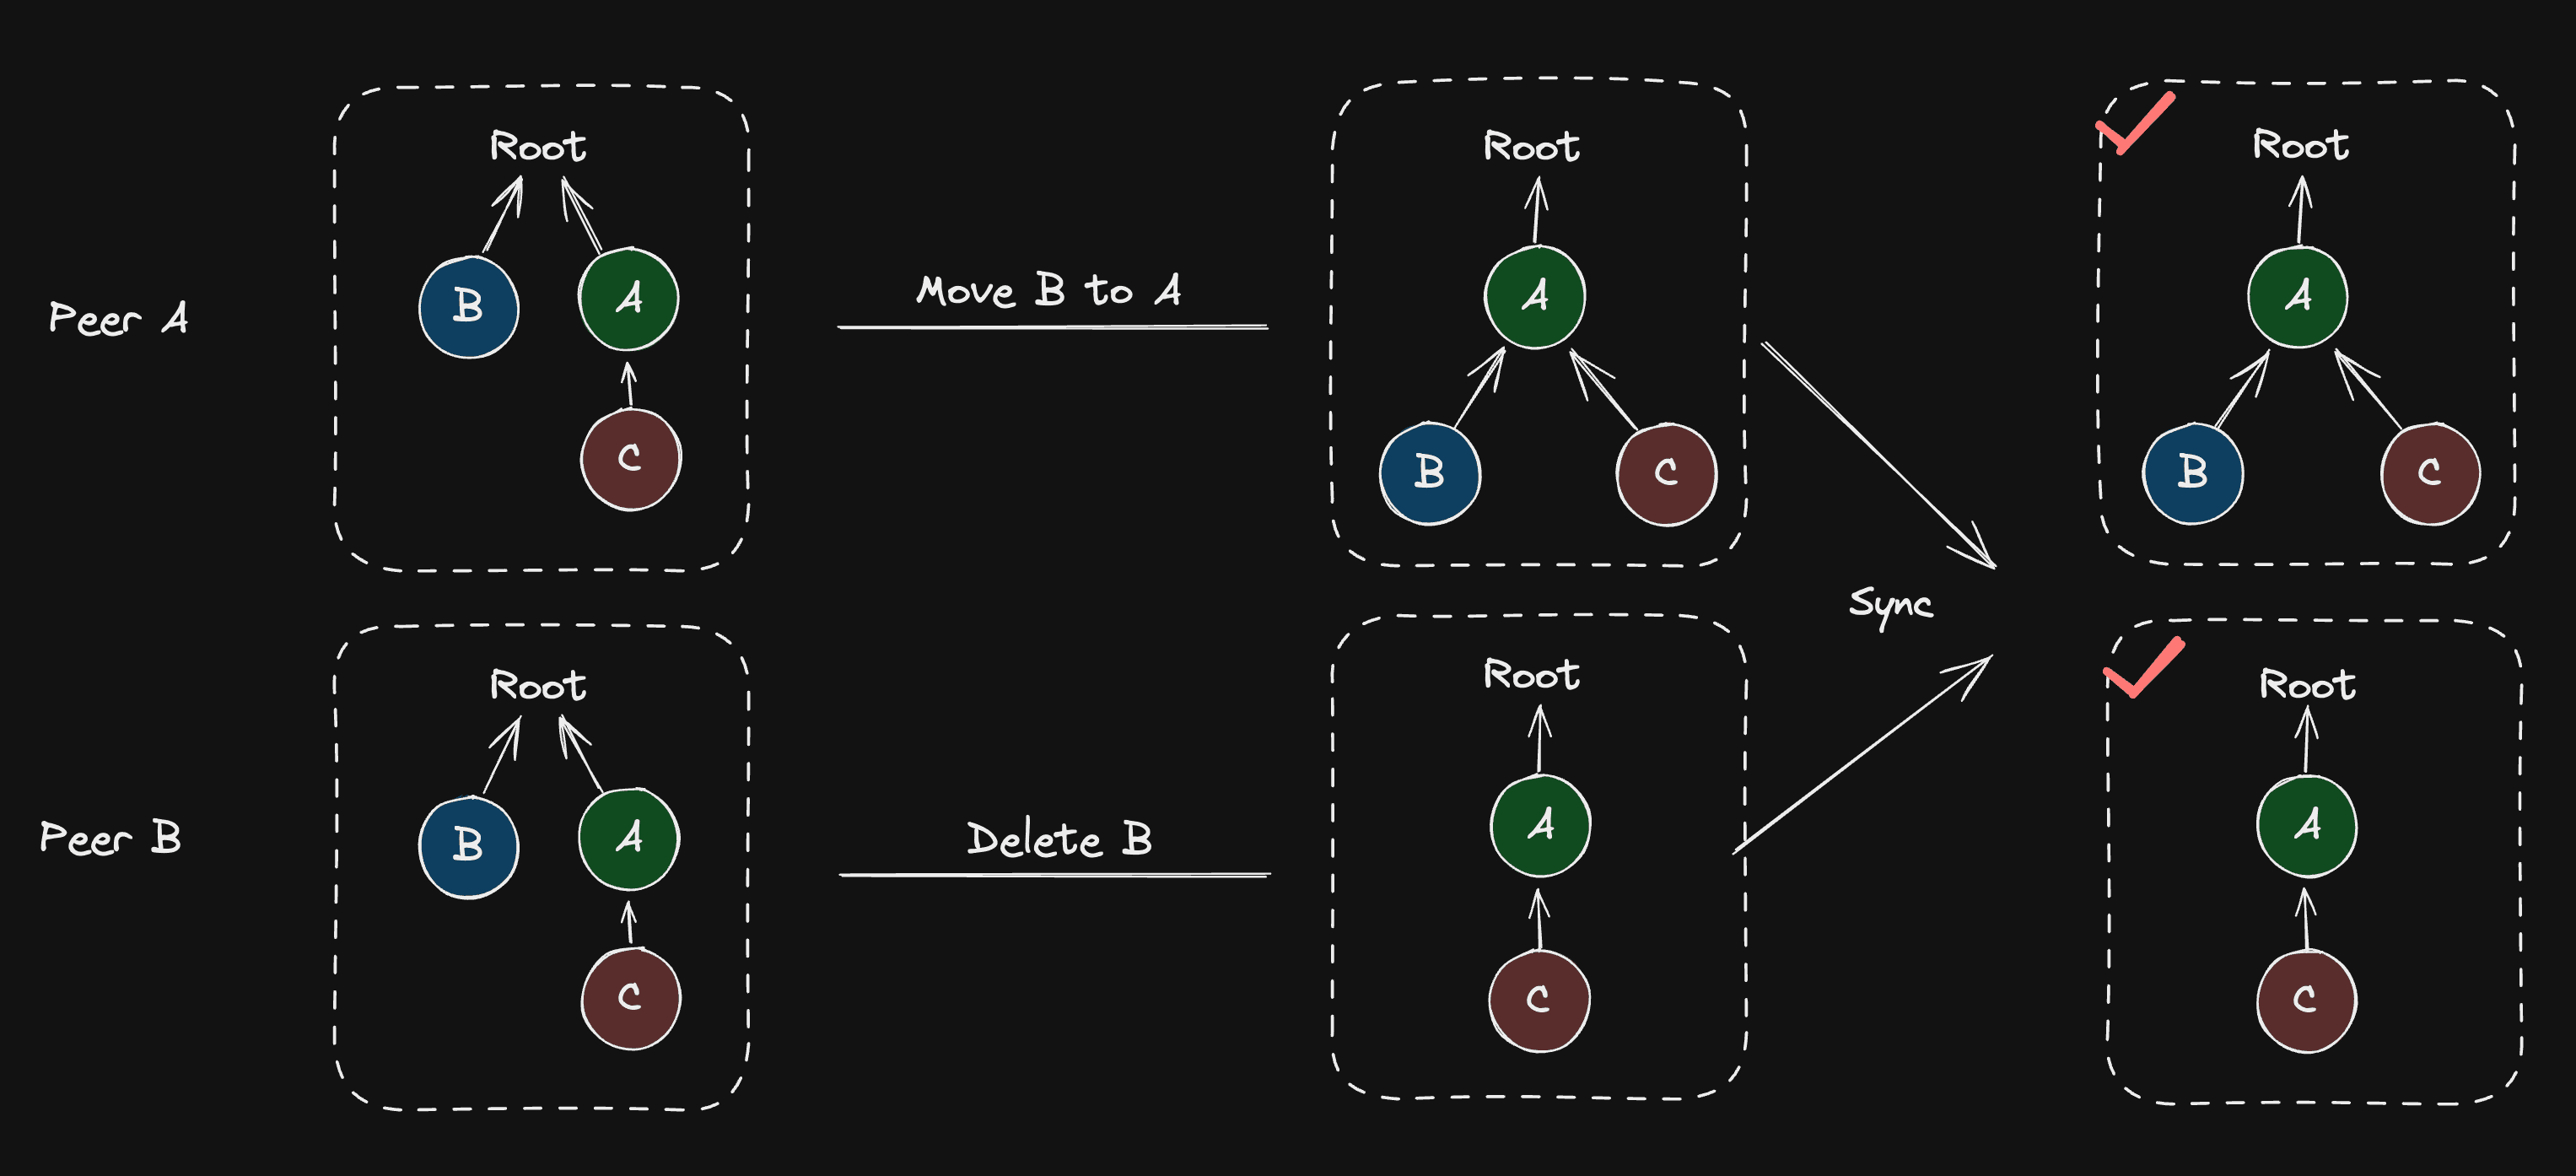
fractional-indexing
As mentioned earlier, the scene graph can be viewed as a "movable tree", with possible conflicts including three scenarios: addition, deletion, and movement. Movable tree CRDTs and Loro's implementation details Loro's implementation approach for these three scenarios. For instance, when deleting and moving the same node, both results are acceptable, depending on the order in which the server receives the messages. However, some operation scenarios may create cycles after synchronization, such as when two users perform B -> C and C -> B operations respectively, breaking the tree's structural definition.
import { Loro, LoroTree, LoroTreeNode } from 'loro-crdt';

let doc = new Loro();
let tree: LoroTree = doc.getTree('tree');
let root: LoroTreeNode = tree.createNode();
Realtime editing of ordered sequences introduces how Figma uses fractional-indexing to reflect element positions in the scene graph.
Excalidraw also uses the same implementation:
// @see https://github.com/excalidraw/excalidraw/blob/9ee0b8ffcbd3664a47748a93262860321a203821/packages/excalidraw/fractionalIndex.ts#L380
import { generateNKeysBetween } from 'fractional-indexing';
const fractionalIndices = generateNKeysBetween(
    elements[lowerBoundIndex]?.index,
    elements[upperBoundIndex]?.index,
    indices.length,
) as FractionalIndex[];
Loro's built-in Tree includes the Fractional Index algorithm, see: Movable tree CRDTs and Loro's implementation.
We integrated the Fractional Index algorithm into Loro and combined it with the movable tree, making the child nodes of the movable tree sortable.
In Lesson 14, we aim to manipulate the rendering order through ZIndex. In the editor UI, this functionality manifests as features like “Adjust Layer Order,” “Move Up,” and “Move Down.” Therefore, when ZIndex is first added or modified, we first traverse the scene graph, sorting child nodes by ZIndex. After obtaining the sorted array, we update the current node's fractional index based on its two immediate sibling nodes.
class ComputeZIndex extends System {
    private readonly zIndexes = this.query(
        (q) => q.addedOrChanged.with(ZIndex).trackWrites,
    );

    execute() {
        this.zIndexes.addedOrChanged.forEach((entity) => {
            // Travese scenegraph, sort children by z-index
            const descendants = getDescendants(
                getSceneRoot(entity),
                sortByZIndex,
            );
            const index = descendants.indexOf(entity);
            const prev = descendants[index - 1] || null;
            const next = descendants[index + 1] || null;
            const prevFractionalIndex =
                (prev?.has(FractionalIndex) &&
                    prev.read(FractionalIndex)?.value) ||
                null;
            const nextFractionalIndex =
                (next?.has(FractionalIndex) &&
                    next.read(FractionalIndex)?.value) ||
                null;

            // Generate fractional index with prev and next node
            const key = generateKeyBetween(
                prevFractionalIndex, // a0
                nextFractionalIndex, // a2
            );

            if (!entity.has(FractionalIndex)) {
                entity.add(FractionalIndex);
            }
            entity.write(FractionalIndex).value = key; // a1
        });
    }
}
This allows sorting based on fractional indices before rendering. It's worth noting that you cannot directly use localeCompare for comparison:
export function sortByFractionalIndex(a: Entity, b: Entity) {
    if (a.has(FractionalIndex) && b.has(FractionalIndex)) {
        const aFractionalIndex = a.read(FractionalIndex).value;
        const bFractionalIndex = b.read(FractionalIndex).value;

        // Can't use localeCompare here.
        // @see https://github.com/rocicorp/fractional-indexing/issues/20
        if (aFractionalIndex < bFractionalIndex) return -1;
        if (aFractionalIndex > bFractionalIndex) return 1;
        return 0;
    }

    return 0;
}