课程 20 - 协同
在上节课中我们介绍了历史记录功能的实现,本节课中我们将基于此实现协同编辑的功能,包括以下话题:
- CRDT 的分类与实现
- 基于 Loro / Yjs 和 BroadcastChannel 本地模拟实现协同编辑
- 基于 liveblocks 实现服务器和多客户端的协同编辑
- 端到端加密的 CRDT
- 基于 Yjs 实现感知特性:多人光标和评论
CRDT
什么是 CRDT 呢?下面的介绍来自 What are CRDTs,Google Docs / Figma / Tiptap 的协同功能都是基于它实现的,这篇文章还详细对比了 CRDT 和 OT 的特点:
CRDT (conflict-free replicated data type) is a data structure that can be replicated across multiple computers in a network, where replicas can be updated independently and in parallel, without the need for coordination between replicas, and with a guarantee that no conflicts will occur.
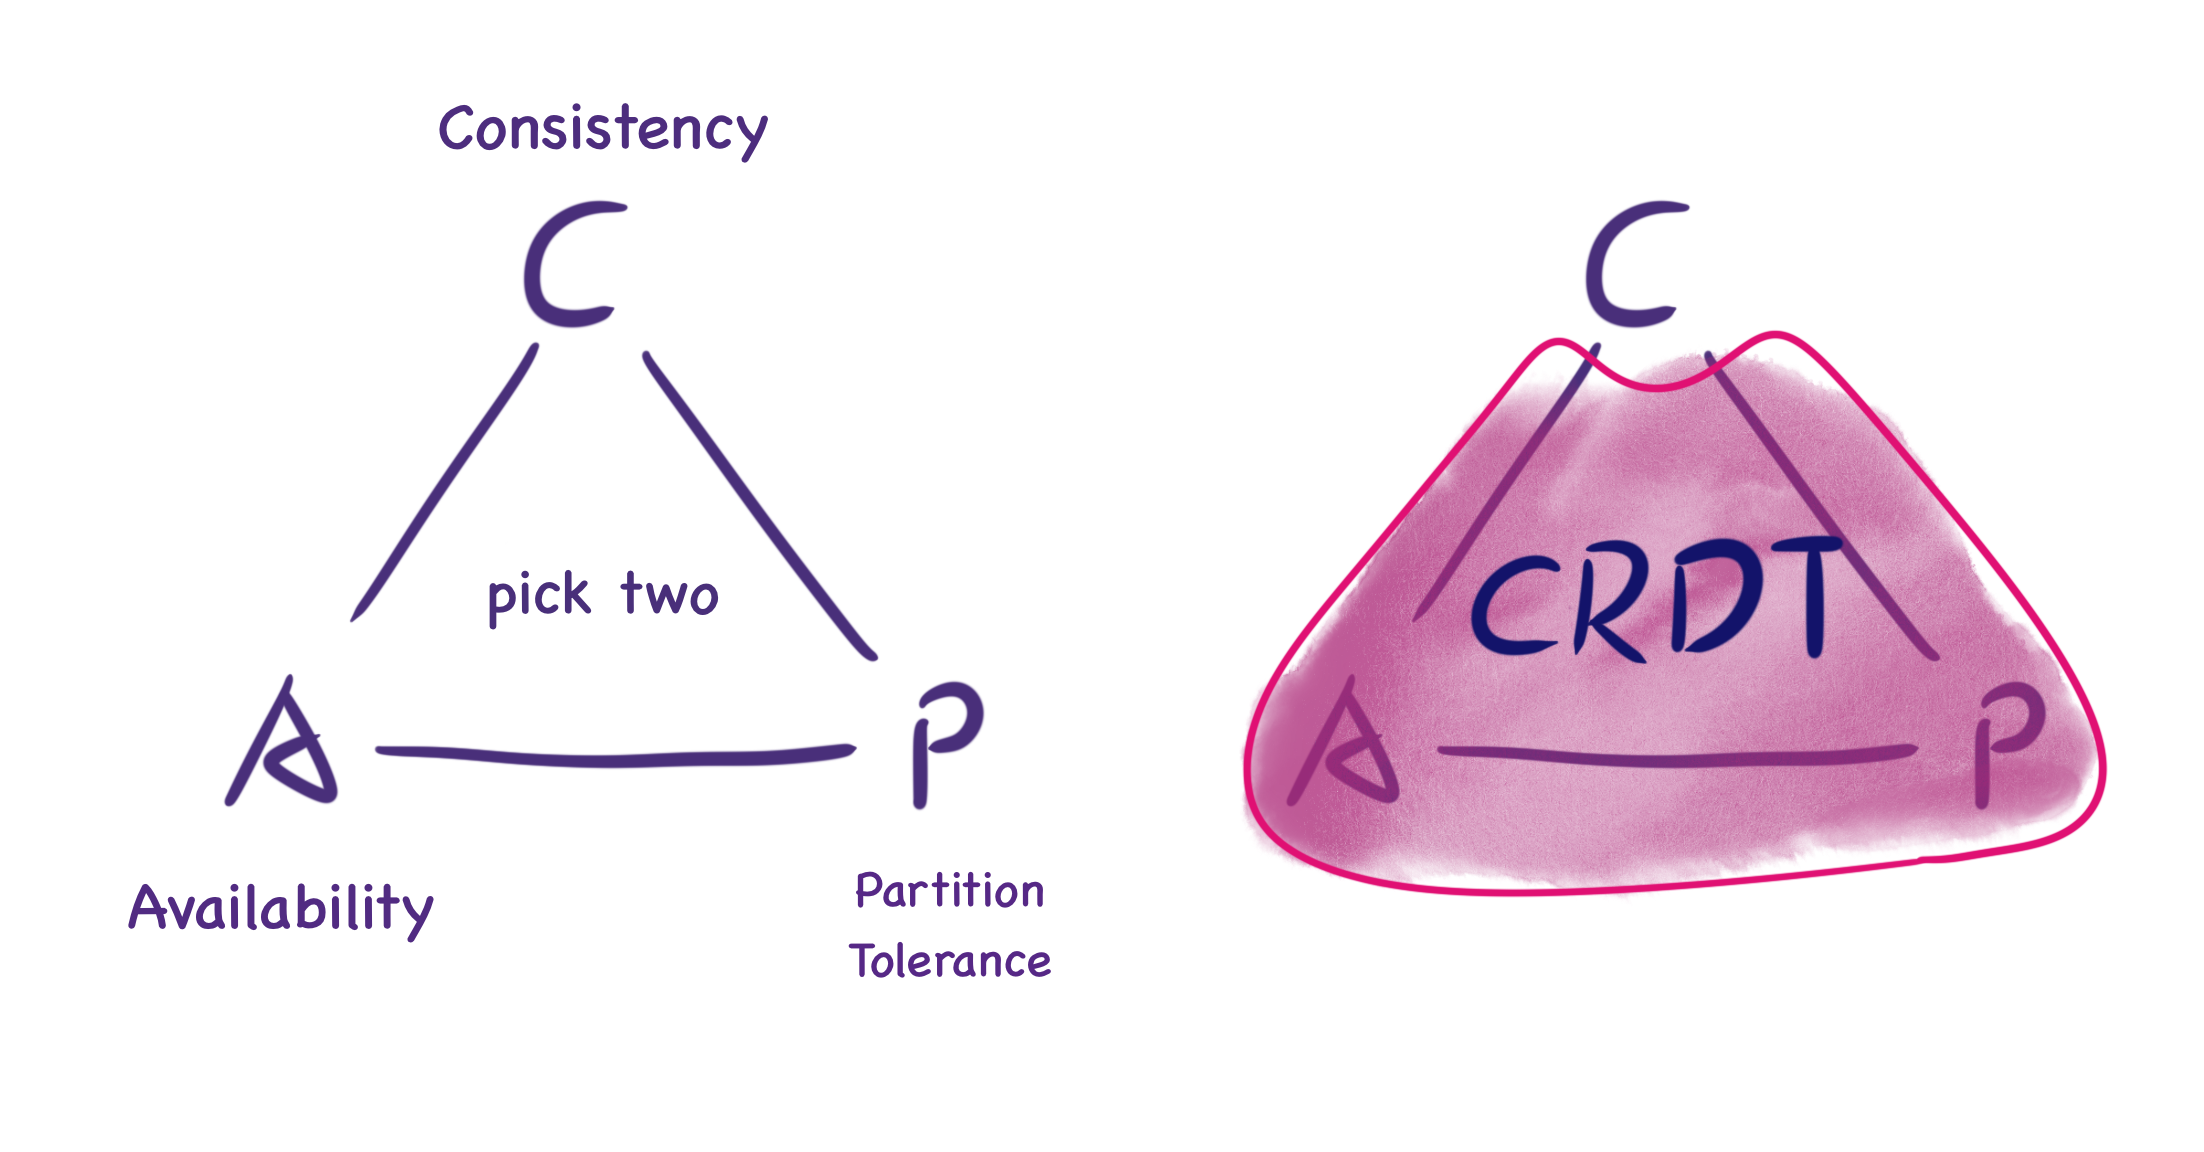
下图来自 What are CRDTs,它展示了 CAP 定理下,CRDT 不提供“完美的一致性”,而是最终的一致性。虽然无法保证实时一致,但当两个节点同步消息时,会恢复到一致性状态。
How Figma’s multiplayer technology works 一文介绍了 Figma 没有像 Google Docs 那样选择 OT 的原因。
It’s also worth noting that Figma's data structure isn't a single CRDT. Instead it's inspired by multiple separate CRDTs and uses them in combination to create the final data structure that represents a Figma document (described below).
CRDT 的两种类型
CRDT 有两种类型:Op-based 和 State-based。前者的原理是,如果两个用户执行相同的操作序列,则文档的最终状态也应相同。为此,每个用户保存了对数据(操作)执行的所有操作,并将这些操作与其他用户同步,以确保最终状态。而后者需要在节点间传递整个状态。看上去前者需要传递的数据量更少更节省带宽,毕竟只是操作的描述,但这要求前者通过复杂实现保证幂等的操作和处理操作的顺序问题,相对来说后者的实现会更简单。
现在让我们通过下面这个系列教程来了解 State-based CRDT:
- An Interactive Intro to CRDTs
- Building a Collaborative Pixel Art Editor with CRDTs
- Making CRDTs 98% More Efficient
教程给出了一个 CRDT 的通用数据结构,它包括一个必须满足结合律、交换律和幂等性的合并函数。这个合并函数可以是一个 Last-Writer Wins(LWW) Register,每次对比自身和输入数据的时间戳,如果输入数据的时间戳更大,则更新自身数据:
interface CRDT<T, S> {
    value: T;
    state: S;
    merge(state: S): void;
}
键值对形式的样式表就很适合使用 LWW Register。Designing Data Structures for Collaborative Apps 一文介绍了 Quill 编辑器使用的 {bold: true} 样式。
对我们的场景更有帮助的是 How Figma’s multiplayer technology works 一文,Figma CTO 介绍了内部实现使用的类 DOM 树形结构(场景图),每个对象都有一个 ID 和一组属性值,可以看作是一个两级映射:Map<ObjectID, Map<Property, Value>>。在处理对象属性、对象增删、顺序等问题时采取不同的合并策略:
- 修改对象的同一个属性。例如两个用户分别将同一个文本对象的属性值修改为 AB 和 BC,Figma 是不会使用合并算法得出 ABC 的结果的,而是取决于服务器收到消息的时间。
- 对象删减。创建对象直接使用 LWW Register。和 CRDT 模型的不同点在于删除对象时的行为,Figma 服务端不会保存被删除对象的属性,而是让客户端负责存储以便实现后续可能的 undo 操作。
- 场景图结构变动。子节点通过属性引用父节点的 ID,在节点列表中的位置使用 Fractional indexing 实现,优点是更改位置只需要更新一个值,详见:Realtime editing of ordered sequences,该方案的缺陷之一 interleaving 同样不考虑。
Local-first 软件
Local-first software - You own your data, in spite of the cloud
In this article we propose “local-first software”: a set of principles for software that enables both collaboration and ownership for users. Local-first ideals include the ability to work offline and collaborate across multiple devices, while also improving the security, privacy, long-term preservation, and user control of data.
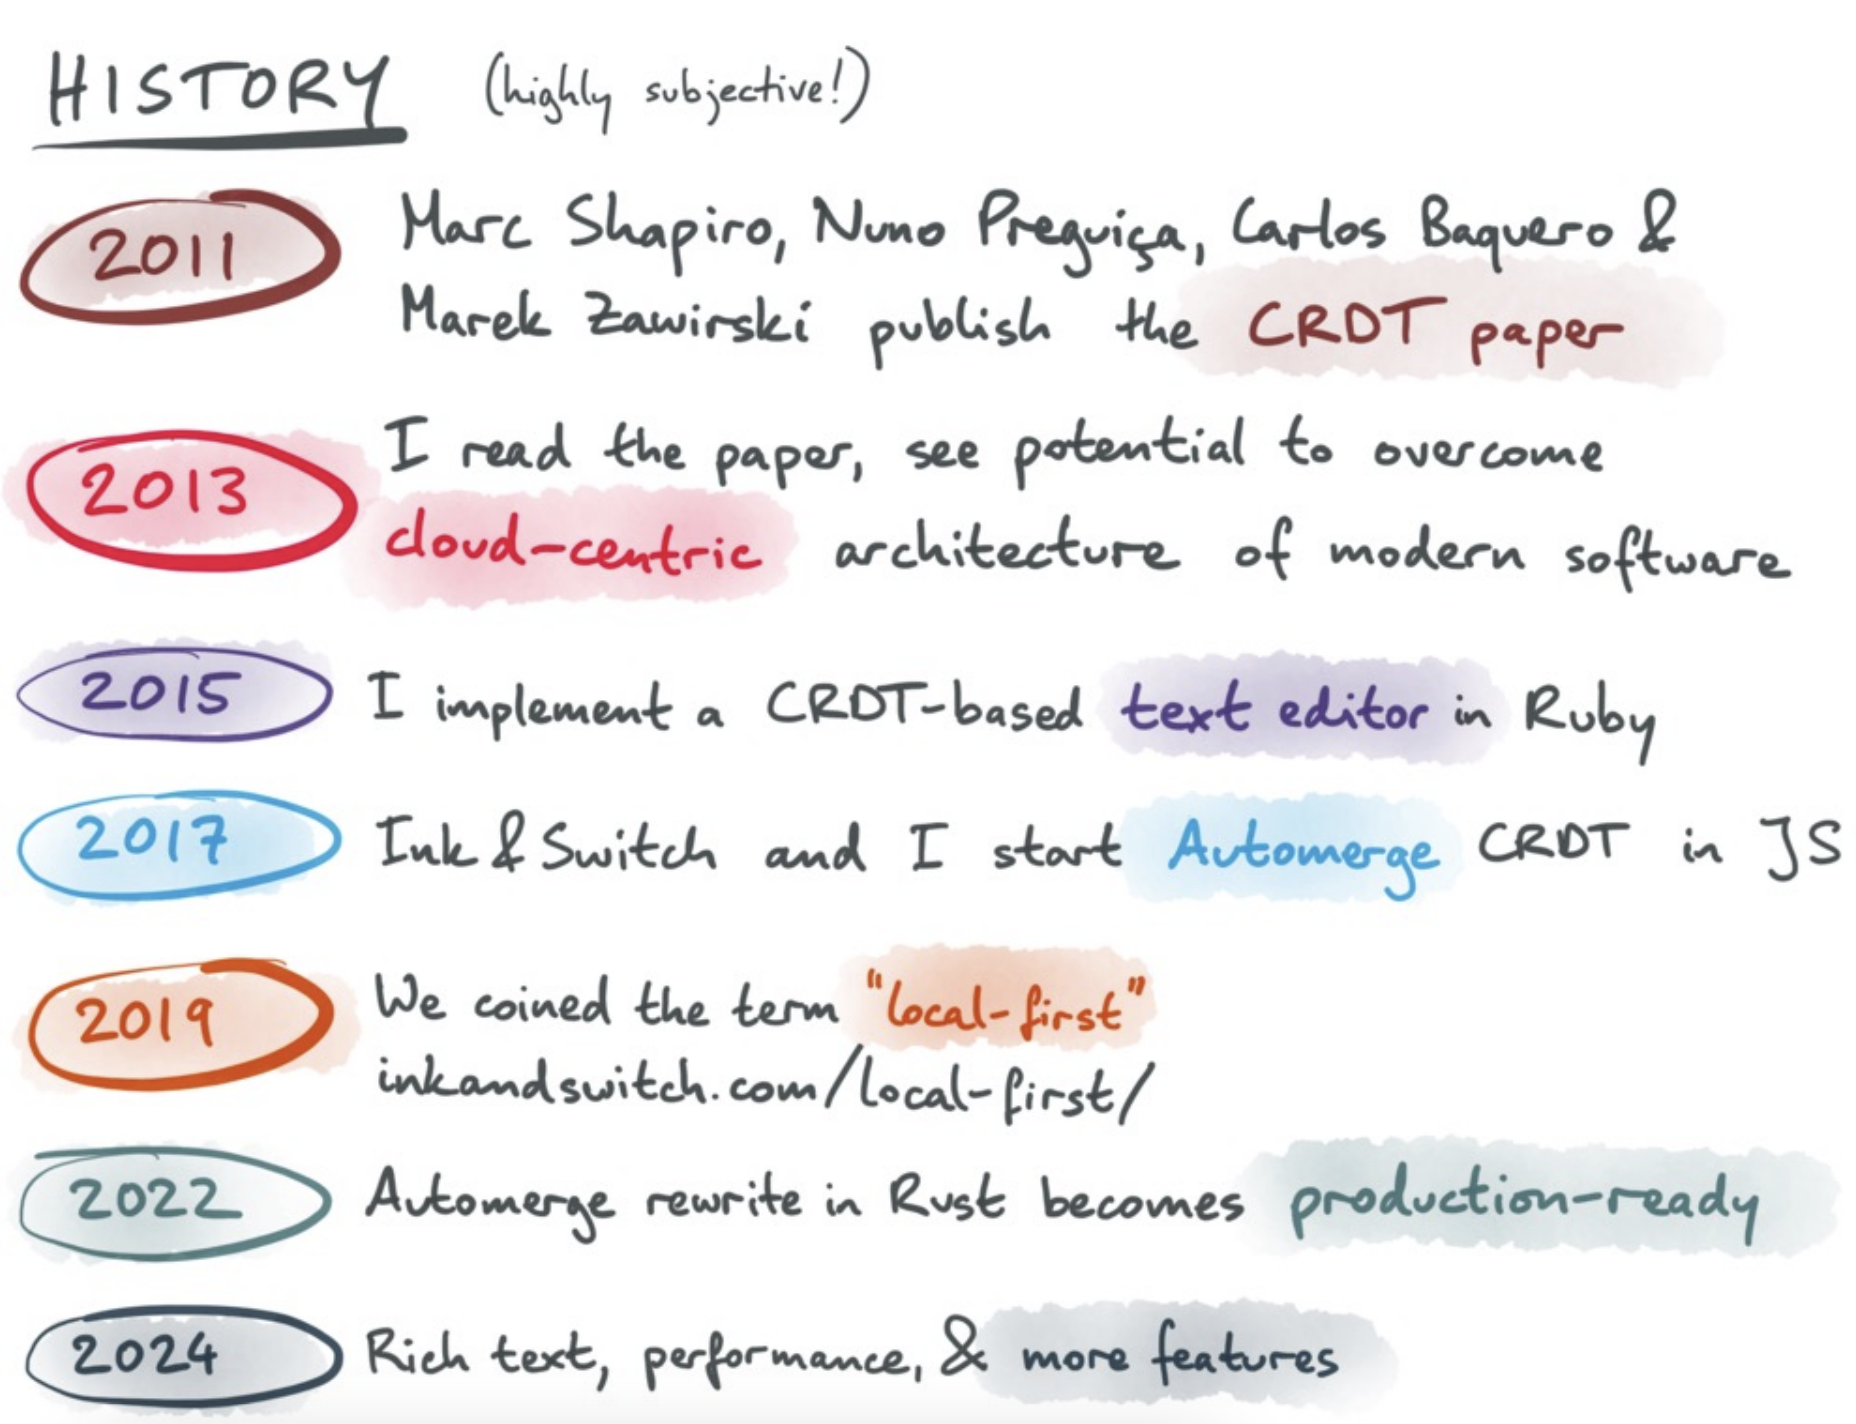
下图来自 The past, present, and future of local-first,可以看出 Local first 这种软件开发和数据管理的理念也可以基于 CRDT 实现。
How Figma’s multiplayer technology works
Figma lets you go offline for an arbitrary amount of time and continue editing. When you come back online, the client downloads a fresh copy of the document, reapplies any offline edits on top of this latest state, and then continues syncing updates over a new WebSocket connection.
富文本编辑器和代码编辑器也都支持,详见 TipTap offline support 和 The Full Spectrum of Collaboration。
CRDT 的实现
Y.js 及其他语言的移植版本无疑是最著名的 CRDT 实现,下文来自 https://tiptap.dev/docs/collaboration/getting-started/overview#about-yjs
As a CRDT, Y.js ensures that the sequence of changes does not impact the final state of the document, similar to how Git operates with commits. This guarantees that all copies of the data remain consistent across different environments.
由于不涉及协同状态下文本或者富文本的合并,我们只需要用到简单的数据结构存储画布的状态,例如 Y.Map。其他 CRDT 实现也都提供了类似的 API,例如:
- Liveblocks 提供了
LiveObject/List/Map,详见:Data Structures in Liveblocks - Automerge 提供了 Simple Values,支持 JSON 中的全部合法类型,甚至还包括
Date - Loro 也提供了 Map
基于 BroadcastChannel 在本地模拟
下面我们参考 Loro Excalidraw Example 和 dgmjs-plugin-yjs,使用 BroadcastChannel 支持同源下多个标签页间通讯的特性,模拟多个用户协同编辑的效果。
基于 Loro 的实现
在 Excalidraw 中可以通过 onChange 钩子监听场景中所有图形的变化:
<Excalidraw
    onChange={(elements) => {
        const v = getVersion(elements);
    }}
/>
在上一节介绍的历史记录发生改变时,我们就调用这个钩子:
export class API {
    onchange: (snapshot: {
        appState: AppState;
        nodes: SerializedNode[];
    }) => void;
}

api.onchange = (snapshot) => {
    const { appState, nodes } = snapshot;
};
参考 Excalidraw updateScene,我们也可以提供一个 updateNodes 方法,用于更新场景图。
api.updateNodes(nodes);下面我们以 Loro 为例,使用 BroadcastChannel 支持同源下多个标签页间通讯的特性,模拟多个用户协同编辑的效果。每当画布内容发生变化时发送消息给其他页面,而每当接收到来自其他页面的消息时,完成同步。因此需要同时承担消息发送者和接受者的角色。先来看作为消息接收端的代码实现:
首先创建一个 LoroDoc,使用 List 结构存储图形列表,接收到消息时将数据导入到 LoroDoc 中,可参考 Exporting and Importing:
import { LoroDoc } from 'loro-crdt';

const channel = new BroadcastChannel('loro-crdt');
const doc = new LoroDoc();
const docNodes = doc.getList('nodes');

channel.onmessage = (e) => {
    const bytes = new Uint8Array(e.data);
    doc.import(bytes);
};
更进一步的,将 docNodes 转换成 JS 对象后,调用画布 API updateNodes 完成场景的更新:
doc.subscribe((e) => {
    if (e.by !== 'local') {
        api.updateNodes(docNodes.toJSON());
    }
});
再来看消息发送端的实现。通过 onchange 钩子订阅画布场景图的变化,记录到文档后提交变更,其他窗口就会触发上一步的场景更新:
api.onchange = (snapshot) => {
    const { appState, nodes } = snapshot;
    if (recordLocalOps(docElements, nodes)) {
        doc.commit();
    }
};
在提交本地变更过程中:
function recordLocalOps(
    loroList: LoroList,
    nodes: readonly { version?: number; isDeleted?: boolean }[],
): boolean {
    nodes = nodes.filter((e) => !e.isDeleted); // 首先排除掉被删除的图形
}
你可以在下面的例子中,在左右侧窗口中任意拖动、resize 或者改变矩形的颜色,另一个窗口会同步这些修改:Example with Loro
基于 Yjs 的实现
首先监听本地画布变化,将图形列表及其属性对象同步到本地的 Y.Doc 中:
api.onchange = (snapshot) => {
    const { appState, nodes } = snapshot;
    doc.transact(() => {
        // 写入 Y.Doc
    }, local);
};
然后监听 Y.Doc 的变更,通过 origin 区分变更来自本地还是远端。如果来自本地则发送同步消息;如果来自远端则更新画布内容。
doc.on('update', (update, origin) => {
    if (origin === local) {
        channel.postMessage(update);
    }

    if (origin !== local) {
        const nodes = yArray.toArray().map((node) => node.toJSON());
        api.updateNodes(nodes);
    }
});使用 Liveblocks 作为服务端
上面基于 BroadcastChannel 的实现毕竟只是一个简单的实例。下面我们基于 liveblocks 和 Yjs 实现一个更实际的,基于服务端实时协同的例子。以上一节 Yjs 的实现为基础,配合开箱即用的 API 很容易实现。
import { createClient } from '@liveblocks/client';
import { getYjsProviderForRoom } from '@liveblocks/yjs';

const client = createClient({
    publicApiKey: 'pk_dev...',
});
const { room, leave } = client.enterRoom('my-room-id', {});

const yProvider = getYjsProviderForRoom(room, {
    // Enable V2 encoding for better performance with LiveMaps
    // https://liveblocks.io/docs/guides/yjs-best-practices-and-tips#Enable-experimental-V2-encoding-for-Y.Maps
    useV2Encoding_experimental: true,
});
const yDoc = yProvider.getYDoc();可以在多个浏览器窗口中打开这个示例:Example with Liveblocks
使用 IndexedDB 支持离线
在创建房间时,liveblocks 也提供了 offlineSupport_experimental 配置项很方便地实现离线功能:
Enable offline support using IndexedDB. This means the after the first load, documents will be stored locally and load instantly.
import { getYjsProviderForRoom } from '@liveblocks/yjs';

const yProvider = getYjsProviderForRoom(room, {
    offlineSupport_experimental: true,
});
端到端加密
现在我们可以将文档存储为 CRDT,然后使用某种同步服务器来合并更新并转发它们,我们希望这个文件是私密的。
在 End-to-End Encryption in the Browser 一文中,Excalidraw 介绍了一种简单的端到端加密方式,允许各种客户端进行通信,但让服务器无法读取通信内容。将加密内容放在服务器无法读取的链接 hash 部分,仅在客户端进行解码:https://excalidraw.com/#json=5645858175451136,8w-G0ZXiOfRYAn7VWpANxw
接下来我们分析下 Excalidraw 是如何使用 Web Crypto API 实现相关功能。
生成密钥
通过 generateKey API 选择 AES-GCM 算法生成一个随机密钥,extractable 参数表示后续支持通过 exportKey 导出外部可移植格式的密钥,例如这里选择 JSON Web Key 'jwk' 格式:
// @see https://github.com/excalidraw/excalidraw/blob/7f66e1fe897873713ba04410534be2d97b9139af/packages/excalidraw/data/encryption.ts#L17
export const generateEncryptionKey = async <
    T extends 'string' | 'cryptoKey' = 'string',
>(
    returnAs?: T,
): Promise<T extends 'cryptoKey' ? CryptoKey : string> => {
    const key = await window.crypto.subtle.generateKey(
        {
            name: 'AES-GCM',
            length: ENCRYPTION_KEY_BITS,
        },
        true, // extractable
        ['encrypt', 'decrypt'],
    );
    return (
        returnAs === 'cryptoKey'
            ? key
            : (await window.crypto.subtle.exportKey('jwk', key)).k
    ) as T extends 'cryptoKey' ? CryptoKey : string;
};
加密解密数据
首先生成加密安全的随机数:
export const createIV = () => {
    const arr = new Uint8Array(IV_LENGTH_BYTES);
    return window.crypto.getRandomValues(arr);
};
然后使用这个私钥对序列化后的场景数据进行加密,再从客户端上传到 firestore 或者 AWS S3 云端存储:
// @see https://github.com/excalidraw/excalidraw/blob/7f66e1fe897873713ba04410534be2d97b9139af/excalidraw-app/components/ExportToExcalidrawPlus.tsx#L42
const encryptionKey = (await generateEncryptionKey())!;
const encryptedData = await encryptData(
    // 使用 iv 加密
    encryptionKey,
    serializeAsJSON(elements, appState, files, 'database'), // 序列化数据
);
const blob = new Blob(
    [encryptedData.iv, new Uint8Array(encryptedData.encryptedBuffer)],
    {
        type: MIME_TYPES.binary,
    },
);

// 上传文件到 Firebase / AWS S3
同态加密的 CRDT
Homomorphically Encrypting CRDTs
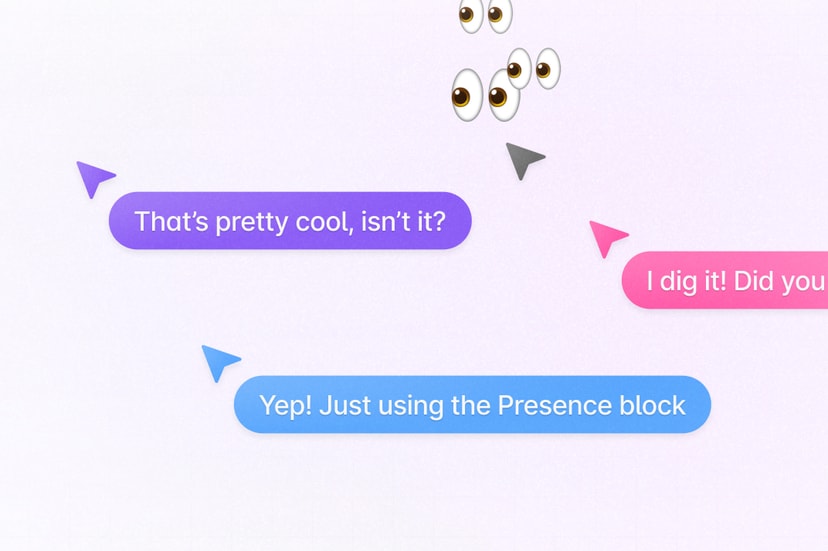
Awareness 和 Presence
Yjs 提供了 Awareness & Presence 特性,用来共享光标位置和状态信息,感知到其他协同用户的存在。这部分信息并不会存储在 Yjs 文档中,因为不需要跨会话持久化,但可以以 JSON 对象形式传播给所有用户,当用户离线时会将自己的状态删除。
使用 Liveblocks 作为服务端
作为 Yjs 的 Provider 实现,liveblocks 也在 Room API 中提供了 Presence 特性。我们可以监听画布上的 pointermove 事件,通过 updatePresence 进行广播。值得注意的是这里需要转换到世界坐标系下再保存,详见 课程 6 - 坐标系转换:
function onPointerMove(event) {
    const { x, y } = api.viewport2Canvas({
        x: event.offsetX,
        y: event.offsetY,
    });
    room.updatePresence({
        cursor: {
            x
            y,
        },
    });
}
这样在客户端就可以订阅其他人的状态改变了,用来渲染他们的鼠标位置,这里需要再将鼠标位置从世界坐标系转换到视口坐标系:
room.subscribe('others', (others) => {
    others.forEach((other) => {
        // [{ cursor: {} }, { cursor: {} }, ...]
        const { x, y } = api.canvas2Viewport({
            x: other.presence.cursor.x,
            y: other.presence.cursor.y,
        });
        // Render cursor with [x, y]
    });
});
当然我们可以通过 throttling 降低更新频率,毕竟没必要真的“实时”展示其他人的鼠标位置,但这会引发下一个问题。
const client = createClient({
    throttle: 16,
    publicApiKey:
        'pk_dev_MYcFNShiwPwRDvuvhklopMg6SAkdASzz6QrOMQIlu86NkcuXVNxP06aXrxi9qo7M',
});
更流畅的鼠标动画
How to animate multiplayer cursors 展示了使用 throttling 降低更新频率后,其他用户鼠标位置卡顿的表现,类似刷新率从 60FPS 降低到 20FPS 一样。
解决办法是让鼠标在前后相邻两个位置间平滑而非阶跃移动。幸运的是 tldraw 提供了 perfect-cursors 替我们处理好了这一切。
另外我们也可以使用 framer-motion,通过声明式的方式(支持 React / Vue),使用它内置的 Spring 缓动函数实现类似的效果,详见:Example with framer-motion。
// Cursor.vue
<script lang="ts" setup>
import { motion } from 'motion-v';
</script>
<template>
<motion.div
class="Cursor"
aria-hidden="true"
:initial="{ x, y }"
:animate="{ x, y }"
:transition="{
type: 'spring',
damping: 20,
mass: 0.4,
stiffness: 400,
}"
>
<svg path="..."></svg>
</motion.div>
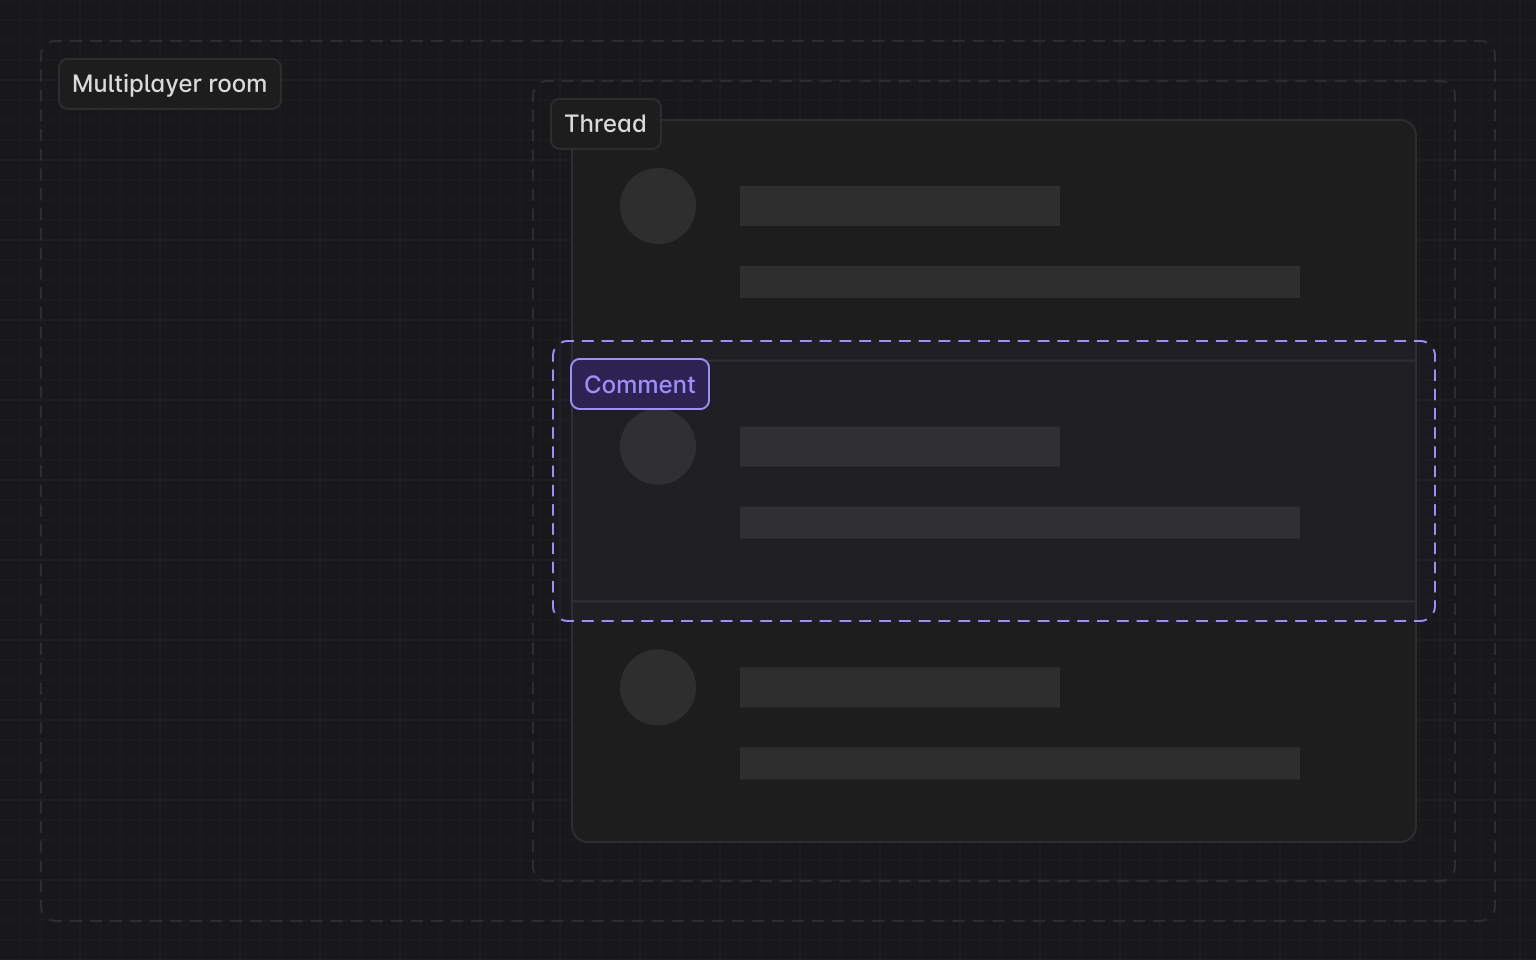
</template>评论
在协同编辑场景下,即时的聊天和评论十分重要。在 Figma 中可以在画布的任意位置留下评论气泡。另外在低缩放等级下采用聚合的方式展示评论集合的概览,而随着缩放等级的提升,将出现更多更小的集合,直至最终每个评论气泡的分布被展示出来。详见:Guide to comments in Figma。
数据结构
下面我们基于 Liveblocks Comments 实现类似的功能。先来看数据结构,Thread 和 Comment 之间是一对多关系。
interface Thread {
    id: string;
    roomId: string; // liveblocks room
    createdAt: Date;
    comments: Comment[];
    metadata: {
        x: number; // x position in canvas coordinates
        y: number;
    };
}
点聚合
在以上点聚合的场景中,我们有两个问题需要解决:
- 如何聚合?即给定一个点,以此为圆心,如何找到一定半径范围内所有点?
- 聚合完毕后,给定一个包围盒(例如当前视口),如何找到其中包含的聚合后的要素?
对于这两个问题(radius & range query),在海量点数据下,如果使用暴力遍历每个点的方法必然是低效的。为了高效搜索,我们需要使用空间索引,例如 kdbush。尽管我们不是 GIS 场景,但仍可以参考 supercluster 的实现。
在点聚合场景中,k-d 树的节点除了原始的 Point 要素,还有聚合生成的点集合要素,后者需要一个聚合后的中心点。这个中心点的数据结构如下:
// createPointCluster
data.push(
    x,
    y, // projected point coordinates
    Infinity, // the last zoom the point was processed at
    i, // index of the source feature in the original input array
    -1, // parent cluster id
    1, // number of points in a cluster
);
在创建索引阶段,我们需要为每个缩放等级都构建一棵 k-d tree:
// supercluster/index.js

// maxZoom 最大缩放等级
// minZoom 最小缩放等级
let clusters = [];
for (let i = 0; i < points.length; i++) {
    clusters.push(createPointCluster(points[i], i));
}
// 创建根 k-d 树
this.trees[maxZoom + 1] = new KDBush(
    clusters,
    getX,
    getY,
    nodeSize,
    Float32Array,
);
// 为每个缩放等级创建一棵 k-d 树
for (let z = maxZoom; z >= minZoom; z--) {
    // 创建点聚合,后面详细介绍
    clusters = this._cluster(clusters, z);
    this.trees[z] = new KDBush(clusters, getX, getY, nodeSize, Float32Array);
}
聚合一定范围的点需要解决两个问题:
- 使用 k-d tree 的 radius 查询一定半径内的所有邻居,kdbush 中提供了 within 方法
- 使用范围内的点坐标生成聚合点的坐标,权重为每个子集合包含的点数目
getClusters(bbox, zoom) {
// 取得缩放等级对应的 k-d tree
    const tree = this.trees[this._limitZoom(zoom)];
// 查询包围盒包含的要素索引数组
    const ids = tree.range(minX, minY, maxX, maxY);
    const clusters = [];
    for (const id of ids) {
// 通过索引找到 k-d 树节点
        const c = tree.points[id];
// 如果该节点是点集合,创建对应的 GeoJSON feature;如果只是单个点,直接返回
        clusters.push(c.numPoints ? getClusterJSON(c) : this.points[c.index]);
    }
    return clusters;
}
展示聚合后的评论
按视口范围查询聚合后的点:
const { cameraZoom } = this.api.getAppState();
const { minX, minY, maxX, maxY } = this.api.getViewportBounds();
this.clusters = this.cluster.getClusters([minX, minY, maxX, maxY], cameraZoom);
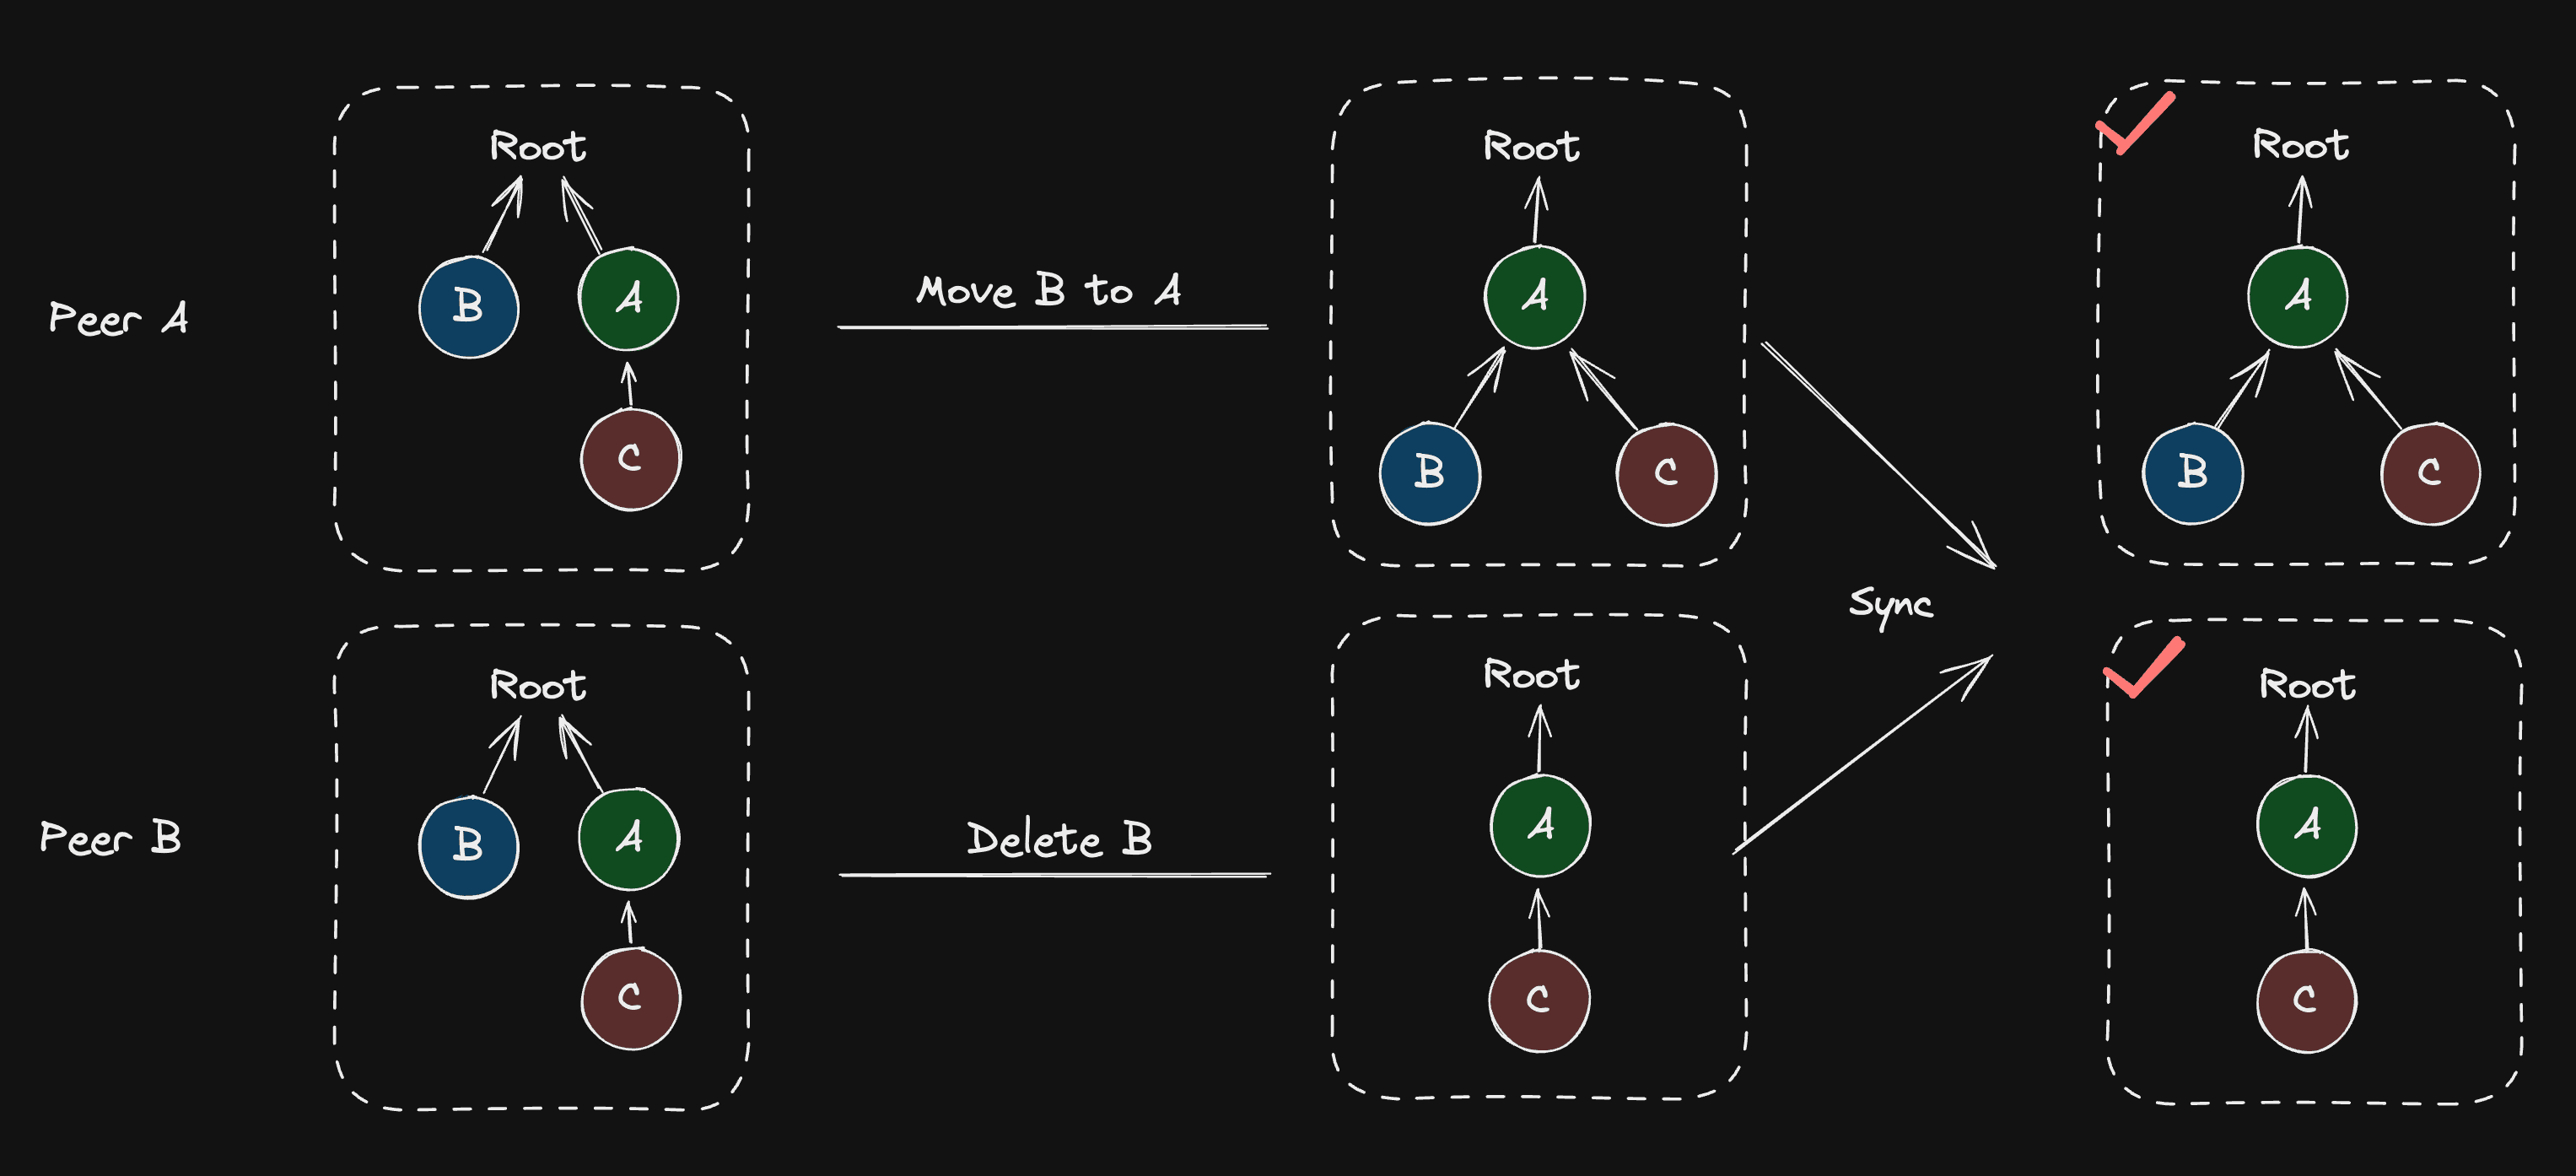
fractional-indexing
正如前文提到的,场景图可以看作一个 "movable tree",可能的冲突包括新增、删除和移动这三种场景。Movable tree CRDTs and Loro's implementation 一文详细介绍了这三种场景下 Loro 的实现思路。比如删除和移动同一个节点,此时两种结果都可以接受,取决于服务端接收到消息的顺序。但有些操作场景同步后会造成环,比如两个用户分别进行 B -> C 和 C -> B 操作,破坏树本身的结构定义。
import { Loro, LoroTree, LoroTreeNode } from 'loro-crdt';

let doc = new Loro();
let tree: LoroTree = doc.getTree('tree');
let root: LoroTreeNode = tree.createNode();
Realtime editing of ordered sequences 中介绍了 Figma 使用 fractional-indexing 反映元素在场景图中的位置。
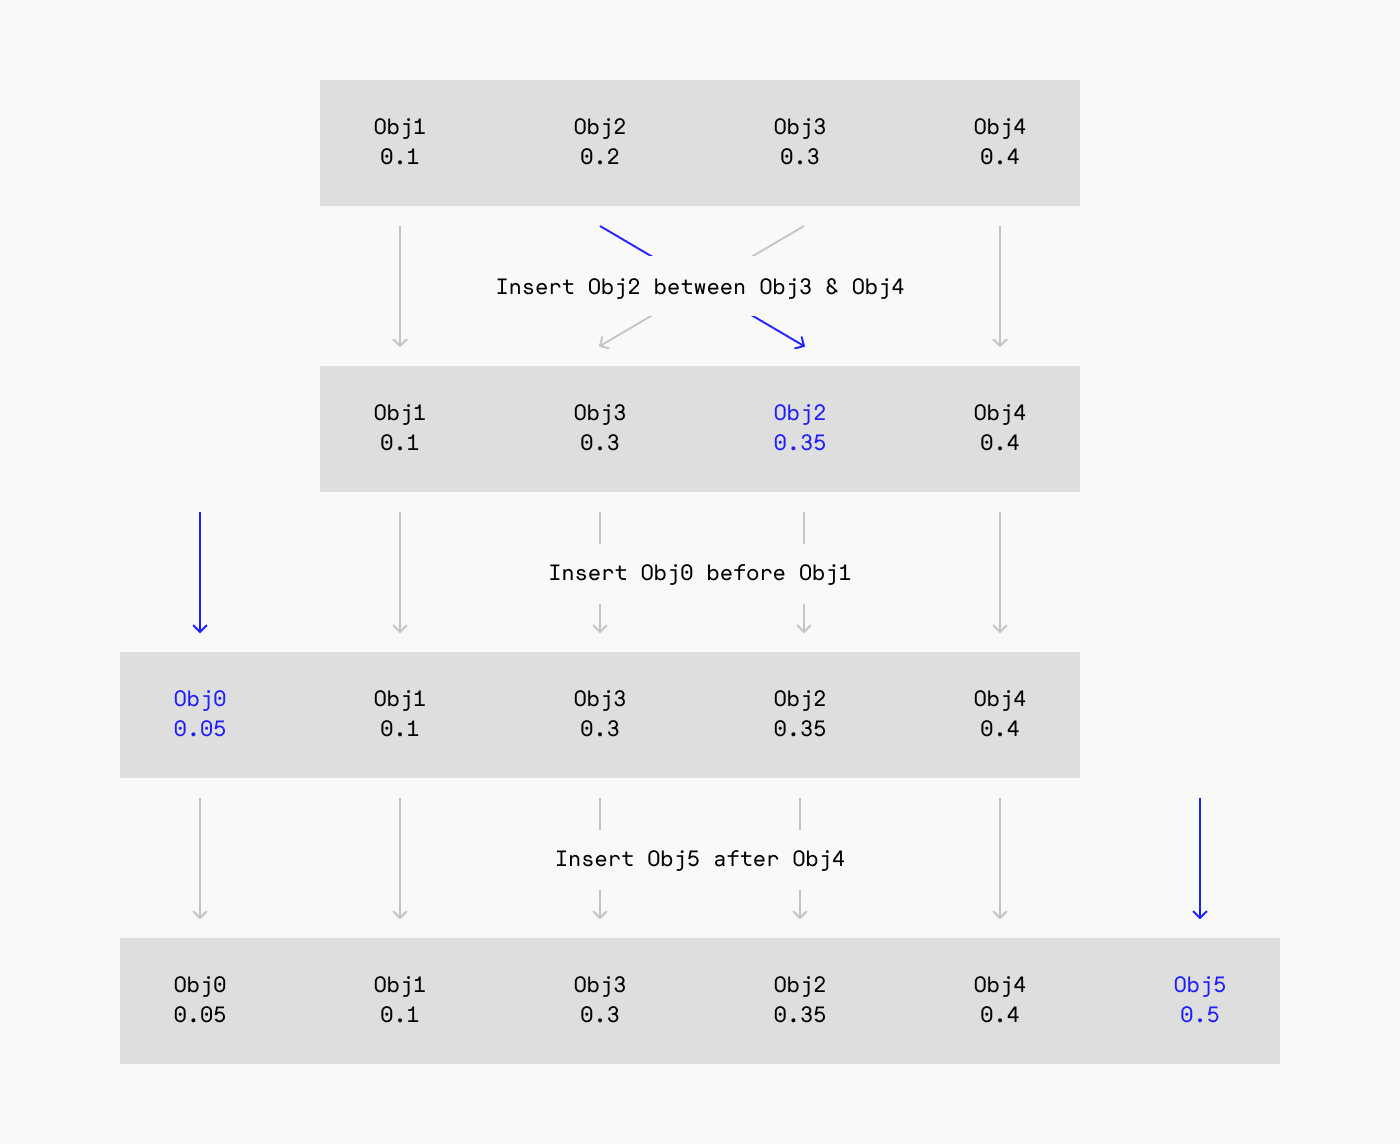
Excalidraw 也使用了同样的实现:
// @see https://github.com/excalidraw/excalidraw/blob/9ee0b8ffcbd3664a47748a93262860321a203821/packages/excalidraw/fractionalIndex.ts#L380
import { generateNKeysBetween } from 'fractional-indexing';
const fractionalIndices = generateNKeysBetween(
    elements[lowerBoundIndex]?.index,
    elements[upperBoundIndex]?.index,
    indices.length,
) as FractionalIndex[];
Loro 提供的 Tree 内置了 Fractional Index 算法,详见:Movable tree CRDTs and Loro's implementation。
We integrated the Fractional Index algorithm into Loro and combined it with the movable tree, making the child nodes of the movable tree sortable.
在课程 14中,我们希望通过 ZIndex 干预渲染次序,在编辑器 UI 中会以“调整图层次序”、“上移”、“下移”这样的功能呈现。因此当 ZIndex 首次被添加或发生修改时,我们首先遍历场景图,对子节点按照 ZIndex 排序,得到排序后的数组后根据一前一后两个兄弟节点,更新当前节点的 fractional index
class ComputeZIndex extends System {
    private readonly zIndexes = this.query(
        (q) => q.addedOrChanged.with(ZIndex).trackWrites,
    );

    execute() {
        this.zIndexes.addedOrChanged.forEach((entity) => {
            // Travese scenegraph, sort children by z-index
            const descendants = getDescendants(
                getSceneRoot(entity),
                sortByZIndex,
            );
            const index = descendants.indexOf(entity);
            const prev = descendants[index - 1] || null;
            const next = descendants[index + 1] || null;
            const prevFractionalIndex =
                (prev?.has(FractionalIndex) &&
                    prev.read(FractionalIndex)?.value) ||
                null;
            const nextFractionalIndex =
                (next?.has(FractionalIndex) &&
                    next.read(FractionalIndex)?.value) ||
                null;

            // Generate fractional index with prev and next node
            const key = generateKeyBetween(
                prevFractionalIndex, // a0
                nextFractionalIndex, // a2
            );

            if (!entity.has(FractionalIndex)) {
                entity.add(FractionalIndex);
            }
            entity.write(FractionalIndex).value = key; // a1
        });
    }
}
这样在渲染前就可以根据 fractional index 排序,值得一提的是不可以直接使用 localeCompare 比较:
export function sortByFractionalIndex(a: Entity, b: Entity) {
    if (a.has(FractionalIndex) && b.has(FractionalIndex)) {
        const aFractionalIndex = a.read(FractionalIndex).value;
        const bFractionalIndex = b.read(FractionalIndex).value;

        // Can't use localeCompare here.
        // @see https://github.com/rocicorp/fractional-indexing/issues/20
        if (aFractionalIndex < bFractionalIndex) return -1;
        if (aFractionalIndex > bFractionalIndex) return 1;
        return 0;
    }

    return 0;
}