课程 34 - Group, Frame 与裁切
目前我们的 Group / g 是一种逻辑分组,它没有几何边界,例如 x/y/width/height,因此也不会对子元素应用裁剪。tldraw 就提供了 Group 和 Frame 这两种 Structural shapes。
Group
在 Figma 里,group 本质就是一个“容器”,类似文件夹,详见:The difference between frames and groups
- 把多个元素当作一个整体操作(移动、缩放等)
- 点击时默认选中整个 group,group 的大小会 自动由子元素决定
- 双击可以进入内部编辑单个元素
- 成组/取消成组
- 使用上下文菜单和快捷键
- 在图层列表中通过拖拽完成
拖拽图层成组
在实现拖拽成组前,我们可以使用 sortablejs 先实现同级列表内图形的拖拽排序。
import Sortable from 'sortablejs';

const lists = root.querySelectorAll<HTMLElement>('.layer-siblings');
lists.forEach((el) => {
    const parentId = el.dataset.layerParentId ?? '';
    const sortable = Sortable.create(el, {
        animation: 150,
        draggable: '.layer-branch',
        filter: '.layer-branch--locked', // 锁定图层无法拖拽
        preventOnFilter: false,
        group: {
            name: `layers-${parentId || 'root'}`,
            pull: true,
            put: true,
        },
        onEnd: (evt) => {
            if (evt.oldIndex === evt.newIndex) {
                return;
            }
            const to = evt.to as HTMLElement;
            const orderedIds = Array.from(to.children)
                .filter((c): c is HTMLElement =>
                    c.classList.contains('layer-branch'),
                )
                .map((c) => c.dataset.nodeId)
                .filter((id): id is string => !!id);
            // 所有兄弟节点重新排序,依次设置 zIndex
            this.applyLayerSiblingOrder(
                to.dataset.layerParentId ?? '',
                orderedIds,
            );
        },
    });
    this.sortableInstances.push(sortable);
});
拖拽成组/解除绑定需要跨组操作。
StencilBuffer
在 tldraw 中,裁剪是通过 CSS clip-path 实现的,在父元素上通过重载 getClipPath 定义,内置的 Frame 就是这样实现的。在 Figma 中该属性称作 clip content,详见 Frame properties in Figma。
而在 pencil.dev 中,Frame 的定义如下,它是一个可以拥有子元素的矩形,具备裁剪能力:
/** A frame is a rectangle that can have children. */
export interface Frame extends Rectangleish, CanHaveChildren, Layout {
    type: 'frame';
    /** Visually clip content that overflows the frame bounds. Default is false. */
    clip?: BooleanOrVariable;
    placeholder?: boolean;
    /** The presence of this property indicates that this frame is a "slot" - which means that it is intended be customized with children in instances of the parent component. Each element of the array is an ID of a "recommended" reusable component, one which fits semantically as a child here (e.g. inside a menu bar, the content slot would recommend IDs of various menu item components). */
    slot?: string[];
}考虑通用性,我们希望每个图形都可以成为裁剪父容器,超出容器范围的子元素都会被裁切,同时这个父元素也可以正常渲染,fill/stroke 这些属性都可以正常应用。属性声明如下:
{
    clipChildren: true;
}
下面我们来看在 WebGL / WebGPU 中如何实现裁剪效果。
成为裁剪容器之后,在 RenderPass 中我们需要同时渲染到 stencil buffer,它的默认值为 0:
{
stencilWrite: true, // 开启写入 stencil buffer
stencilFront: {
compare: CompareFunction.ALWAYS,
passOp: StencilOp.REPLACE,
},
stencilBack: {
compare: CompareFunction.ALWAYS,
passOp: StencilOp.REPLACE,
}
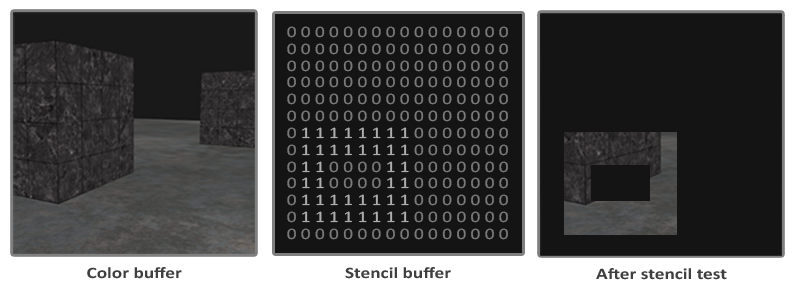
}然后向 stencil buffer 写入参考值,用于后续子元素渲染时与它进行比较,这个值可以是 [0-255] 间的值,例如上图中使用的是 1:
renderPass.setStencilReference(STENCIL_CLIP_REF);被裁剪的子元素在渲染时,会判断 buffer 中的值是否等于之前的约定值,因此为 0 的部分就不会被渲染,实现了裁剪效果:
{
    stencilFront: {
        compare: CompareFunction.EQUAL,
        passOp: StencilOp.KEEP,
    }
}
橡皮擦效果
现在我们可以来实现 课程 25 - 非原子化橡皮擦 中遗留的部分了。橡皮擦效果和之前的裁剪效果完全相反,CSS 的 clip-path 本质是定义“可见区域”,SVG 中对应的 <clipPath> 元素同理,它们是无法定义“不可见区域”的。
但 SVG 的 <mask> 可以做到,详见:Clipping and masking in SVG。在 WebGL / WebGPU 中我们只需要反转一下判定条件即可:
{
    stencilFront: {
        compare: CompareFunction.EQUAL,
        compare: CompareFunction.NOTEQUAL,
        passOp: StencilOp.KEEP,
    }
}
这样我们的属性也需要作出更改,能够区分 clip 和 erase 这两种模式:
{
    clipChildren: true,
    clipMode: 'erase', // 'clip' | 'erase'
}
另外在 Fragment Shader 中,在开启 stencil buffer 时需要跳过原有的根据 alpha 通道的丢弃像素逻辑,详见:课程 2 - SDF。否则当 fill='none' 时就无法得到正确的渲染结果:
// sdf.glsl
#ifdef USE_STENCIL
  // Stencil pass: discard by geometry (SDF distance), not alpha. Include the same
  // anti-alias band as the normal pass (fwidth(distance)) so the stencil boundary
  // matches the visible shape and avoids edge holes.
  float outerBoundary = (strokeAlignment < 1.5) ? 0.0 : strokeWidth;
  if (distance > outerBoundary)
    discard;
#else
  if (outputColor.a < epsilon)
    discard;
#endif
导出成图片
在导出被裁剪的单个元素为图片时,需要计算自身包围盒与父包围盒的交集,作为渲染到 OffscreenCanvas 的尺寸,或者在导出 SVG 时设置为 viewbox 的大小:
const { minX, minY, maxX, maxY } =
    entity.read(ComputedBounds).renderWorldBounds;
const {
    minX: parentMinX,
    minY: parentMinY,
    maxX: parentMaxX,
    maxY: parentMaxY,
} = parentEntity.read(ComputedBounds).renderWorldBounds;
const isectMinX = Math.max(minX, parentMinX);
const isectMinY = Math.max(minY, parentMinY);
const isectMaxX = Math.min(maxX, parentMaxX);
const isectMaxY = Math.min(maxY, parentMaxY);
bounds.addFrame(isectMinX, isectMinY, isectMaxX, isectMaxY);
导出 PNG
唯一需要考虑的是,即使只选择导出被裁剪的子元素,也需要先渲染父元素。
导出 SVG
先来看 clipMode='clip' 的状况。
作为裁剪的父元素有对应的 <g> 元素,设置它的 clip-path 引用自身对应的图形,要注意 <clipPath> 本身是不会被渲染的。
<g clip-path="url(#clip-path-frame-1)" transform="matrix(1,0,0,1,100,100)">
    <defs>
        <clipPath id="clip-path-frame-1">
            <ellipse
                id="node-frame-1"
                fill="green"
                cx="100"
                cy="100"
                rx="100"
                ry="100"
            />
        </clipPath>
    </defs>
    <ellipse
        id="node-frame-1"
        fill="green"
        cx="100"
        cy="100"
        rx="100"
        ry="100"
    />
    <rect
        id="node-rect-1"
        fill="red"
        width="100"
        height="100"
        transform="matrix(1,0,0,1,-50,-50)"
    />
</g>
再来看 clipMode='erase' 的状况,SVG 的 mask 规则是:
- 白色(luminance 1)被遮元素显示
- 黑色(luminance 0)被遮元素不显示
先绘制一个足够大的白色矩形,再用黑色绘制负责擦除的元素:
const $whiteRect = createSVGElement('rect');
$whiteRect.setAttribute('x', '-10000');
$whiteRect.setAttribute('y', '-10000');
$whiteRect.setAttribute('width', '20000');
$whiteRect.setAttribute('height', '20000');
$whiteRect.setAttribute('fill', 'white');
$clipPath.appendChild($whiteRect);

$parentNode.setAttribute('fill', 'black');
$parentNode.setAttribute('stroke', 'black');
最终 SVG 结构如下:
<defs xmlns="http://www.w3.org/2000/svg">
    <mask id="mask-frame-1">
        <rect x="-10000" y="-10000" width="20000" height="20000" fill="white" />
        <rect fill="black" width="100" height="100" stroke="black" />
    </mask>
</defs>
裁切图片
裁切最常用应用于图片,详见:Crop an image 和 image cropping in excalidraw
值得注意的是在编辑器中,裁切通常都会保留原始的图片,因此被裁剪仅仅只是展示效果,便于重新调整裁切区域:
Cropping is a non-destructive action, meaning that the cropped area does not get deleted. This allows you to make changes to the cropped area, if needed.
裁剪部分的半透明效果
在进入裁剪模式后,还需要展示原始的图片内容,通过透明度表示被裁切的部分。我们为 clipMode 再增加一种模式 'soft',用来展示这种效果:
实现原理如下,我们实际上对被裁剪图形渲染了两遍,第一遍(compare: CompareFunction.EQUAL)是正常被裁剪的部分和之前介绍的一样,第二遍(compare: CompareFunction.NOTEQUAL)应用了固定的透明度:
#ifdef USE_SOFT_CLIP_OUTSIDE
  outputColor *= 0.15;
#endif
增加交互
接下来我们为裁剪区域增加交互让其可编辑,进入裁剪模式后,可交互部分有两个:
- 固定裁剪区域,拖拽被裁剪图形
- 调整裁剪区域大小
参考 Figma 的交互设计,选中图形后通过右键菜单可以进入裁剪模式,此时会为选中的元素创建一个裁剪父元素:
const children = layersSelected.map((id) => this.api.getNodeById(id));
const bounds = this.api.getBounds(children);
const { minX, minY, maxX, maxY } = bounds;
// create a clip parent for all the selected nodes
const clipParent: RectSerializedNode = {
    id: uuidv4(),
    type: 'rect',
    clipMode: 'clip',
    x: minX,
    y: minY,
    width: maxX - minX,
    height: maxY - minY,
};

this.api.runAtNextTick(() => {
    this.api.updateNodes([clipParent]);
    // clipParent -> children
    children.forEach((child) => {
        this.api.reparentNode(child, clipParent);
    });
    this.api.setAppState({
        layersCropping: [clipParent.id],
        penbarSelected: Pen.SELECT,
    });
    this.api.record();
});