Bidirectional edges
Two-way links: o--o, <-->, x--x.
flowchart LR
  A o--o B
  B <--> C
C x--x D在 课程 35 - 基于瓦片的渲染 中我们使用了基于 WebGPU Compute Shader 的渲染器 vello。在本节中我们可以尝试一种同样基于 Compute Shader 的全局光照效果,并将它和已有的渲染流程结合起来。
Paste while the canvas is focused to use the same styling as the demo above (dark theme, Gaegu font, etc.).
Two-way links: o--o, <-->, x--x.
flowchart LR
A o--o B
B <--> C
C x--x DMindmap
mindmap
  root((mindmap))
    Origins
      Long history
      ::icon(fa fa-book)
      Popularisation
        British popular psychology<br/> author Tony Buzan
    Research
      On effectiveness<br/>and features
      On Automatic creation
        Uses
            Creative techniques
            Strategic planning
            Argument mapping
    Tools
      Pen and paper
MermaidNested composite states with inner states.
stateDiagram-v2
    [*] --> Idle
    Idle --> Active: Start
Active --> [*]Actors and messages; paste to render on the canvas.
sequenceDiagram
  Alice->>John: Hello John, how are you?
  John-->>Alice: Great!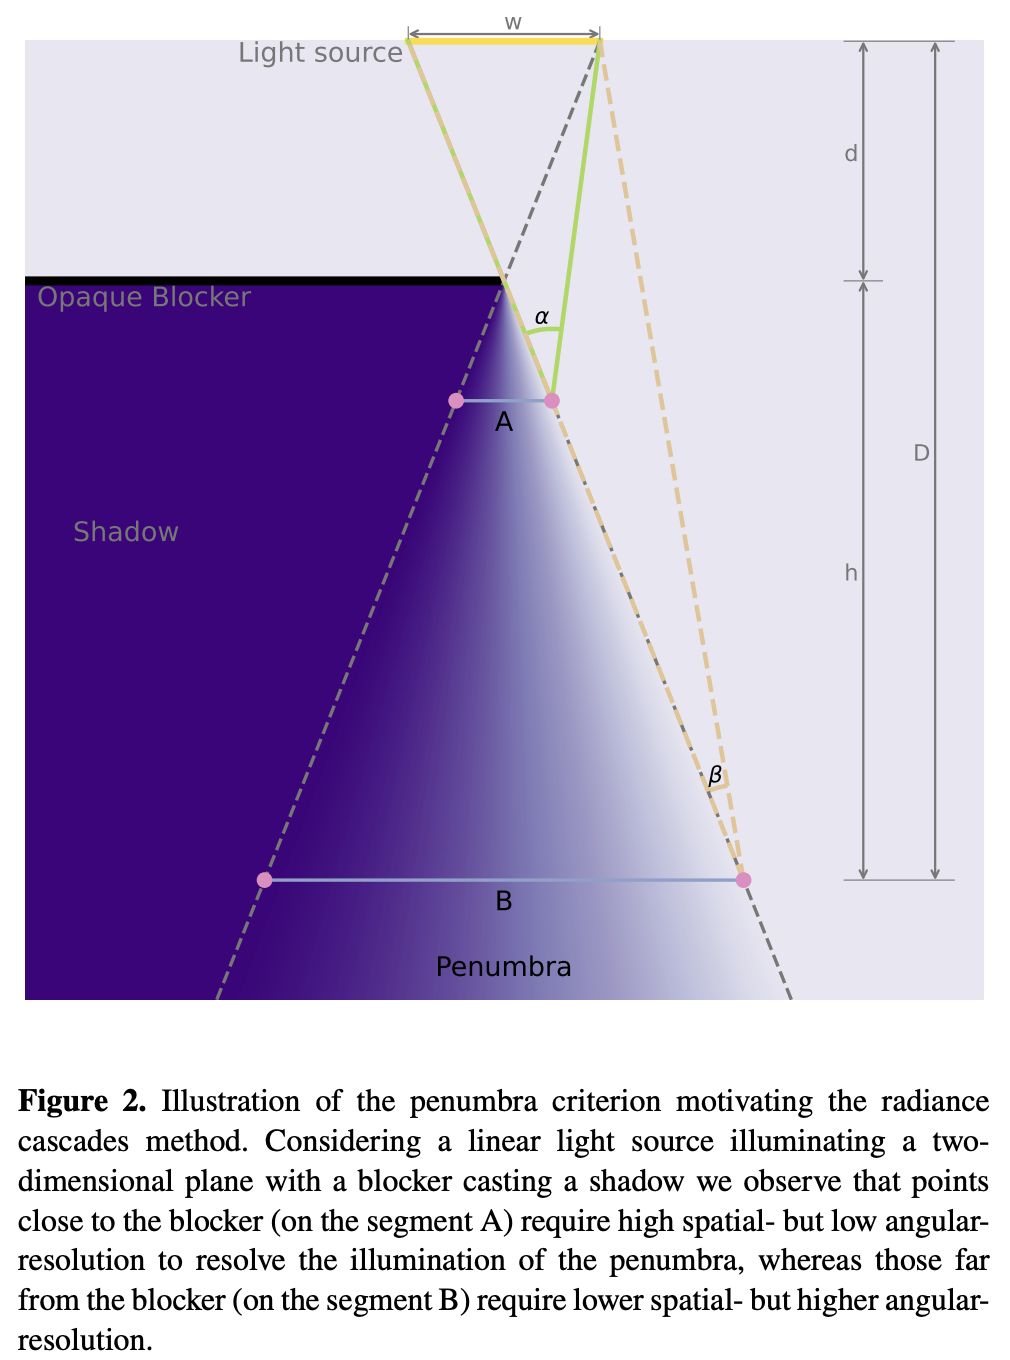
Alice-)John: See you later!完整原理介绍详见:Fundamentals of Radiance Cascades
What we've observed is that the further we are from the closest object in the scene:
- The less spatial resolution we need. (e.g. the larger spacing can be between probes)
- The more angular resolution we need. (e.g. the more rays we need per probe)
整体流程如下:
let mut rc_enc = device_handle
    .device
    .create_command_encoder(&wgpu::CommandEncoderDescriptor {
        label: Some("rc_gi"),
    });
rp.encode_distance_pass();
rp.encode_rc_cascade_passes();
rp.encode_rc_mipmap();
rp.encode_rc_apply();
device_handle.queue.submit([rc_enc.finish()]);先使用解析几何。在 课程 2 - 绘制圆 和 课程 9 - 绘制椭圆和矩形 中我们已经介绍过 Circle Ellipse 和 Rect 的 SDF,在图形边缘和内部距离为 0。下图为使用灰度图的可视化效果,使用 saturate(d * DIST_FIELD_VIZ_SCALE) 将原始距离映射到 [0,1]:
为了生成距离场纹理,Vertex shader 依然使用一个全屏三角形(类似之前 post processing 中的做法),prims 记录了场景中图形基础几何信息,便于使用 sdf_prim 生成解析几何距离场。最终结果写入 rc_dist 纹理中,该纹理使用全画布分辨率,格式为 R16F 存储无符号距离。
@group(0) @binding(0) var<uniform> header: DistHeader;
@group(0) @binding(1) var<storage, read> prims: array<GpuRcPrim>;

@fragment
fn dist_fs(i: VsOut) -> @location(0) vec4<f32> {
  var d = 1e6;
  let n = header.count;
  for (var i = 0u; i < 64u; i = i + 1u) {
    if i >= n { break; }
    d = min(d, sdf_prim(p_canvas, prims[i]));
  }
  // d 为并集 SDF:形内 <0、形外 >0、边 ≈0。R 存 max(d,0):实心内部与边上为 0,外部为到边界的正距离。
  return vec4(max(d, 0.0), 0.0, 0.0, 1.0);
}
目前我们暂时只支持 Rect Ellipse Line Polyline,其他 SDF 可以参考 distfunctions2d
bevy_radiance_cascades 使用的 Jump Flood Algorithm (JFA) 是一种并行距离场生成算法。它的核心思想是:通过指数级递减的"跳跃步长",让信息在 log₂(N) 轮内传遍整个网格。
texture_2d<u32>(存种子坐标)。这样射线步进可以用较大的步长跳到下一个“安全”距离,而不是固定小步长。
Fundamentals of Radiance Cascades
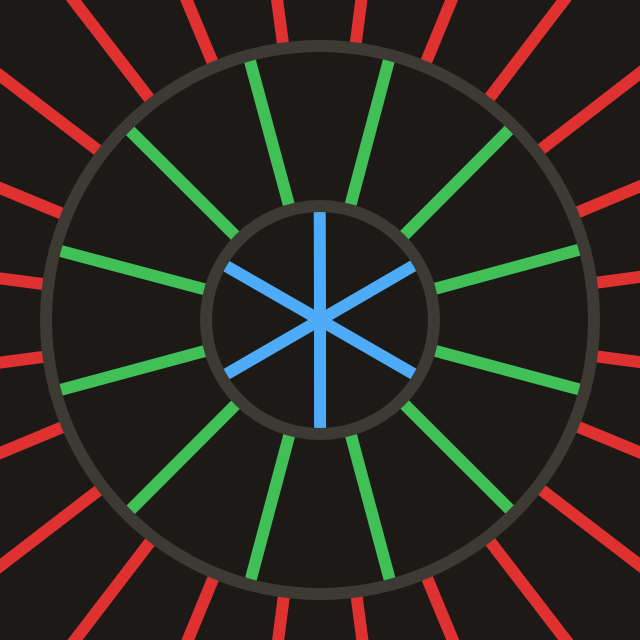
A cascade is basically a grid of probes, in which all probes have equal properties. (e.g. interval count, interval length, probe spacing)
每个 Probe 结构如下,后续传入 GPU 按 std140 对齐时需要考虑 padding:
pub struct Probe {
    pub width: u32, // 每个 probe 占多少格纹理、多少条方向采样(角度离散度)
    pub start: f32, // 这条射线从离中心多远开始算(跳过已由更内层级联覆盖的近距)
    pub range: f32, // 从该起点沿射线再追踪多远(当前级联负责的深度段长度)
}

pub fn probe_for_cascade(c: u32, resolution_factor: u32, interval0: f32) -> Probe {
    let width = 1u32 << (c + resolution_factor);
    let start = interval0 * (1.0 - 4.0_f32.powi(c as i32)) / -3.0;
    let range = interval0 * 4.0_f32.powi(c as i32);
    Probe {
        width,
        start,
        range,
    }
}
根据画布对角线长度计算所需的 cascade 数目:
pub fn cascade_count_for_gi_size(gi_w: u32, gi_h: u32) -> usize {
    let diag = ((gi_w * gi_w + gi_h * gi_h) as f32).sqrt();
    cascade_count_for_diagonal(diag, RC_INTERVAL0, RC_MAX_CASCADES).max(1)
}

pub const RC_INTERVAL0: f32 = 2.0;
pub const RC_MAX_CASCADES: usize = 16;
在画布初始化时分配 Probe:
for c in 0..cascade_count {
    let p = probe_for_cascade(c as u32, RC_RESOLUTION_FACTOR, RC_INTERVAL0);
    let slot = ProbeUniformSlotPadded::from_probe(&p);
    queue.write_buffer(
        &self.rc_probe_dynamic_buf,
        (c * PROBE_UNIFORM_STRIDE) as u64,
        bytemuck::bytes_of(&slot),
    );
}
CPU 侧调度分成两个 pipeline,需要准备 rc_ping_a 和 rc_ping_b 两张纹理。
let rc_usage =
    TextureUsages::STORAGE_BINDING | TextureUsages::TEXTURE_BINDING | TextureUsages::COPY_SRC;
let (rc_a, rc_a_view) = mk_sz(
    device,
    "rc_ping_a",
    TextureFormat::Rgba16Float,
    rc_usage,
    gi_width,
    gi_height,
);
// rc_ping_b 同上
首先是第一个 pipeline,它负责读 rc_ping_a,写 rc_ping_b,先计算最远段。
let mut pass = encoder.begin_compute_pass(&ComputePassDescriptor {
    label: Some("radiance_cascades_first_pass"),
    timestamp_writes: None,
});
pass.set_pipeline(&self.rc_cascade_first_pipeline);
pass.set_bind_group(0, &radiance_cascades_10, &[first_offset]);
pass.dispatch_workgroups(gw, gh, 1);
第二个 pipeline 会交替使用 radiance_cascades_01 / 10 两套 bind group 做 ping-pong(依次写 rc_ping_a / rc_ping_b)。逐级向更小的 c 合并,每步用对应的 Probe 偏移。
let mut merge_pass = encoder.begin_compute_pass(&ComputePassDescriptor {
    label: Some("radiance_cascades_merge_passes"),
    timestamp_writes: None,
});
merge_pass.set_pipeline(&self.rc_cascade_merge_pipeline);
for pass_i in 1..cascade_count {
    let cascade_idx = cascade_count - 1 - pass_i;
    let dyn_off = (cascade_idx * PROBE_UNIFORM_STRIDE) as u32;
    let merge_idx = pass_i - 1;
    let bg = if merge_idx % 2 == 0 {
        &radiance_cascades_01
    } else {
        &radiance_cascades_10
    };
    merge_pass.set_bind_group(0, bg, &[dyn_off]);
    merge_pass.dispatch_workgroups(gw, gh, 1);
}
无论是首次还是后续 ping-pong 的 compute pass,它们派发射线的逻辑都是一样的。
@compute @workgroup_size(8, 8, 1)
fn rc_cascade_first(@builtin(global_invocation_id) gid: vec3<u32>) {
  radiance_dispatch(0u, gid);
}

@compute @workgroup_size(8, 8, 1)
fn rc_cascade_merge(@builtin(global_invocation_id) gid: vec3<u32>) {
  radiance_dispatch(1u, gid);
}每个 Compute Shader 线程处理 GI 级联纹理里的 一个 texel:
在同一块 probe 里,不同 texel = 不同方向;块内铺满 width² 个方向采样。下面的解释视频来自:Fundamentals of Radiance Cascades
let probe_texel = vec2<u32>(base_coord.x % probe_w, base_coord.y % probe_w);

// 把二维局部坐标压平成 0 … probe_w²-1 的射线编号(每个 texel 对应一条固定方向)。
let ray_index = probe_texel.x + probe_texel.y * probe_w;
let ray_count = probe_w * probe_w;

// 在 一整圈 [0, 2π) 上 均匀 划分 ray_count 个方向。
// + 0.5 取每个扇区的中心角,避免把边界落在两条射线的接缝上。
let ray_angle = (f32(ray_index) + 0.5) / f32(ray_count) * PI2;
let ray_dir = normalize(vec2(cos(ray_angle), sin(ray_angle)));

// 当前 texel 属于第几行、第几列 probe(整除)。
let probe_cell = vec2<u32>(base_coord.x / probe_w, base_coord.y / probe_w);
// 该 probe 在 GI 纹理 里的 左上角 像素坐标。
let probe_coord = vec2<u32>(probe_cell.x * probe_w, probe_cell.y * probe_w);
// 该 probe 的 中心(GI 纹理像素坐标,整数像素中心用 +w/2 近似)。
let probe_coord_center = probe_coord + vec2<u32>(probe_w / 2u, probe_w / 2u);
// 当前 probe 中心在 全分辨率 下的位置(用于「从哪一点出发往四周看」)。
let center_full = vec2<f32>(probe_coord_center) * rs.gi_scale;
未命中且 merge 开启时加上 merge() 从上一级纹理插值来的辐射。
@group(0) @binding(5) var tex_radiance_cascades_destination: texture_storage_2d<rgba16float, write>;

fn radiance_dispatch(merge_flag: u32, gid: vec3<u32>) {
  // ...

  // 不在中心直接起步,而是沿 ray_dir 前移 probe.start。
  // 这是 Radiance Cascades 里 按级联划分的距离段:内层 cascade 已覆盖近处,这里从 start 开始只负责更远一段,避免重复累加。
  let origin = center_full + ray_dir * ru.probe_start;
  var color = raymarch(origin, ray_dir, ru.probe_range);
  if merge_flag != 0u && color.a != 1.0 {
    color = color + merge(probe_cell, ray_index);
  }
  textureStore(tex_radiance_cascades_destination, ...);
}对于每一根从像素点出发,沿指定方向前进的射线,最多向前步进 MAX_RAYMARCH 步。每一步读取上一步生成的距离场 tex_dist_field,按 dist 沿射线前进;若距离 < EPSILON 就认为击中表面或者图形内部,直接读取 tex_main 作为颜色。
fn raymarch(origin: vec2<f32>, ray_dir: vec2<f32>, range: f32) -> vec4<f32> {
    // ...
    var color = vec4(0.0);
    var covered_range = 0.0;
    for (var r = 0u; r < MAX_RAYMARCH; r = r + 1u) {
        if ( // 终止条件
            covered_range >= range ||
            any(position >= dimensions)
        ) {
            break;
        }

        var dist = textureLoad(tex_dist_field, coord, 0).r;
        if (dist < EPSILON) {
            color = textureLoad(tex_main, coord, 0);
            break;
        }
        position = position + ray_dir * dist;
        covered_range = covered_range + dist;
    }
    return color;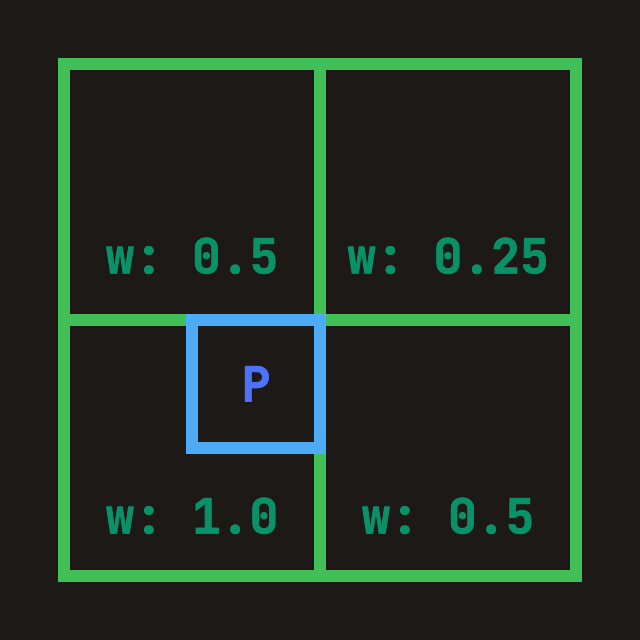
}「从内层(更细)级联合并到当前层」:当前层每个 probe 的 width = W,上一层(已写在 tex_radiance_cascades_source 里)对应的是 prev_width = 2W,即每个 probe 有 2 倍边长 → 4 倍条数 的方向采样。合并时要:
fn merge(probe_cell: vec2<u32>, ray_index: u32) -> vec4<f32> {
    let dimensions = textureDimensions(tex_radiance_cascades_source);
    // 上一层级联里,每个 probe 在纹理里占的边长(texel 数)。
    // 当前层是 W,上一层是 2W,方向数是 ((2W)^2),是当前的 4 倍。
    let prev_width = probe.width * 2u;

    let prev_ray_index_start = ray_index * 4u;
    for (var p = 0u; p < 4u; p = p + 1u) {
        let prev_ray_index = prev_ray_index_start + p;
        let offset_coord = vec2<u32>(
            prev_ray_index % prev_width,
            prev_ray_index / prev_width,
        );

        // 对四个空间角各采一次样
        TL = TL + fetch_cascade(
            probe_cell_i,
            probe_correction_offset + vec2<i32>(-1, -1),
            offset_coord,
            dimensions,
            prev_width,
        );
        // 省略 TR BL BR 方向
    }

    let weight = vec2<f32>(0.75, 0.75)
        - vec2<f32>(f32(probe_correction_offset.x), f32(probe_correction_offset.y)) * 0.5;
    // 对四个角上的 累加 radiance 做 空间双线性。
    return mix(mix(TL, TR, weight.x), mix(BL, BR, weight.x), weight.y)
    // 把前面 4 个 p(4 条细射线)的和 平均 成一条粗方向上的合并结果。
        * 0.25;
}
使用 WebGPU inspector 可以查看 rc_ping_b 最终的合并结果,可以看出未击中部分需要被补全,得到更平滑的半影效果。
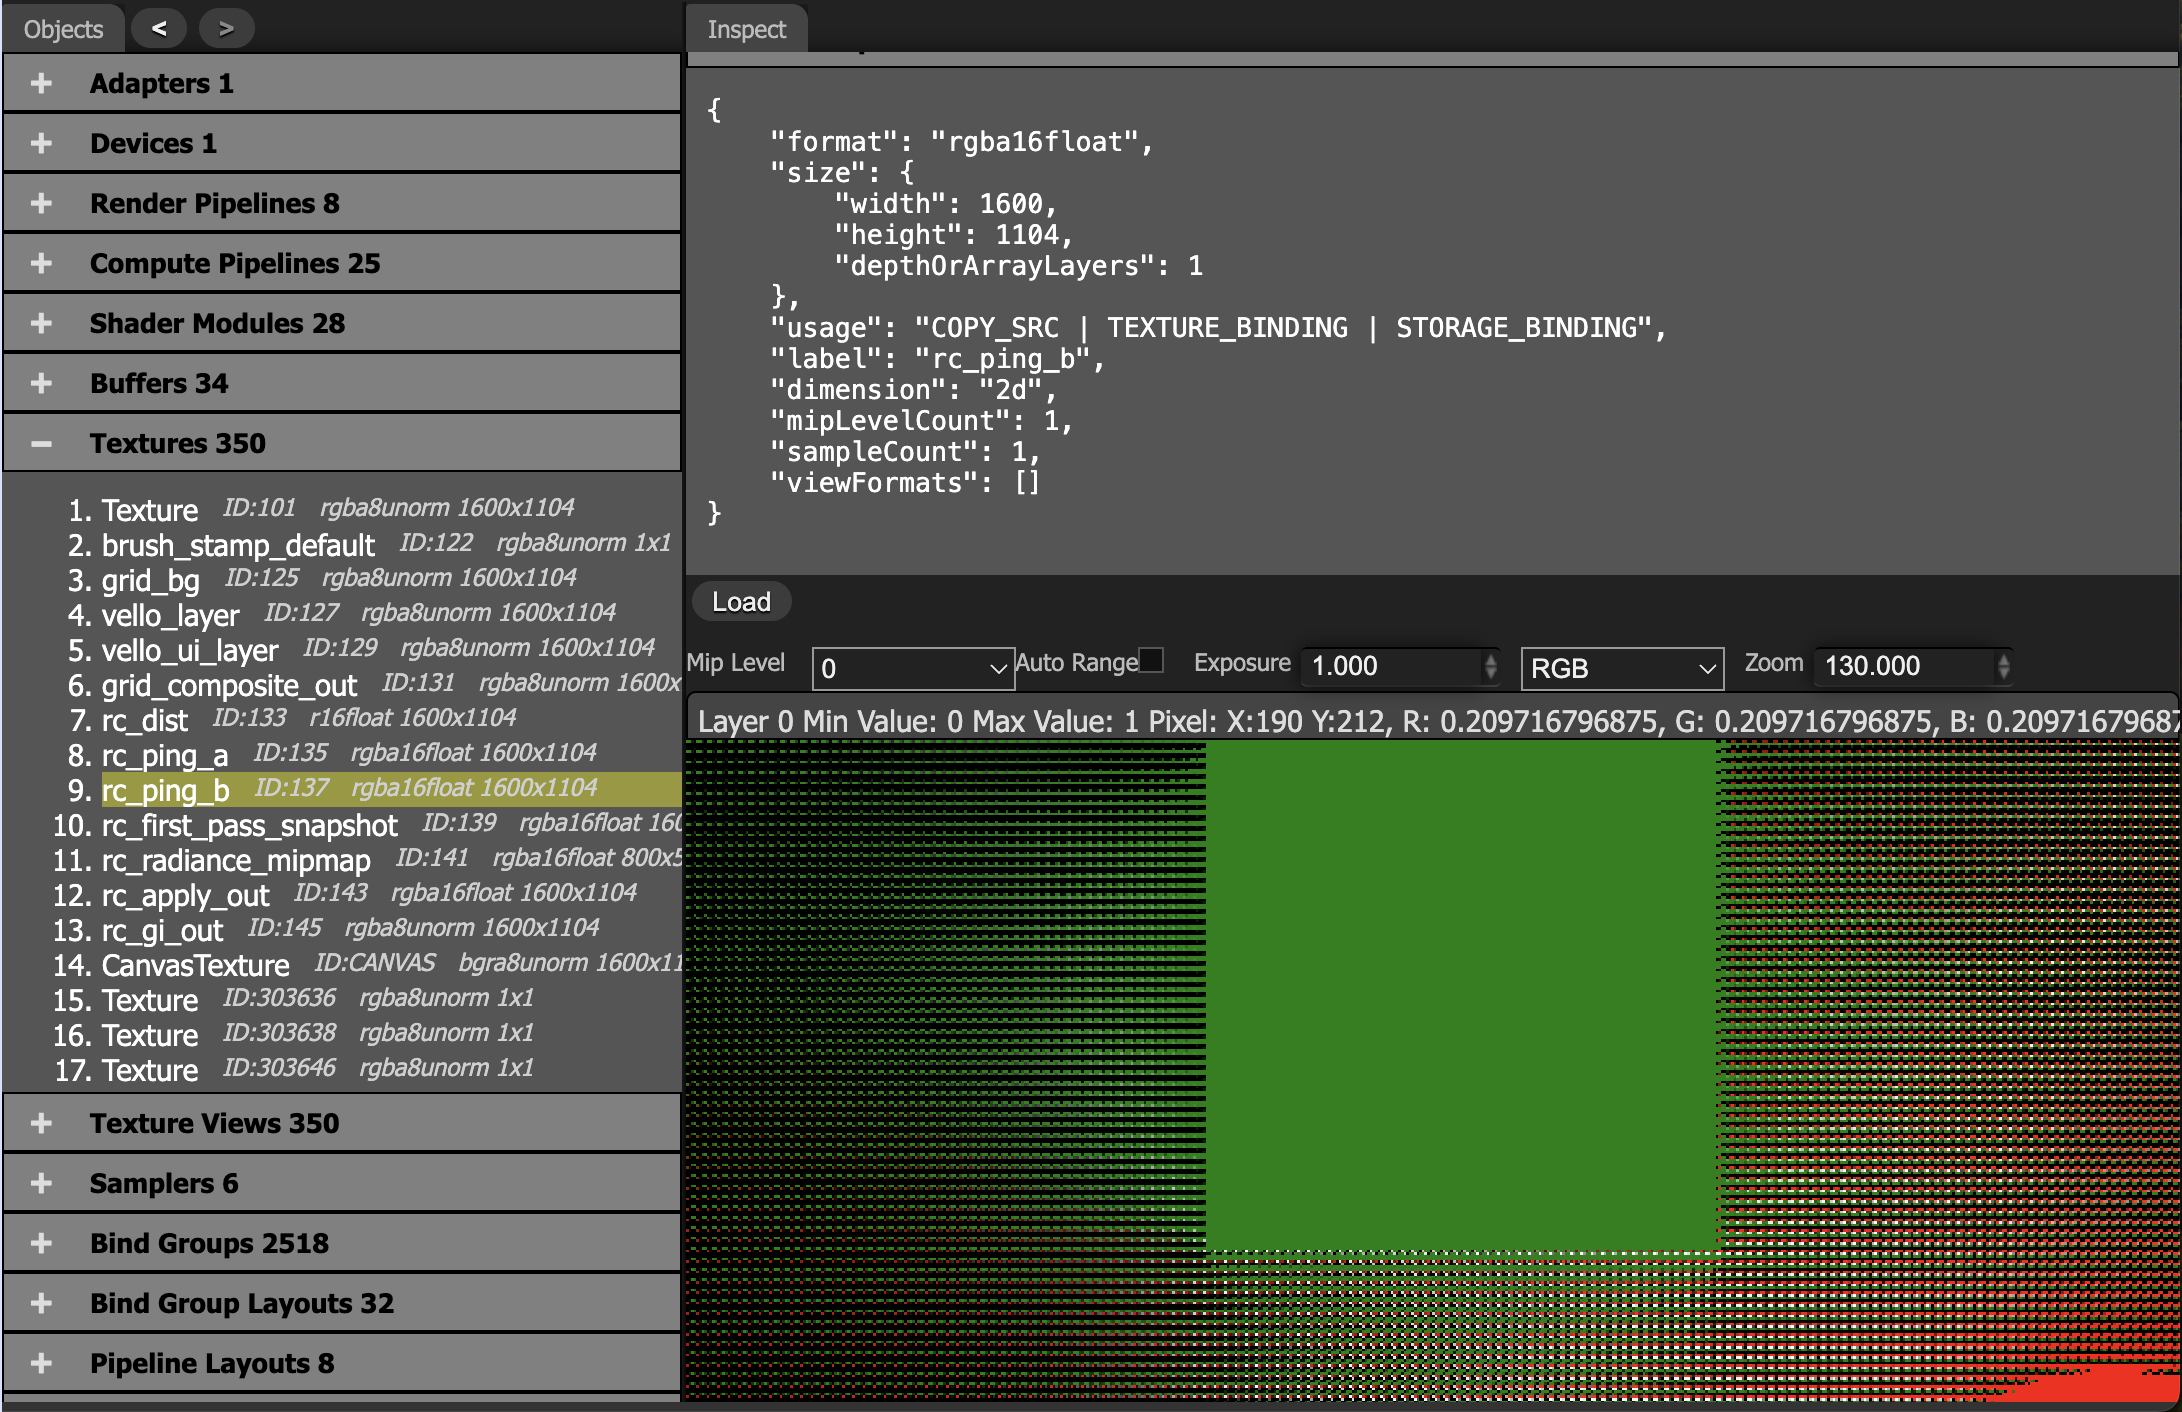
当探针间距大于阴影细节尺度时,插值会平均化明暗边界。
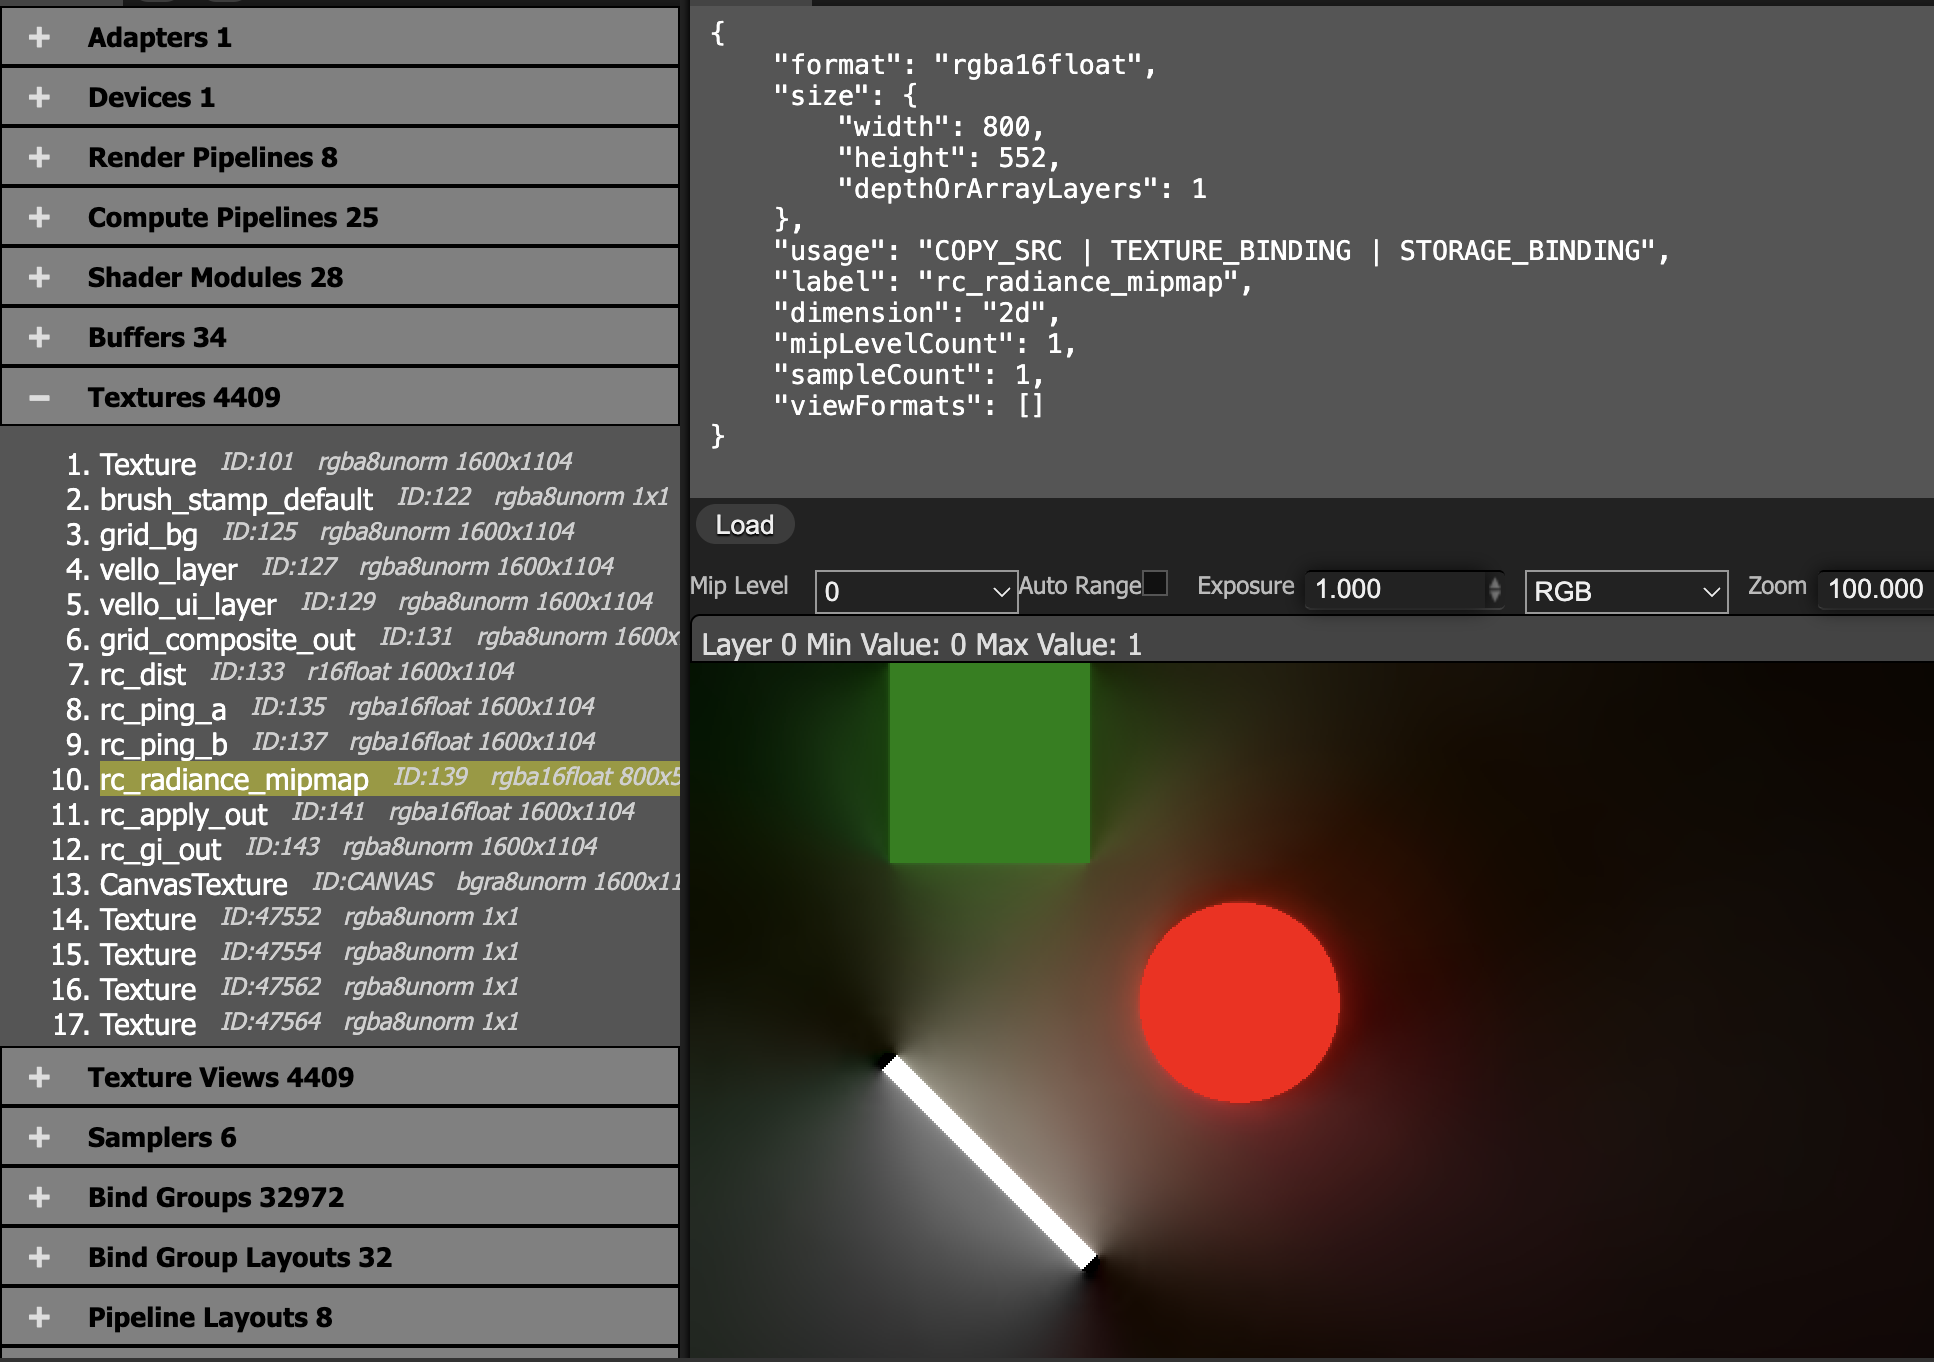
把最后一级联结果按 probe 网格做平均,写到缩小的 radiance_mipmap。
@group(0) @binding(0) var<uniform> probe: MipmapProbe;
@group(0) @binding(1) var tex_radiance_cascades: texture_2d<f32>;
@group(0) @binding(2) var tex_radiance_mipmap: texture_storage_2d<rgba16float, write>;

@compute @workgroup_size(8, 8, 1)
fn rc_radiance_mipmap(@builtin(global_invocation_id) global_id: vec3<u32>) {
  let base_coord = global_id.xy;
  let dimensions = textureDimensions(tex_radiance_mipmap);
  if any(base_coord >= dimensions) {
    return;
  }
  let pw = probe.width;
  let ray_count = pw * 2u;
  let probe_cell = base_coord * vec2<u32>(pw, pw);
  var accumulation = vec4(0.0);
  for (var y = 0u; y < pw; y = y + 1u) {
    for (var x = 0u; x < pw; x = x + 1u) {
      let coord = vec2<i32>(i32(probe_cell.x + x), i32(probe_cell.y + y));
      accumulation = accumulation + textureLoad(tex_radiance_cascades, coord, 0);
    }
  }
  accumulation = accumulation / f32(ray_count);
  textureStore(tex_radiance_mipmap, vec2<i32>(base_coord), accumulation);
}
main + radiance_mipmap,把间接光加回主色
@group(0) @binding(0) var tex_main: texture_2d<f32>;
@group(0) @binding(1) var sampler_main: sampler;
@group(0) @binding(2) var tex_radiance_mipmap: texture_2d<f32>;
@group(0) @binding(3) var sampler_radiance_mipmap: sampler;

@fragment
fn rc_apply_fs(i: VsOut) -> @location(0) vec4<f32> {
  let uv = vec2(i.ndc.x * 0.5 + 0.5, 0.5 - i.ndc.y * 0.5);
  let main = textureSample(tex_main, sampler_main, uv);
  let radiance = textureSample(tex_radiance_mipmap, sampler_radiance_mipmap, uv);
  return main + radiance;
}
对 mipmap 使用线性采样器
let sampler_rc_mipmap = device.create_sampler(&SamplerDescriptor {
    label: Some("rc_mipmap_sampler"),
    mag_filter: FilterMode::Linear,
    min_filter: FilterMode::Linear,
    mipmap_filter: MipmapFilterMode::Nearest,
    ..Default::default()
});目前我们的 demo 会出现 ringing、漏光、边界附近拉扯等 artifacts,尤其在 probe 相对几何特征较粗时。
| 经典 RC (2024 及之前) | 全息 RC (HRC) |
|---|---|
| 离散探针(Probes):规则网格点上存储射线平均值 | 全息边界(Holographic Boundaries):边界面上存储方向性光照信息 |
| 双线性插值:探针间插值导致硬阴影边缘被平滑 | 边界积分重构:从边界向内部插值,保留不连续性 |
| 仅软阴影:适合间接光/环境光,点光源阴影模糊 | 硬+软阴影:点光源产生的清晰阴影边界得以保留 |
实现: