课程 36 - Animation
在这节课中你将学习到以下内容:
- 如何设计动画 API
- 参考 Web Animation API 实现声明式 Keyframe 与控制器
- 实现路径、笔迹、形变等动画效果
- 支持 Lottie 等格式
如何设计动画 API
Motion 是完全兼容声明式动画 WAAPI 的,详见:Improvements to Web Animations API。它直接调用浏览器原生的 element.animate(),享受 GPU 加速、独立渲染线程、不阻塞主线程的优势。同时用 JavaScript 轻量实现 WAAPI 缺失的能力:
- Spring 物理动画(WAAPI 只支持贝塞尔曲线)
- 独立
transform属性(单独动画 x, y, scale 而非组合 transform) - 可以指定缩放和旋转中心
transformOrigin - Timeline 序列控制
sequence(),stagger()
import { animate, stagger } from 'motion';

// 返回动画控制器,可暂停、播放、反向
const controls = animate(
    '.box',
    { x: [0, 100], opacity: [0, 1] }, // keyframes
    { duration: 0.5, delay: stagger(0.1), easing: 'spring(1, 100, 10, 0)' },
);

// 可序列化的控制指令
controls.pause();
controls.play();
controls.reverse();
其中 Keyframes 和 Options 是纯对象,可直接 JSON 化。但运行时状态:animate() 返回的 Animation 对象包含与 DOM 的绑定、当前播放时间、velocity 等运行时状态,无法序列化。
参考 WAAPI 实现
我们可以参考 WAAPI 的 polyfill web-animations-js,结合我们的 ECS 系统实现。
在数据层使用类 WAAPI 的 Keyframes 格式(可序列化)
interface Keyframe {
    offset?: number; // 0-1,对应 WAAPI 的 offset
    [property: string]: any; // x, y, scale, fill, strokeWidth...
    easing?: string; // "ease-out", "spring(1, 100)"
}

interface AnimationOptions {
    duration: number; // ms
    delay?: number;
    iterations?: number | 'infinite';
    direction?: 'normal' | 'reverse' | 'alternate';
    fill?: 'forwards' | 'backwards' | 'both'; // This property specifies how the graph will be displayed when the animation is in a non-running state (e.g. before the animation starts, after it ends).
    easing?: string; // 全局缓动(若 keyframe 未指定)
}
在控制层实现类 WAAPI 的 Animation 控制器。与真正 WAAPI polyfill 的区别:
- 不要解析 CSS 字符串。WAAPI 支持
{ transform: 'translate(100px)' }这类 CSS 字符串,解析成本高。直接支持{ x: 100 }(类似 Motion 的独立 transform 属性) - 内置
ease,ease-in,ease-out,linear,以及 Motion 风格的spring(mass, stiffness, damping) - Composite 模式。参考 WAAPI 的
composite: 'add' | 'replace',支持动画叠加到基础值上(如 Entity 已有位置,动画在其上叠加偏移) - Timeline 支持。像 Motion 的
timeline()或 WAAPI 的 GroupEffect,支持多 Entity 的 stagger 动画
控制器
const animation = api.animate(
    node1,
    [
        { x: 100, fill: 'green' },
        { x: 200, fill: 'red' },
    ],
    {
        duration: 1000,
        direction: 'alternate',
        iterations: 'infinite',
        easing: 'ease-in-out',
    },
);
animation.pause();
animation.play();
animation.finish(); 矩形在 x: 100 ↔ 200 之间往复,填充在 green 与 red 之间插值;可用按钮控制同一 AnimationController。
变量插值
像 x/y/opacity 这种数字很容易插值,对于 fill/stroke 这样的颜色值,需要先用 d3-color 解析出 rgba 各个分量再分别插值。
function interpolateValue(from: unknown, to: unknown, t: number) {
    if (isFiniteNumber(from) && isFiniteNumber(to)) {
        return interpolateNumber(from, to, t);
    }
    const fromColor = parseColor(from);
    const toColor = parseColor(to);
    if (fromColor && toColor) {
        return colorToRgbaString({
            r: interpolateNumber(fromColor.r, toColor.r, t),
            g: interpolateNumber(fromColor.g, toColor.g, t),
            b: interpolateNumber(fromColor.b, toColor.b, t),
            a: interpolateNumber(fromColor.a, toColor.a, t),
        });
    }
    return t < 1 ? from : to;
}
缓动函数
除了常规的缓动函数,我们还可以支持 spring
function evaluateEasing(easing: string, t: number) {
    const p = clamp01(t);
    const bezier = EASING_FUNCTION[easing as keyof typeof EASING_FUNCTION];
    if (bezier) {
        return clamp01(bezier(p));
    }
    if (easing.startsWith('spring(')) {
        return evaluateSpringEasing(p, easing);
    }
    return p;
} 切换缓动会重新创建动画(新 easing 在构造时生效)。矩形仍在 x: 100 ↔ 200 往复,便于对比不同曲线的加减速感。
变换中心
transformOrigin: { x: 50, y: 50 }scale: 0.5 ↔ 1.2rotation: Math.PI / 4 ↔ -Math.PI / 4
特殊的动画效果
路径动画
Moving graphics along a path is a common requirement, and is accomplished in CSS via MotionPath.
#motion-demo {
    animation: move 3000ms infinite alternate ease-in-out;
    offset-path: path('M20,20 C20,100 200,0 200,100');
}
@keyframes move {
    0% {
        offset-distance: 0%;
    }
    100% {
        offset-distance: 100%;
    }
}
笔迹动画
需要支持获取路径的长度:
const length = api.getTotalLength(path);
api.animate(
    path,
    [{ strokeDasharray: [0, length] }, { strokeDasharray: [length, 0] }],
    {
        duration: 3500,
    },
);虚线偏移
drawio 中通过动画表示连接线的方向:

Export your diagram to a SVG file to include the connector animation when you publish it in a web page or on a content platform that supports SVG images.
api.animate(node, [{ strokeDashoffset: -20 }, { strokeDashoffset: 0 }], {
    duration: 500,
    iterations: Infinity,
});形变效果
在很多 SVG 相关的库中都能看到形变动画的例子,例如:
以上部分库会要求变换前后的路径定义包含相同的分段,不然无法进行插值。
参考 Kute.js 中的 CubicMorph,首先将 Path 定义中的各个部分转成三阶贝塞尔曲线表示,然后利用三阶贝塞尔曲线易于分割的特性,将变换前后的路径规范到相同数目的分段,最后对各个分段中的控制点进行插值实现动画效果
function mergePaths(
    left: { absolutePath: AbsoluteArray; curve: CurveArray | null },
    right: { absolutePath: AbsoluteArray; curve: CurveArray | null },
): [CurveArray, CurveArray, (b: CurveArray) => CurveArray] {
    let curve1 = left.curve;
    let curve2 = right.curve;
    if (!curve1 || curve1.length === 0) {
        // convert to curves to do morphing & picking later
        // @see http://thednp.github.io/kute.js/svgCubicMorph.html
        curve1 = path2Curve(left.absolutePath, false) as CurveArray;
        left.curve = curve1;
    }
    if (!curve2 || curve2.length === 0) {
        curve2 = path2Curve(right.absolutePath, false) as CurveArray;
        right.curve = curve2;
    }

    let curves = [curve1, curve2];
    if (curve1.length !== curve2.length) {
        curves = equalizeSegments(curve1, curve2);
    }

    const curve0 =
        getDrawDirection(curves[0]) !== getDrawDirection(curves[1])
            ? reverseCurve(curves[0])
            : (clonePath(curves[0]) as CurveArray);

    return [
        curve0,
        getRotatedCurve(curves[1], curve0) as CurveArray,
        (pathArray: CurveArray) => {
            // need converting to path string?
            return pathArray;
        },
    ];
}Lottie
- lottie json schema
- Tips for rendering
- lottie-parser 我们主要参考它的解析逻辑
- velato 是一个使用 vello 的渲染器
使用方法
我们实现了一个插件,将 lottie json 转换成图形和 keyframes,以下是一些实现要点:
- 支持 Shape Layer 中定义的以下元素:
- lottie 中的
anchorX/anchorY表示缩放和旋转中心,相对于图形的包围盒左上角,在映射到transformOrigin时需要注意 - 将多组动画轨道合并成一组 keyframes,补全缺失的属性
import { loadAnimation } from '@infinite-canvas-tutorial/lottie';

fetch('/bouncy_ball.json')
    .then((res) => res.json())
    .then((data) => {
        const animation = loadAnimation(data, {
            loop: true,
            autoplay: true,
        });

        api.runAtNextTick(() => {
            animation.render(api);
            animation.play();
        });
});下面是官方示例的运行效果:Bouncy Ball
表达式
Expressions 描述了 After Effects 导出到 Bodymovin JSON 时,如何在属性上挂一段 JavaScript(属性对象上的字符串字段 x)。本教程里的 Lottie 插件不会在每一帧实时执行这些脚本,而是在 loadAnimation / parse 时按合成时间范围把表达式烘焙成普通关键帧,再交给现有的 Web Animations API 驱动,因此行为与 AE 接近,但依赖「烘焙」这一实现策略。
下面是一段路径属性上的表达式示例(运行时仍表现为普通 shape 关键帧动画):
{
    "ty": "sh",
    "ks": {
        "a": 0,
        "k": {
            "i": [],
            "o": [],
            "v": []
        },
        "x": "var group = thisLayer.content(\"Quadratic Points\");\nvar num_points = 3;\nvar points = [];\nvar ip = [];\nvar op = [];\nfor ( var i = 0; i < num_points; i++ )\n{\n    var pos = group.content(\"p\" + i).position;\n    points.push(pos);\n    ip.push(pos);\n    op.push(pos);\n}\nvar $bm_rt = {\n    v: points,\n    i: ip,\n    o: op\n};\n"
    }
}下面的示例来自:Beziers in Lottie
Text layer
Clipping mask
Layer effects
Rive

Manim
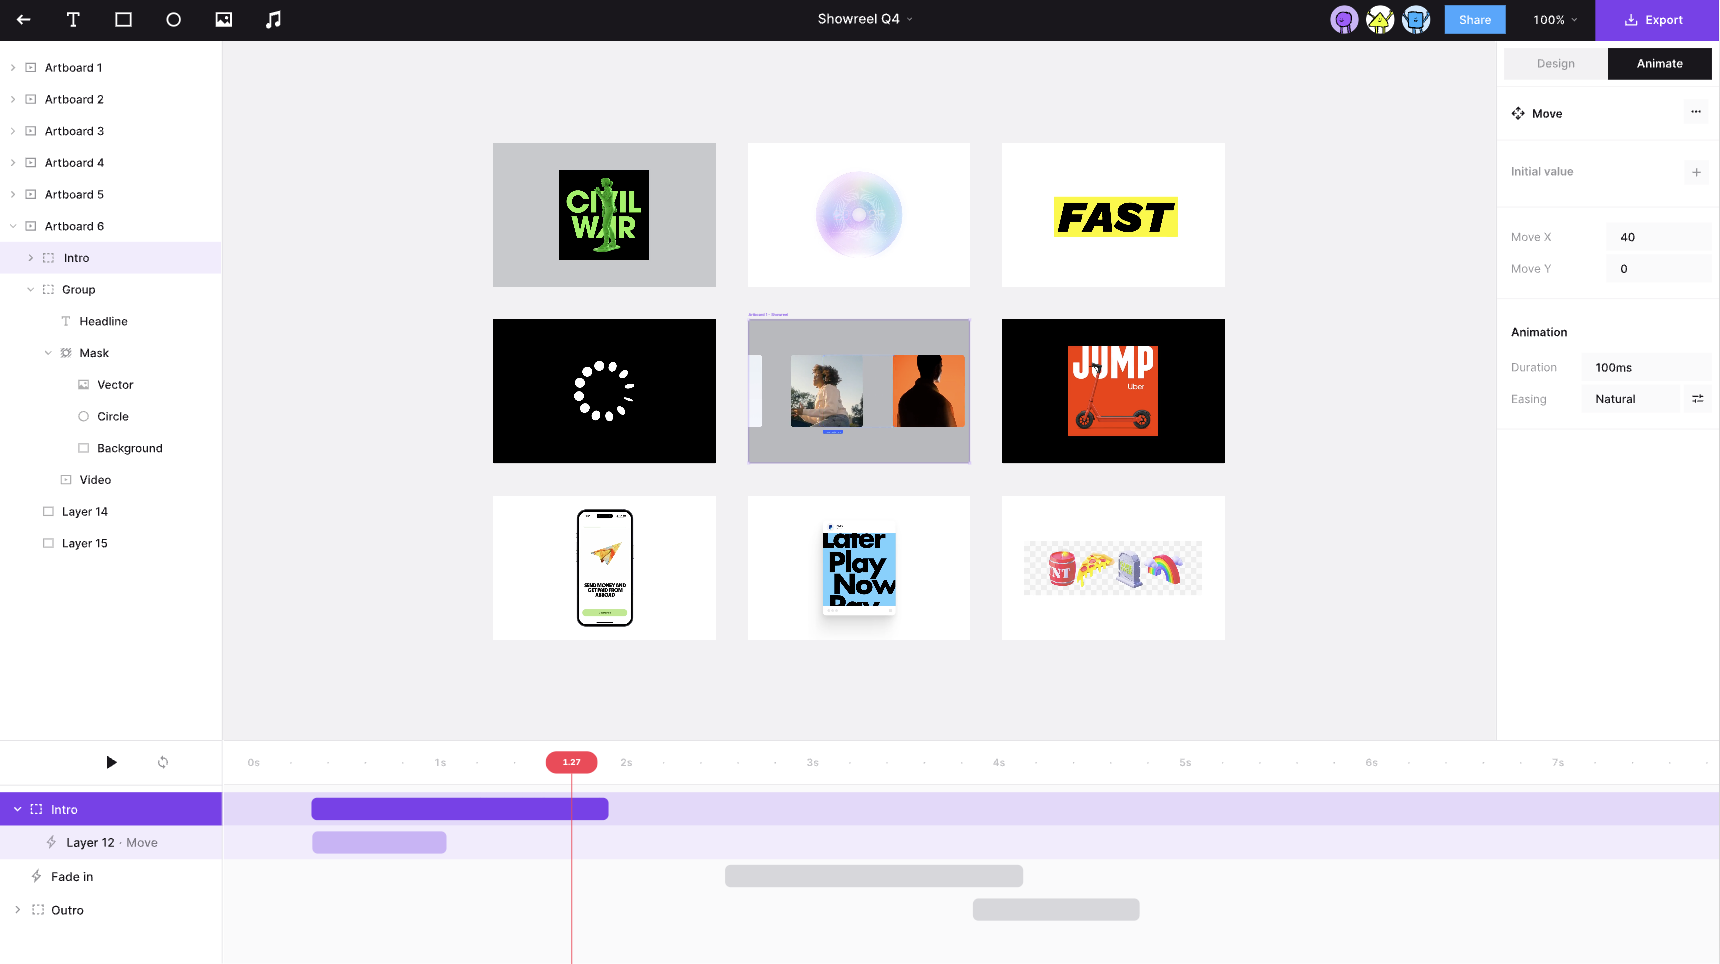
动画编辑器
参考 lottielab、Jitter 等产品,我们在 Web Components 层实现了一套轻量动画编辑器:右侧 Animation 面板负责编辑当前选中元素的 keyframes,底部 Timeline 面板展示整场景的时间轴并驱动全局播放头。两者共用同一份可序列化的 Keyframes 数据与 AppState 里的场景时钟。
整体布局
Taskbar 提供两个独立开关:
SHOW_ANIMATION_PANEL→ic-spectrum-animation-panel(右侧,与 Properties 面板并列)SHOW_TIMELINE_PANEL→ic-spectrum-timeline-panel(底部 dock,横跨画布宽度)
典型工作流:
- 选中单个元素,在 Animation 面板添加动画或编辑属性轨道。
- 打开 Timeline,查看场景中所有带动画的图层及其时间范围。
- 拖动播放头或点击播放,预览整场景在同一时刻的合成效果。
- 在 Timeline 选中某条轨道会同步选中对应元素,右侧 Animation 面板随即展示该元素的 keyframes。
场景时钟与编辑模式
Timeline 不只是 UI,它驱动 AppState 中的全局播放头,与每个 AnimationController 解耦:
| 字段 | 含义 |
|---|---|
animationEditing | 为 true 时进入确定性 scrub 模式:所有控制器按同一 animationCurrentTime 采样,而非各自 free-run |
animationCurrentTime | 全局播放头位置(毫秒) |
animationPlaying | 是否自动推进播放头 |
animationLoop | 到达场景末尾是否回到 0 |
AnimationSystem 在 animationEditing === true 时走 executeEditing:暂停状态下把每个 entity 的控制器固定在 animationCurrentTime;播放状态下用 performance.now() 的 delta 推进播放头,并写回 animationCurrentTime。关闭 Timeline 或离开编辑模式后,原先被 pause 的控制器会从当前位置继续 autoplay,而不是从头重播。
打开 Timeline 时会自动 setAnimationEditing(true),保证 scrub 与预览行为一致。
Timeline 面板设计
底部为 ic-spectrum-timeline-panel:拖动播放头 scrub、点击 ▶ 预览整场景; 点击轨道可选中元素并在右侧 Animation 面板编辑 keyframes。Hero 淡入 2s,Orbit 延迟 0.5s 后位移 1.5s。
轨道数据
Timeline 不直接读节点 JSON,而是通过 api.getAnimatedTracks() 聚合:
interface Track {
    id: string; // 节点 id
    name: string; // 图层名,缺省为 id
    properties: string[]; // 如 ['opacity', 'x']
    delay: number; // ms
    duration: number; // 有效动画时长(total − delay)
    totalDuration: number;
}
场景总时长 = 所有 track 的 totalDuration 最大值。条形块的 left / width 分别由 delay * PX_PER_MS 与 duration * PX_PER_MS 换算。
交互
| 操作 | 行为 |
|---|---|
| 点击轨道标签 | layersSelected = [track.id],高亮轨道,驱动 Animation 面板 |
| 拖动 lane / ruler | scrub 播放头,画布实时预览该帧 |
| Play / Pause | toggleAnimationPlaying(),在编辑模式下推进全局时钟 |
| Loop | setAnimationLoop(),到场景末尾是否回绕 |
Animation 面板(与 Timeline 配合)
组件:packages/webcomponents/src/spectrum/animation-panel.ts。
- 仅单选元素时可编辑;多选或未选显示占位提示。
- 全局选项:
duration、delay、默认easing、iterations(Loop 开关)。 - 按属性轨道分组展示 keyframes:每行包含
offset(0–1)、属性值、easing、删除按钮。 - Add keyframe at playhead:读取当前
animationCurrentTime,换算为 normalized offset,并调用controller.getCurrentValues()采样当前属性值——因此应先打开 Timeline 并 scrub 到目标时刻再插入 keyframe。 fill/stroke使用 popover +ic-spectrum-color-picker;其余数值属性用sp-number-field。- 面板宽高可拖拽调整,尺寸持久化到
localStorage(与 Properties 面板相同的 handle 交互)。
所有编辑经 setNodeAnimation / updateNodeAnimationKeyframe 等 API 写入,参与 undo 历史与文档序列化。
与 Lottie 式编辑器的差异
当前实现刻意保持简单,与 lottielab 等完整 DCC 相比:
- Timeline 以节点为轨道,而非 Lottie 的 layer + property 多轨展开;属性名显示在标签后缀(
Rect · opacity, x)。 - 暂不支持在 Timeline 上直接拖动 keyframe 或条形块改 timing;timing 在 Animation 面板通过
offset编辑。 - 表达式、Text layer、Clipping mask 等 Lottie 高级特性仍走插件烘焙路径,不由该编辑器直接创作。
后续可在此基础上扩展:property 子轨、keyframe 菱形标记、条形块 edge 拖拽改 delay/duration 等。