Lesson 36 - Animation
In this lesson you will learn:
- How to design an animation API
- How to implement declarative keyframes and controllers aligned with the Web Animations API
- How to implement path, stroke, and morphing effects
- How formats like Lottie fit in
How to design the animation API
Motion is fully compatible with declarative WAAPI-style animation; see Improvements to Web Animations API. It calls the browser’s native element.animate() for GPU acceleration, an independent compositor thread, and work off the main thread. JavaScript fills in what WAAPI does not provide:
- Spring physics (WAAPI only supports Bézier easing)
- Independent
transformproperties (animatex,y,scaleseparately instead of one combined transform string) transformOriginfor scale and rotation centers- Timeline helpers such as
sequence()andstagger()
import { animate, stagger } from 'motion';

// Returns a controller you can pause, play, and reverse
const controls = animate(
    '.box',
    { x: [0, 100], opacity: [0, 1] }, // keyframes
    { duration: 0.5, delay: stagger(0.1), easing: 'spring(1, 100, 10, 0)' },
);

// Serializable control calls
controls.pause();
controls.play();
controls.reverse();
Keyframes and options are plain objects and can be JSON-serialized. Runtime state from animate()—bindings to the DOM, current time, velocity, etc.—is not serializable.
Following WAAPI
We can follow the WAAPI polyfill web-animations-js and integrate with our ECS.
Data layer: WAAPI-like keyframes (serializable)
interface Keyframe {
    offset?: number; // 0–1, same role as WAAPI offset
    [property: string]: any; // x, y, scale, fill, strokeWidth...
    easing?: string; // "ease-out", "spring(1, 100)"
}

interface AnimationOptions {
    duration: number; // ms
    delay?: number;
    iterations?: number | 'infinite';
    direction?: 'normal' | 'reverse' | 'alternate';
    fill?: 'forwards' | 'backwards' | 'both'; // How the animation appears when not running (before start, after end).
    easing?: string; // Global easing if a keyframe omits its own
}
Control layer: a WAAPI-like Animation controller. Differences from a full WAAPI polyfill:
- No CSS string parsing. WAAPI allows
{ transform: 'translate(100px)' }, which is expensive to parse. Prefer{ x: 100 }(Motion-style independent transform props). - Built-in
ease,ease-in,ease-out,linear, plus Motion-stylespring(mass, stiffness, damping). - Composite modes. Like WAAPI’s
composite: 'add' | 'replace', stack animations on top of base values (e.g. entity position plus an animated offset). - Timeline support. Like Motion’s
timeline()or WAAPI’sGroupEffect, including stagger across entities.
Controller
const animation = api.animate(
    node1,
    [
        { x: 100, fill: 'green' },
        { x: 200, fill: 'red' },
    ],
    {
        duration: 1000,
        direction: 'alternate',
        iterations: 'infinite',
        easing: 'ease-in-out',
    },
);
animation.pause();
animation.play();
animation.finish(); 矩形在 x: 100 ↔ 200 之间往复,填充在 green 与 red 之间插值;可用按钮控制同一 AnimationController。
Interpolation
Scalars like x / y / opacity interpolate trivially. For fill / stroke, parse colors with something like d3-color, then interpolate each rgba channel.
function interpolateValue(from: unknown, to: unknown, t: number) {
    if (isFiniteNumber(from) && isFiniteNumber(to)) {
        return interpolateNumber(from, to, t);
    }
    const fromColor = parseColor(from);
    const toColor = parseColor(to);
    if (fromColor && toColor) {
        return colorToRgbaString({
            r: interpolateNumber(fromColor.r, toColor.r, t),
            g: interpolateNumber(fromColor.g, toColor.g, t),
            b: interpolateNumber(fromColor.b, toColor.b, t),
            a: interpolateNumber(fromColor.a, toColor.a, t),
        });
    }
    return t < 1 ? from : to;
}
Easing
Beyond standard curves, we can support spring:
function evaluateEasing(easing: string, t: number) {
    const p = clamp01(t);
    const bezier = EASING_FUNCTION[easing as keyof typeof EASING_FUNCTION];
    if (bezier) {
        return clamp01(bezier(p));
    }
    if (easing.startsWith('spring(')) {
        return evaluateSpringEasing(p, easing);
    }
    return p;
} 切换缓动会重新创建动画(新 easing 在构造时生效)。矩形仍在 x: 100 ↔ 200 往复,便于对比不同曲线的加减速感。
Transform origin
transformOrigin: { x: 50, y: 50 }scale: 0.5 ↔ 1.2rotation: Math.PI / 4 ↔ -Math.PI / 4
Special animation effects
Path animation
Moving graphics along a path is common; CSS does this with Motion Path.
#motion-demo {
    animation: move 3000ms infinite alternate ease-in-out;
    offset-path: path('M20,20 C20,100 200,0 200,100');
}
@keyframes move {
    0% {
        offset-distance: 0%;
    }
    100% {
        offset-distance: 100%;
    }
}
Stroke animation
We need the path length:
const length = api.getTotalLength(path);
api.animate(
    path,
    [{ strokeDasharray: [0, length] }, { strokeDasharray: [length, 0] }],
    {
        duration: 3500,
    },
);Dash offset
draw.io uses animation to show connector direction:

Export your diagram to a SVG file to include the connector animation when you publish it in a web page or on a content platform that supports SVG images.
api.animate(node, [{ strokeDashoffset: -20 }, { strokeDashoffset: 0 }], {
    duration: 500,
    iterations: Infinity,
});Morphing
Many SVG libraries demonstrate morphing:
- Paper.js
- Kute.js offers Morph and CubicMorph
- GreenSock’s MorphSVGPlugin can even render in Canvas
- vectalign
Some libraries require matching segment structure before and after the morph, or interpolation fails.
Following Kute.js’s CubicMorph: convert path segments to cubic Béziers, use easy subdivision to normalize both paths to the same segment count, then interpolate control points per segment.
function mergePaths(
    left: { absolutePath: AbsoluteArray; curve: CurveArray | null },
    right: { absolutePath: AbsoluteArray; curve: CurveArray | null },
): [CurveArray, CurveArray, (b: CurveArray) => CurveArray] {
    let curve1 = left.curve;
    let curve2 = right.curve;
    if (!curve1 || curve1.length === 0) {
        // convert to curves to do morphing & picking later
        // @see http://thednp.github.io/kute.js/svgCubicMorph.html
        curve1 = path2Curve(left.absolutePath, false) as CurveArray;
        left.curve = curve1;
    }
    if (!curve2 || curve2.length === 0) {
        curve2 = path2Curve(right.absolutePath, false) as CurveArray;
        right.curve = curve2;
    }

    let curves = [curve1, curve2];
    if (curve1.length !== curve2.length) {
        curves = equalizeSegments(curve1, curve2);
    }

    const curve0 =
        getDrawDirection(curves[0]) !== getDrawDirection(curves[1])
            ? reverseCurve(curves[0])
            : (clonePath(curves[0]) as CurveArray);

    return [
        curve0,
        getRotatedCurve(curves[1], curve0) as CurveArray,
        (pathArray: CurveArray) => {
            // need converting to path string?
            return pathArray;
        },
    ];
}Lottie
- lottie json schema
- Tips for rendering
- lottie-parser — we mainly follow its parsing logic
- velato — a renderer built on Vello
Usage
We implemented a plugin that converts Lottie JSON into graphics and keyframes. Highlights:
- Supports the following elements from Shape layers:
- In Lottie,
anchorX/anchorYdefine the scale and rotation center relative to the top-left of the shape’s bounding box—take care when mapping totransformOrigin - Merge multiple animation tracks into one keyframe set and fill in missing properties
import { loadAnimation } from '@infinite-canvas-tutorial/lottie';

fetch('/bouncy_ball.json')
    .then((res) => res.json())
    .then((data) => {
        const animation = loadAnimation(data, {
            loop: true,
            autoplay: true,
        });

        api.runAtNextTick(() => {
            animation.render(api);
            animation.play();
        });
    });
Below is the official sample running in our setup: Bouncy Ball
Bézier curves in Lottie
vis an array of vertices.iis an array of “in” tangent points, relative tov.ois an array of “out” tangent points, relative tov.cis a boolean determining whether the poly-Bézier is closed. If it is, there is an extra Bézier segment between the last point invand the first.
Expressions
{
    "ty": "sh",
    "ks": {
        "a": 0,
        "k": {
            "i": [],
            "o": [],
            "v": []
        },
        "x": "var group = thisLayer.content(\"Quadratic Points\");\nvar num_points = 3;\nvar points = [];\nvar ip = [];\nvar op = [];\nfor ( var i = 0; i < num_points; i++ )\n{\n    var pos = group.content(\"p\" + i).position;\n    points.push(pos);\n    ip.push(pos);\n    op.push(pos);\n}\nvar $bm_rt = {\n    v: points,\n    i: ip,\n    o: op\n};\n"
    }
}
Text layer
Clipping mask
Layer effects
Rive

Manim
Animation editor
Inspired by products such as lottielab and Jitter, we built a lightweight animation editor in the Web Components layer: the Animation panel on the right edits keyframes for the selected element, and the Timeline panel at the bottom shows the scene-wide timeline and drives the global playhead. Both share the same serializable keyframe data and the scene clock in AppState.
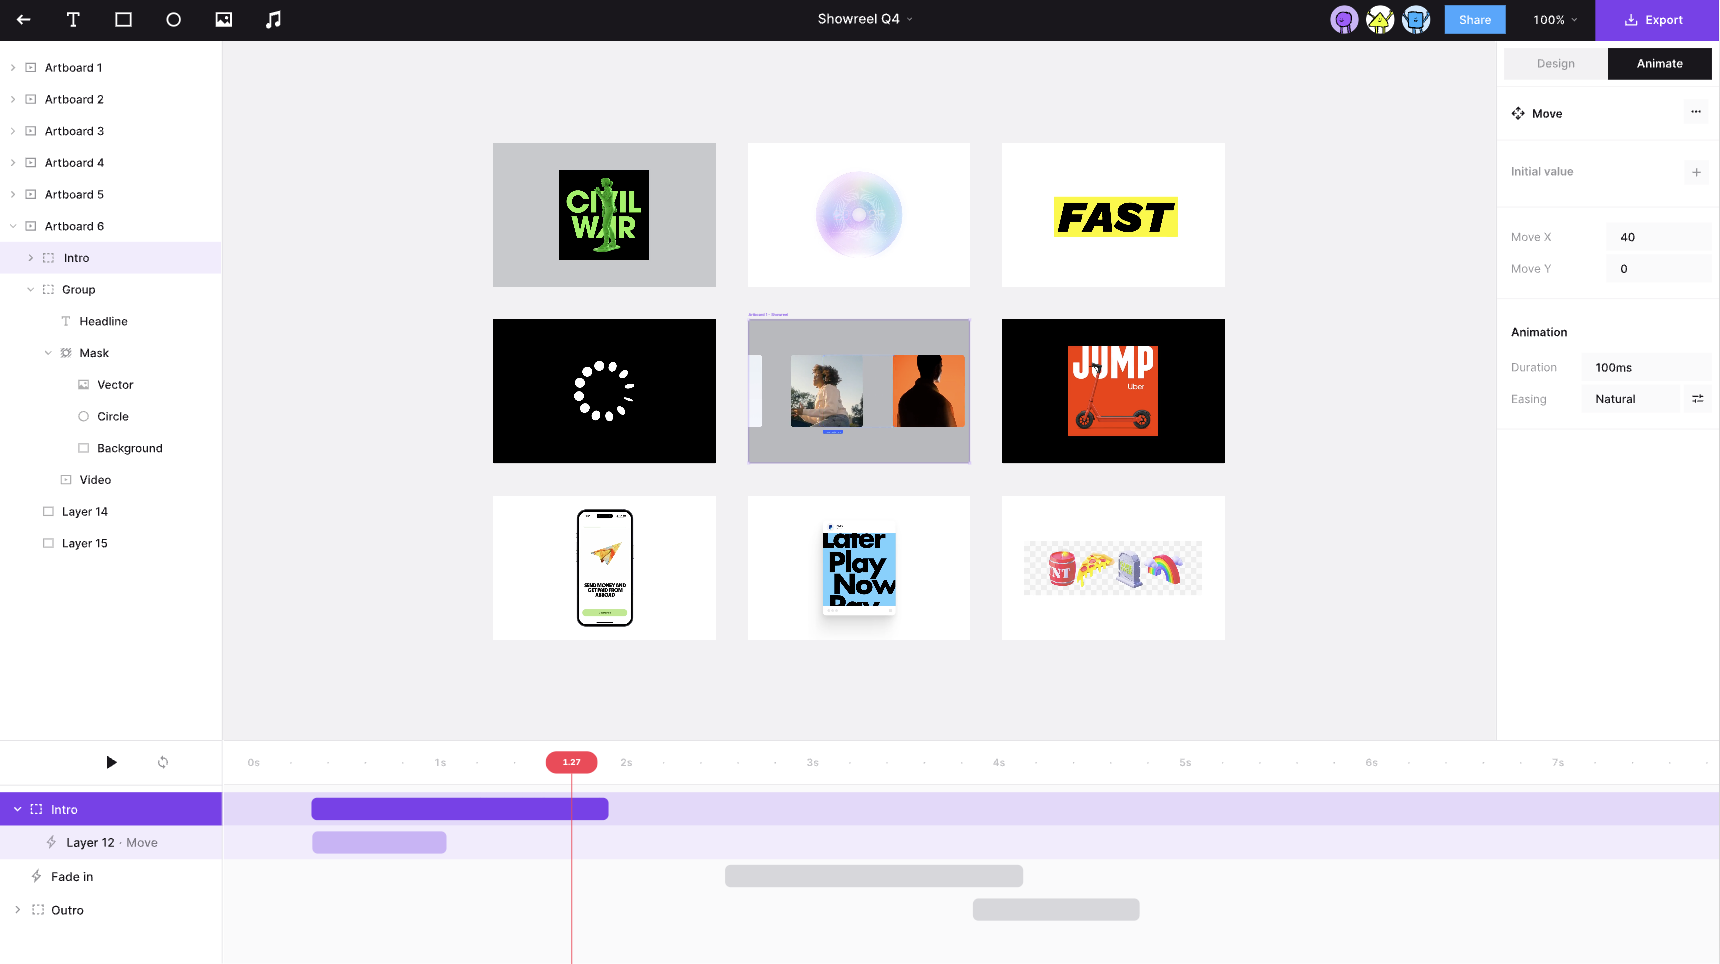
Layout
The taskbar exposes two independent toggles:
SHOW_ANIMATION_PANEL→ic-spectrum-animation-panel(right side, alongside the Properties panel)SHOW_TIMELINE_PANEL→ic-spectrum-timeline-panel(bottom dock, full canvas width)
Typical workflow:
- Select a single element and add an animation or edit property tracks in the Animation panel.
- Open the Timeline to see every animated layer in the scene and its time range.
- Scrub the playhead or press Play to preview the whole scene at one moment in time.
- Selecting a track in the Timeline also selects its element; the Animation panel on the right shows that element’s keyframes.
Scene clock and editing mode
The Timeline is not just UI—it drives the global playhead in AppState, decoupled from each AnimationController:
| Field | Meaning |
|---|---|
animationEditing | When true, enters deterministic scrub mode: every controller is sampled at the same animationCurrentTime instead of free-running on its own |
animationCurrentTime | Global playhead position (milliseconds) |
animationPlaying | Whether the playhead advances automatically |
animationLoop | Whether playback wraps back to 0 at the end of the scene |
When animationEditing === true, AnimationSystem runs executeEditing: while paused, each entity’s controller is fixed at animationCurrentTime; while playing, the playhead advances via performance.now() deltas and is written back to animationCurrentTime. After closing the Timeline or leaving editing mode, controllers that were paused resume autoplay from the current position rather than restarting from the beginning.
Opening the Timeline automatically calls setAnimationEditing(true) so scrubbing and preview stay consistent.
Timeline panel design
底部为 ic-spectrum-timeline-panel:拖动播放头 scrub、点击 ▶ 预览整场景; 点击轨道可选中元素并在右侧 Animation 面板编辑 keyframes。Hero 淡入 2s,Orbit 延迟 0.5s 后位移 1.5s。
Track data
The Timeline does not read node JSON directly; it aggregates via api.getAnimatedTracks():
interface Track {
    id: string; // node id
    name: string; // layer name; falls back to id
    properties: string[]; // e.g. ['opacity', 'x']
    delay: number; // ms
    duration: number; // active animation length (total − delay)
    totalDuration: number;
}
Scene duration = the maximum totalDuration across all tracks. Bar left / width are computed as delay * PX_PER_MS and duration * PX_PER_MS.
Interactions
| Action | Behavior |
|---|---|
| Click track label | layersSelected = [track.id], highlight the track, drive the Animation panel |
| Drag lane / ruler | Scrub the playhead; canvas previews that frame live |
| Play / Pause | toggleAnimationPlaying() advances the global clock in editing mode |
| Loop | setAnimationLoop() controls whether the scene wraps at the end |
Animation panel (works with Timeline)
Component: packages/webcomponents/src/spectrum/animation-panel.ts.
- Editable only with a single selection; multi-select or no selection shows a placeholder.
- Global options:
duration,delay, defaulteasing,iterations(Loop switch). - Keyframes grouped by property track; each row has
offset(0–1), value,easing, and a delete button. - Add keyframe at playhead: reads
animationCurrentTime, converts to a normalized offset, and samples the current property values viacontroller.getCurrentValues()—open the Timeline and scrub to the target time before inserting a keyframe. fill/strokeuse a popover +ic-spectrum-color-picker; other numeric properties usesp-number-field.- Panel width and height are resizable; sizes persist in
localStorage(same handle interaction as the Properties panel).
All edits go through setNodeAnimation / updateNodeAnimationKeyframe and participate in undo history and document serialization.
Differences from Lottie-style editors
The current implementation stays deliberately simple compared with full DCC tools like lottielab:
- The Timeline uses one track per node, not Lottie’s layer + property multi-track layout; property names appear as a label suffix (
Rect · opacity, x). - Keyframes and bar timing cannot be dragged on the Timeline yet; timing is edited via
offsetin the Animation panel. - Expressions, text layers, clipping masks, and other advanced Lottie features still go through plugin baking—not authored directly in this editor.
Possible extensions: property sub-tracks, keyframe diamond markers, dragging bar edges to change delay/duration, and more.