Lesson 34 - Group, Frame and clip
Currently our Group / g is a logical grouping without geometric bounds (e.g. x/y/width/height), so it does not apply clipping to children. tldraw provides both Group and Frame as Structural shapes.
Group
In Figma, a group essentially acts as a “container,” similar to a folder. For more details, see: The difference between frames and groups
- Treat multiple elements as a single unit for operations (moving, scaling, etc.)
- Clicking selects the entire group by default; the group's size is automatically determined by its child elements
- Double-clicking allows you to enter the group and edit individual elements
- Group/Ungroup
- Use context menus and keyboard shortcuts
- Drag and drop in the Layers panel
Group with dnd
Before implementing drag-and-drop grouping, we can use sortablejs to first enable drag-and-drop sorting of items within the same-level list.
import Sortable from 'sortablejs';

const lists = root.querySelectorAll<HTMLElement>('.layer-siblings');
lists.forEach((el) => {
    const parentId = el.dataset.layerParentId ?? '';
    const sortable = Sortable.create(el, {
        animation: 150,
        draggable: '.layer-branch',
        filter: '.layer-branch--locked', // 锁定图层无法拖拽
        preventOnFilter: false,
        group: {
            name: `layers-${parentId || 'root'}`,
            pull: true,
            put: true,
        },
        onEnd: (evt) => {
            if (evt.oldIndex === evt.newIndex) {
                return;
            }
            const to = evt.to as HTMLElement;
            const orderedIds = Array.from(to.children)
                .filter((c): c is HTMLElement =>
                    c.classList.contains('layer-branch'),
                )
                .map((c) => c.dataset.nodeId)
                .filter((id): id is string => !!id);
            // 所有兄弟节点重新排序,依次设置 zIndex
            this.applyLayerSiblingOrder(
                to.dataset.layerParentId ?? '',
                orderedIds,
            );
        },
    });
    this.sortableInstances.push(sortable);
});
Dragging to group or ungrouping requires cross-group operations.
Stencil Buffer
In tldraw, clipping is done via CSS clip-path, defined on the parent by overriding getClipPath; the built-in Frame is implemented this way. In Figma this property is called clip content; see Frame properties in Figma.
In pencil.dev, the Frame is defined as follows: it is a rectangle that can contain child elements and possesses clipping capabilities:
/** A frame is a rectangle that can have children. */
export interface Frame extends Rectangleish, CanHaveChildren, Layout {
    type: 'frame';
    /** Visually clip content that overflows the frame bounds. Default is false. */
    clip?: BooleanOrVariable;
    placeholder?: boolean;
    /** The presence of this property indicates that this frame is a "slot" - which means that it is intended be customized with children in instances of the parent component. Each element of the array is an ID of a "recommended" reusable component, one which fits semantically as a child here (e.g. inside a menu bar, the content slot would recommend IDs of various menu item components). */
    slot?: string[];
}
For generality, we want any shape to be able to act as a clipping parent: children outside the shape are clipped, while the parent itself still renders normally with fill/stroke applied. The property is declared as:
{
    clipChildren: true;
}
Next we look at how to implement this clipping in WebGL / WebGPU.
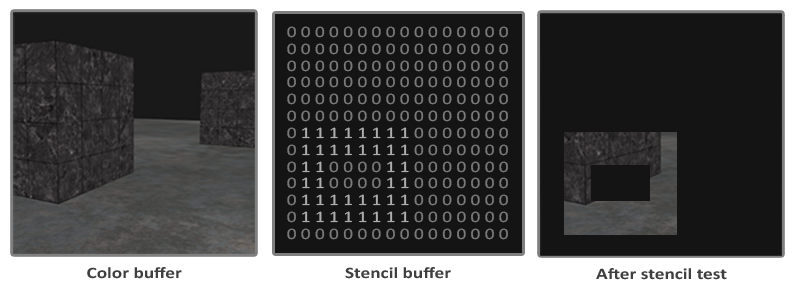
Once a shape is a clipping container, we need to render to the stencil buffer in the RenderPass as well; its default value is 0:
{
    stencilWrite: true, // enable writing to stencil buffer
    stencilFront: {
        compare: CompareFunction.ALWAYS,
        passOp: StencilOp.REPLACE,
    },
    stencilBack: {
        compare: CompareFunction.ALWAYS,
        passOp: StencilOp.REPLACE,
    }
}
We then write a reference value into the stencil buffer for later comparison when rendering children; this value can be in [0-255], e.g. 1 in the diagram above:
renderPass.setStencilReference(STENCIL_CLIP_REF);When rendering clipped children, we check whether the buffer value equals this reference; regions with value 0 are not drawn, achieving the clip:
{
    stencilFront: {
        compare: CompareFunction.EQUAL,
        passOp: StencilOp.KEEP,
    }
}
Eraser effect
We can now implement the remaining part of Lesson 25 - Non-atomic eraser. The eraser effect is the opposite of clipping: CSS clip-path defines the “visible” region, and SVG’s <clipPath> does the same—neither can define an “invisible” region.
SVG’s <mask> can; see Clipping and masking in SVG. In WebGL / WebGPU we only need to invert the comparison:
{
    stencilFront: {
        compare: CompareFunction.EQUAL,
        compare: CompareFunction.NOTEQUAL,
        passOp: StencilOp.KEEP,
    }
}
So we also need a property that distinguishes clip and erase modes:
{
    clipChildren: true,
    clipMode: 'erase', // 'clip' | 'erase'
}
In the Fragment Shader, when using the stencil buffer we must skip the usual alpha-based discard logic; see Lesson 2 - SDF. Otherwise with fill='none' we would not get correct rendering:
// sdf.glsl
#ifdef USE_STENCIL
  // Stencil pass: discard by geometry (SDF distance), not alpha. Include the same
  // anti-alias band as the normal pass (fwidth(distance)) so the stencil boundary
  // matches the visible shape and avoids edge holes.
  float outerBoundary = (strokeAlignment < 1.5) ? 0.0 : strokeWidth;
  if (distance > outerBoundary)
    discard;
#else
  if (outputColor.a < epsilon)
    discard;
#endif
Export as image
When exporting a single clipped element as an image, we need the intersection of its bounds with the parent’s bounds as the size for rendering to OffscreenCanvas, or as the viewBox size when exporting SVG:
const { minX, minY, maxX, maxY } =
    entity.read(ComputedBounds).renderWorldBounds;
const {
    minX: parentMinX,
    minY: parentMinY,
    maxX: parentMaxX,
    maxY: parentMaxY,
} = parentEntity.read(ComputedBounds).renderWorldBounds;
const isectMinX = Math.max(minX, parentMinX);
const isectMinY = Math.max(minY, parentMinY);
const isectMaxX = Math.min(maxX, parentMaxX);
const isectMaxY = Math.min(maxY, parentMaxY);
bounds.addFrame(isectMinX, isectMinY, isectMaxX, isectMaxY);
Export PNG
The only caveat is that even when exporting only the clipped child, we must render the parent first.
Export SVG
First, the clipMode='clip' case.
The clipping parent has a corresponding <g>. Set its clip-path to reference the shape’s own definition; note that <clipPath> itself is not rendered.
<g clip-path="url(#clip-path-frame-1)" transform="matrix(1,0,0,1,100,100)">
    <defs>
        <clipPath id="clip-path-frame-1">
            <ellipse
                id="node-frame-1"
                fill="green"
                cx="100"
                cy="100"
                rx="100"
                ry="100"
            />
        </clipPath>
    </defs>
    <ellipse
        id="node-frame-1"
        fill="green"
        cx="100"
        cy="100"
        rx="100"
        ry="100"
    />
    <rect
        id="node-rect-1"
        fill="red"
        width="100"
        height="100"
        transform="matrix(1,0,0,1,-50,-50)"
    />
</g>
For clipMode='erase', SVG mask rules are:
- White (luminance 1): masked content is visible
- Black (luminance 0): masked content is hidden
Draw a large white rectangle first, then draw the erasing shape in black:
const $whiteRect = createSVGElement('rect');
$whiteRect.setAttribute('x', '-10000');
$whiteRect.setAttribute('y', '-10000');
$whiteRect.setAttribute('width', '20000');
$whiteRect.setAttribute('height', '20000');
$whiteRect.setAttribute('fill', 'white');
$clipPath.appendChild($whiteRect);

$parentNode.setAttribute('fill', 'black');
$parentNode.setAttribute('stroke', 'black');
The resulting SVG structure:
<defs xmlns="http://www.w3.org/2000/svg">
    <mask id="mask-frame-1">
        <rect x="-10000" y="-10000" width="20000" height="20000" fill="white" />
        <rect fill="black" width="100" height="100" stroke="black" />
    </mask>
</defs>
Crop an image
Cropping is most commonly used for images. See Crop an image and image cropping in excalidraw for more details.
It's worth noting that in editors, cropping usually preserves the original image, so the cropped area is only hidden visually, making it easy to readjust the crop region:
Cropping is a non-destructive action, meaning that the cropped area does not get deleted. This allows you to make changes to the cropped area, if needed.
Semi-transparent effect for cropped area
After entering crop mode, the original image content still needs to be displayed, with the cropped area indicated by transparency. We add another mode 'soft' to clipMode to achieve this effect:
The implementation principle is as follows: we actually render the clipped shape twice. The first pass (compare: CompareFunction.EQUAL) renders the normally clipped part as described before, and the second pass (compare: CompareFunction.NOTEQUAL) applies a fixed transparency:
#ifdef USE_SOFT_CLIP_OUTSIDE
  outputColor *= 0.15;
#endif
Adding interaction
Next, we add interaction to make the crop region editable. After entering crop mode, there are two interactive parts:
- Fix the crop region and drag the cropped graphic
- Adjust the crop region size
Referencing Figma's interaction design, after selecting a shape, you can enter crop mode through the context menu. At this point, a clipping parent element is created for the selected elements:
const children = layersSelected.map((id) => this.api.getNodeById(id));
const bounds = this.api.getBounds(children);
const { minX, minY, maxX, maxY } = bounds;
// create a clip parent for all the selected nodes
const clipParent: RectSerializedNode = {
    id: uuidv4(),
    type: 'rect',
    clipMode: 'clip',
    x: minX,
    y: minY,
    width: maxX - minX,
    height: maxY - minY,
};

this.api.runAtNextTick(() => {
    this.api.updateNodes([clipParent]);
    // clipParent -> children
    children.forEach((child) => {
        this.api.reparentNode(child, clipParent);
    });
    this.api.setAppState({
        layersCropping: [clipParent.id],
        penbarSelected: Pen.SELECT,
    });
    this.api.record();
});