Lesson 35 - Tile-based Rendering
Google Maps and Mapbox both provide Map tiles APIs. At different zoom levels, the screen is divided into multiple tiles.
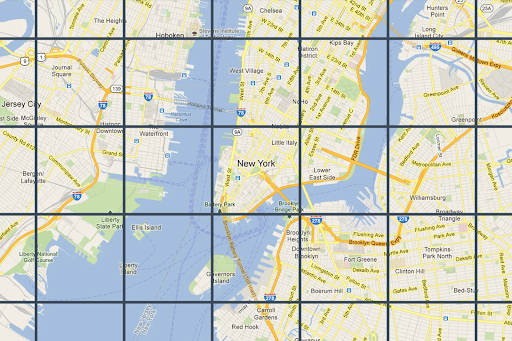
Taking Mapbox as an example, each vector tile stores encoded GeoJSON data. See: Vector tiles introduction. Compared to raster tiles, vector tiles stay sharp at any zoom level.
The traditional mesh-based renderer we introduced earlier has complexity O(pixels × shapes):
for pixel:
   check all shapes
If we partition screen space into tiles, we only need to check shapes within each tile. The complexity becomes O(tiles × shapes_per_tile), where shapes_per_tile << total_shapes. That is why tile-based rendering can be faster in certain scenarios.
for tile:
   check shapes in tile
Tile-based rendering also has bad cases, for example when a huge shape covers the entire screen.
In this lesson we replace the rendering layer with a GPU tile-based renderer vello, which runs entirely on compute shaders and takes full advantage of WebGPU.
vello
vello currently has three parallel implementations. See Vello Sparse Strips:
- vello (GPU) — pure GPU compute shader implementation
- vello CPU — CPU-only implementation with multithreading and SIMD
- vello hybrid — CPU/GPU hybrid mode
All three share the same core algorithm (Sparse Strips), but differ in execution backend.
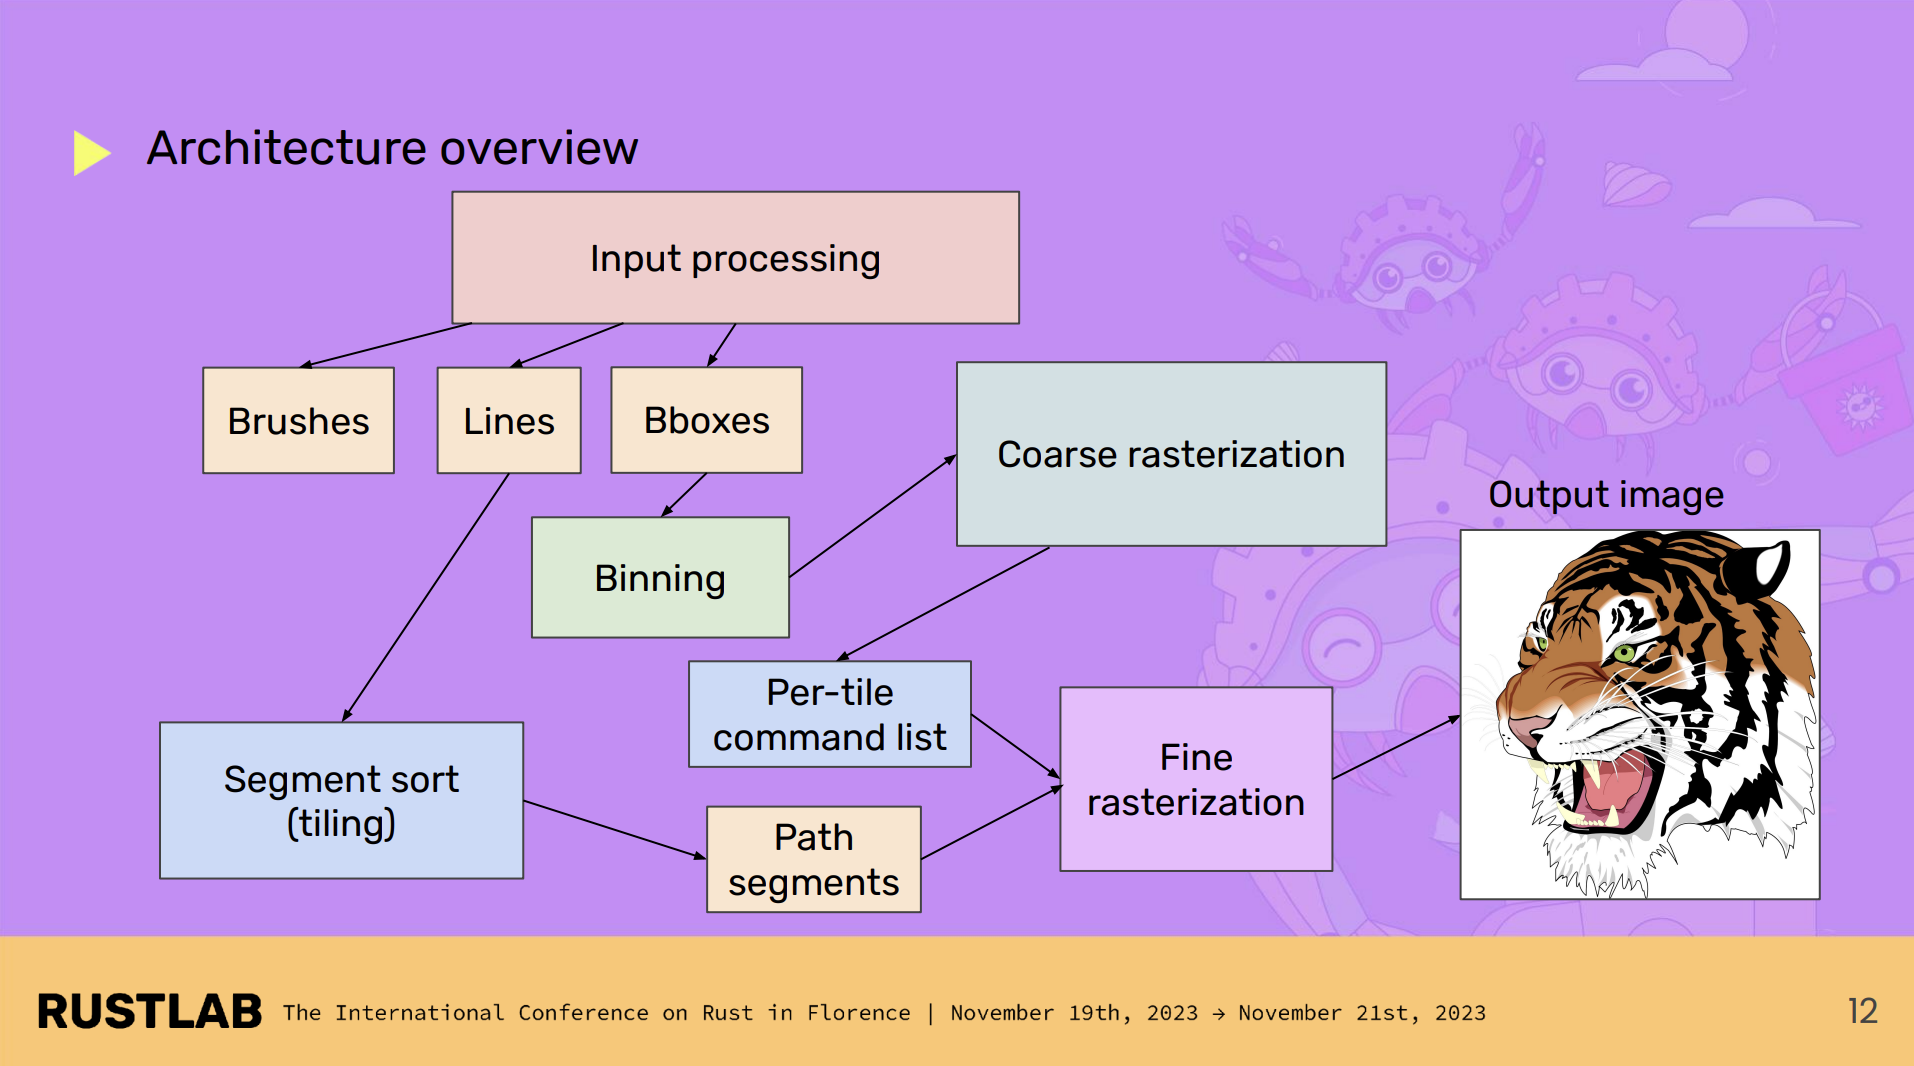
For vello CPU, the overall architecture looks like this:
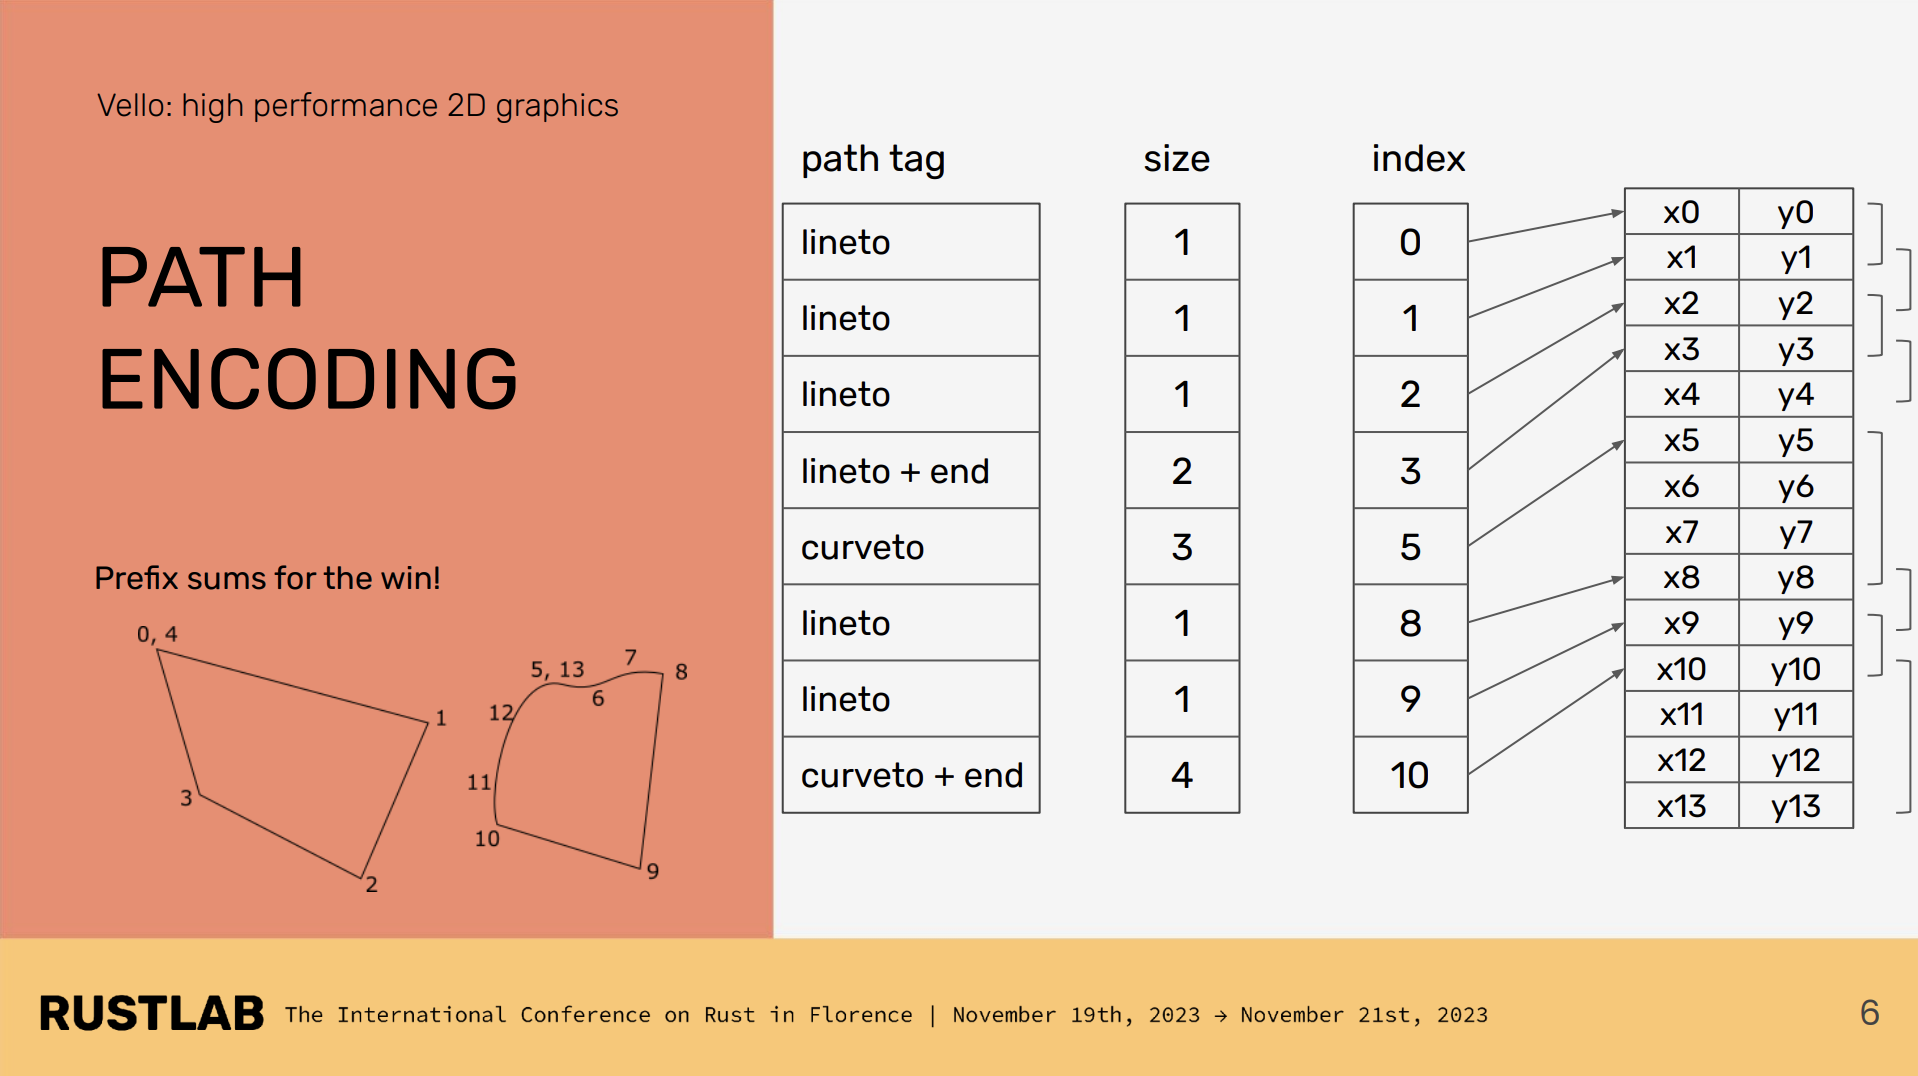
Encoding
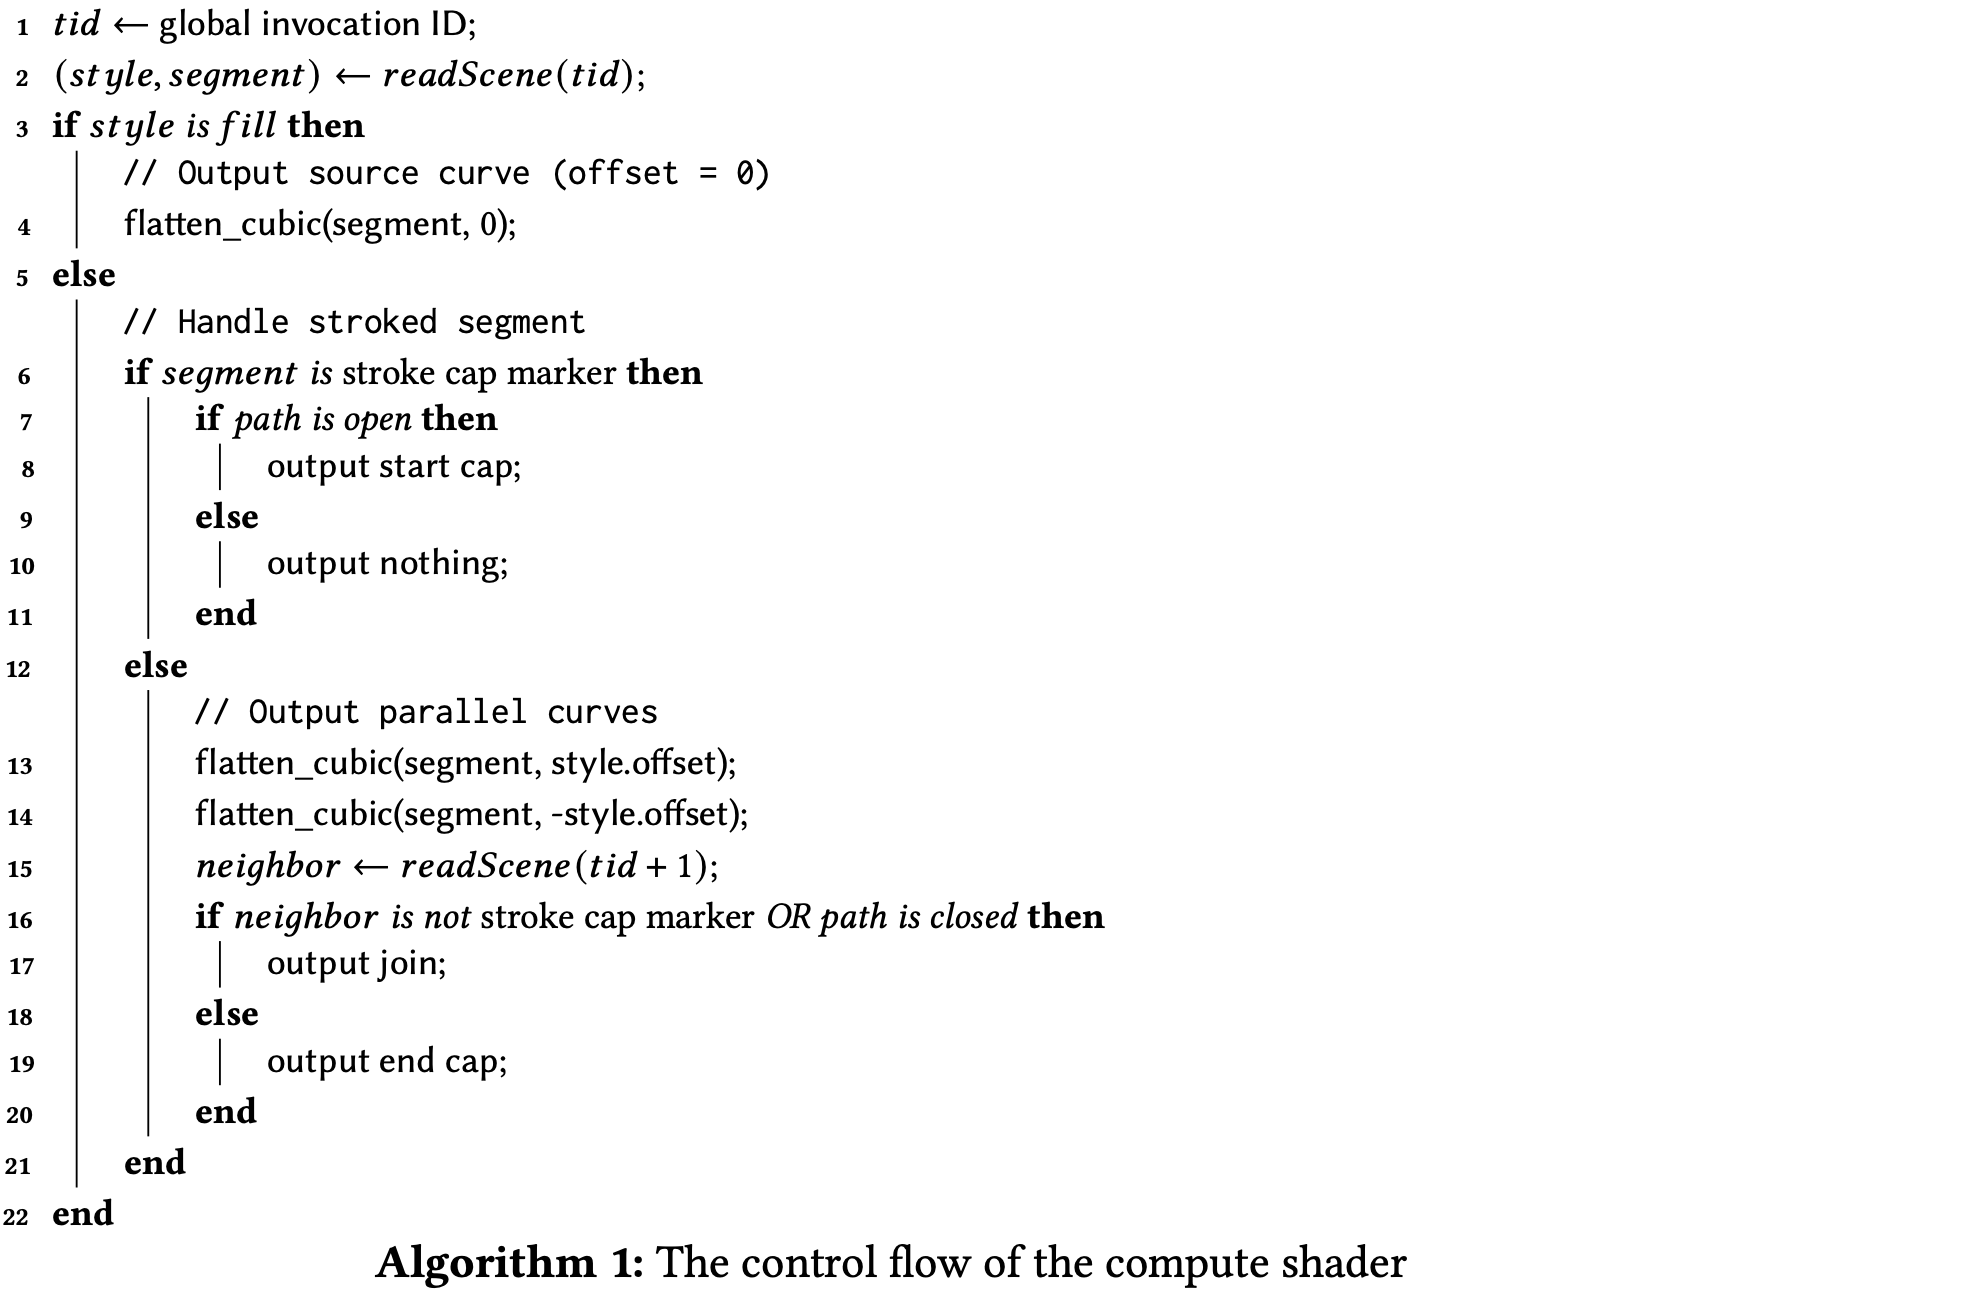
When we call vello draw commands, they are encoded into the following form and written into a buffer for use in the subsequent compute shader stages:
scene.fill(..., &rect)
scene.stroke(..., &path)
https://github.com/linebender/vello/blob/main/vello_encoding/src/path.rs#L248
Stroke expansion
In Lesson 12 - Drawing polylines we introduced stroke expansion for line segments, rendering stroke and fill with separate meshes. vello also expands strokes with width; afterwards stroke and fill can be processed uniformly.

For thickened Bézier centerlines, the inner and outer offset curves (parallel curves) are difficult to compute robustly. GPU-friendly Stroke Expansion proposes a GPU-parallel algorithm that uses a special geometric approximation—Euler spirals—to avoid iterative solves. An Euler spiral is a curve whose curvature varies linearly with arc length. See: [Euler Spiral / Clothoid - An Illustrated Explanation].
Its key properties:
- Can be approximated efficiently with just 1–2 cubic Bézier segments
- Naturally expresses the geometry of parallel curves
- Has closed-form expressions, making it well-suited to GPU computation
Linecap and linejoin must be handled during expansion. Previously we used an analytic stroke approach in the fragment shader. vello does this on the CPU with kurbo; see Stroke expansion. A drawback is limited parallelism; also, because expansion happens in geometric space, a single large stroke can cover nearly all tiles at high zoom. For stroke-alignment, kurbo's offset path can be used. Bezier curves are first converted to polylines before expansion.
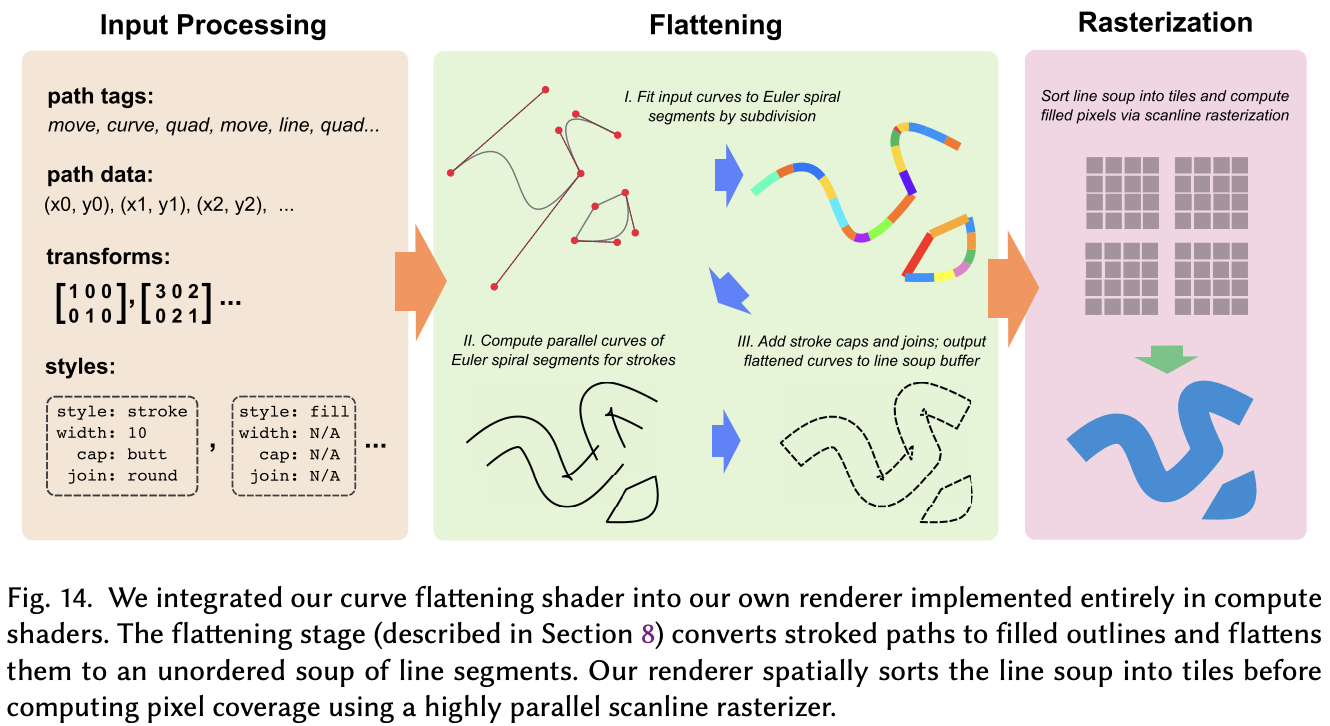
Flattening
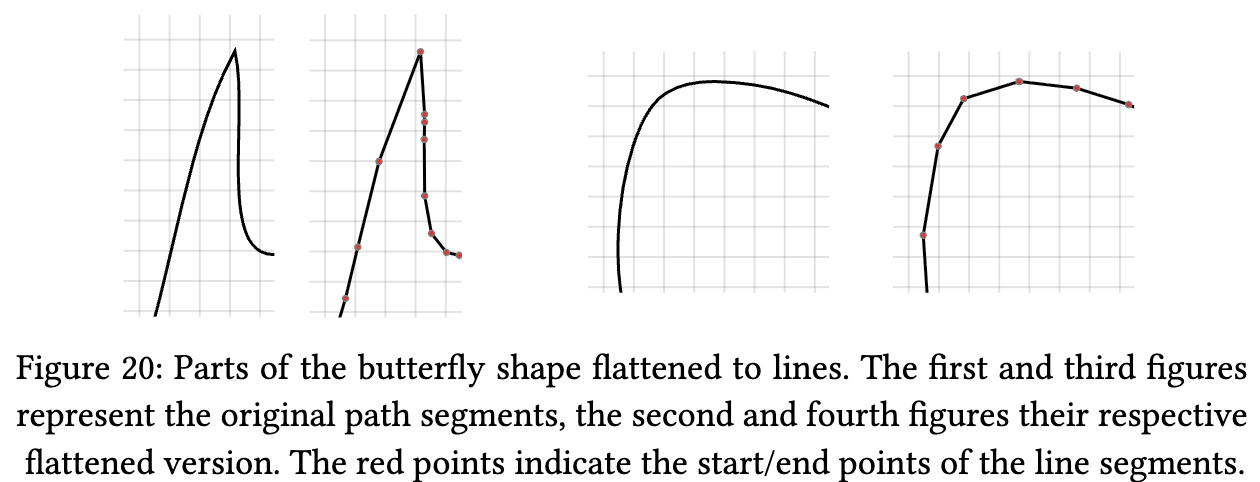
We previously sampled curves and approximated them with polylines. vello also flattens cubic Bézier curves, quadratic Bézier curves, elliptic arcs, etc. into line segments using an adaptive subdivision algorithm that chooses subdivision depth from curvature, and runs in parallel on the GPU with each curve segment processed independently.
In the compute shader, flattening produces a set of Euler spiral sub-curves for fitting, making full use of GPU parallelism:
// This function flattens a cubic Bézier by first converting it into Euler spiral
// segments, and then computes a near-optimal flattening of the parallel curves of
// the Euler spiral segments.
fn flatten_euler(
    cubic: CubicPoints,
    path_ix: u32,
    local_to_device: Transform,
    offset: f32,
    start_p: vec2f,
    end_p: vec2f,
) {
}
You can find the full shader code here: https://github.com/linebender/vello/blob/main/vello_shaders/shader/flatten.wgsl
Tile generation
Flattened paths are then assigned to horizontal strips. The screen is split into fixed-size 4×4 tiles—unlike the LOD-based approach used by map renderers. For each line segment, all 4×4 regions it crosses are computed; a Tile is created for each intersecting region and linked to that segment.
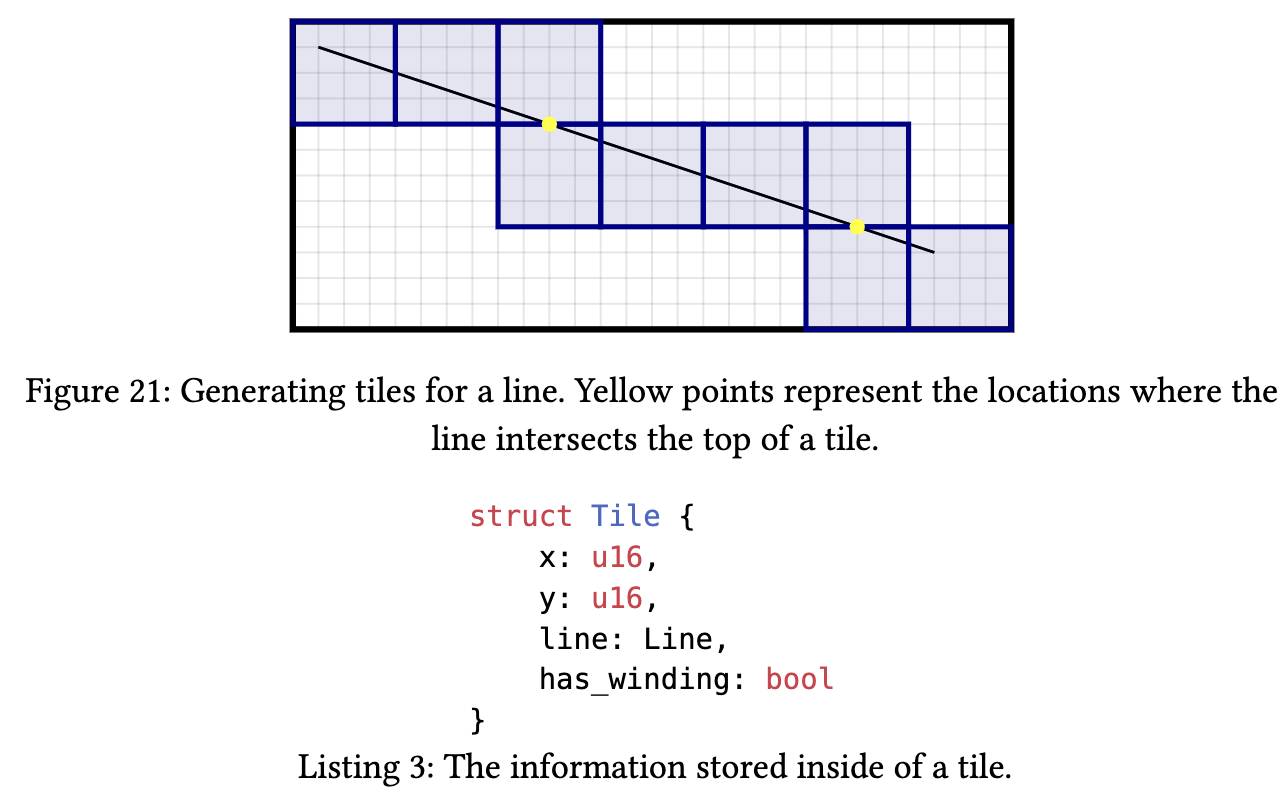
Generated tiles must be sorted in row-major order: sort by Y first, then by X for the same Y. This ordering is required so that the subsequent Strip Generation stage can merge adjacent horizontal tiles efficiently.
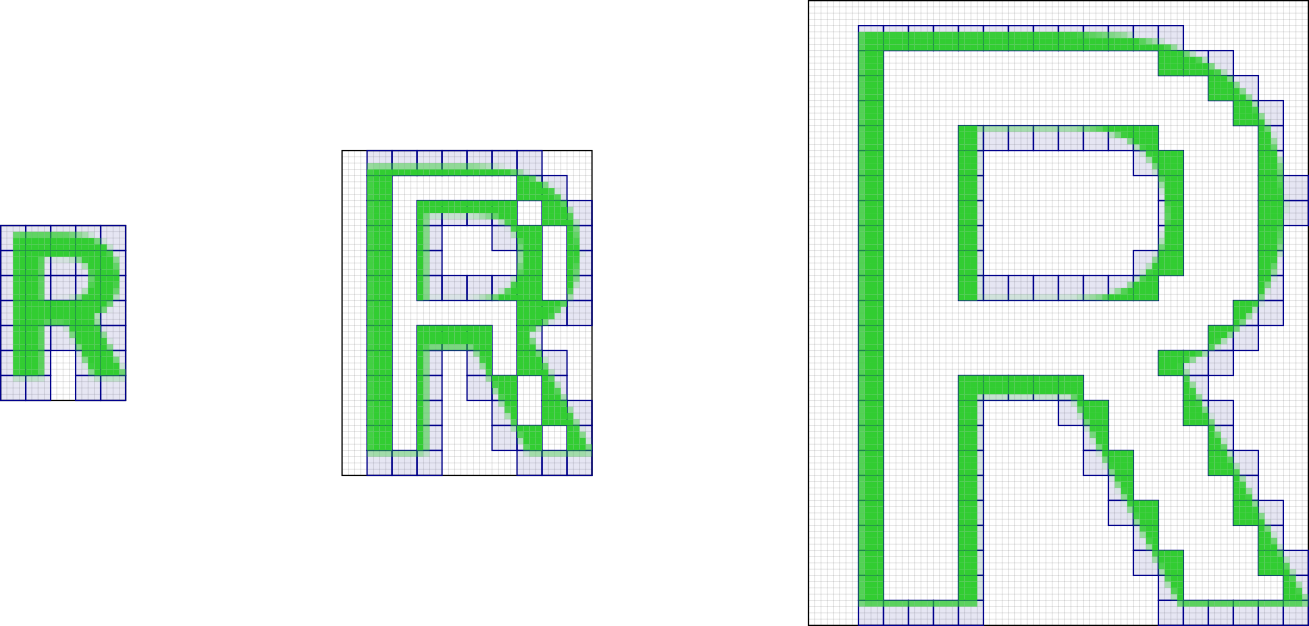
Sparse strips
Adjacent horizontal tiles (after row-major sort) are merged into Sparse Strips. Coverage is stored only in the horizontal strips actually traversed by paths, giving very high memory efficiency. The data structure looks like:
struct Strip {
    x: u16,          // start X coordinate
    width: u16,      // width in pixels (multiple of 4)
    alpha_idx: u32,  // index into alpha values
    fill_gap: bool,  // whether to fill the gap to the next strip
}
For pixels within each 4×4 tile, coverage is computed with:
- Analytic antialiasing (Analytic AA)
- Subpixel coverage per pixel
- Only edge pixels with non-zero coverage stored; interior fill is implicit
Memory optimization: compared to storing full coverage masks (e.g. 8×8 or 16×16), 4×4 tiles with Sparse Strips store only regions that actually have edges, greatly reducing memory bandwidth.
High-performance 2D graphics rendering on the CPU using sparse strips
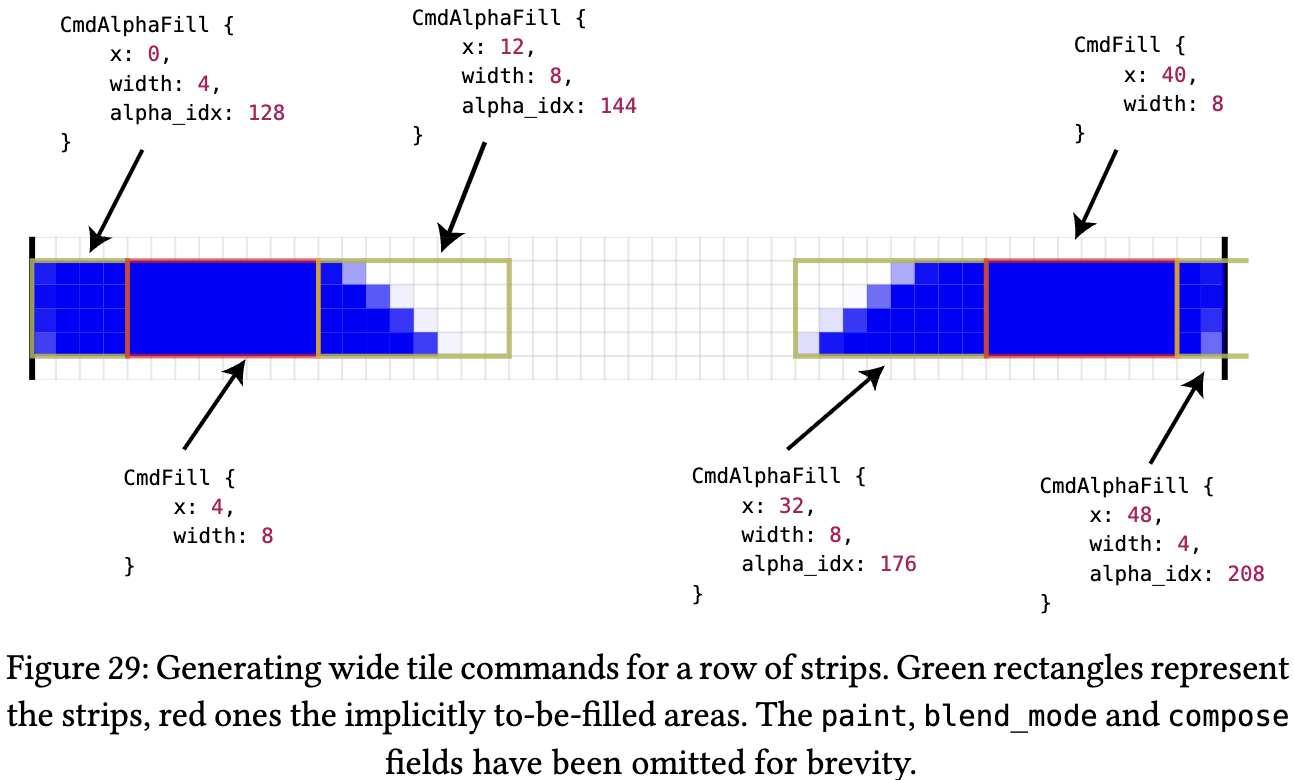
Coarse rasterization
The coarse rasterization stage splits the canvas into 256×4 pixel Wide Tiles. Each Wide Tile holds a command vector with two command types:
- Fill Command — fills non-antialiased regions between strips (solid fill)
- AlphaFill Command — fills antialiased regions within strips (applies alpha mask)
Fine Rasterization
The final pixel shader: each workgroup processes one Wide Tile (256×4 pixels).
// https://github.com/linebender/vello/blob/main/vello_shaders/shader/fine.wgsl

// The X size should be 16 / PIXELS_PER_THREAD
@compute @workgroup_size(4, 16)
fn main(
    @builtin(global_invocation_id) global_id: vec3<u32>,
    @builtin(local_invocation_id) local_id: vec3<u32>,
    @builtin(workgroup_id) wg_id: vec3<u32>,
) {
    let tile_ix = wg_id.y * config.width_in_tiles + wg_id.x;

    while true {
        let tag = ptcl[cmd_ix];
        if tag == CMD_END {
            break;
        }
        switch tag {
            case CMD_FILL: { // process all FillCommands (solid fill)
                let fill = read_fill(cmd_ix);
                cmd_ix += 4u;
            }
            case CMD_SOLID: {
            }
        }
    }

// write to final framebuffer (convert to RGBA8)
    let xy_uint = vec2<u32>(xy);
    for (var i = 0u; i < PIXELS_PER_THREAD; i += 1u) {
        let coords = xy_uint + vec2(i, 0u);
        if coords.x < config.target_width && coords.y < config.target_height {
            let fg = rgba[i];
            // let fg = base_color * (1.0 - foreground.a) + foreground;
            // Max with a small epsilon to avoid NaNs
            let a_inv = 1.0 / max(fg.a, 1e-6);
            let rgba_sep = vec4(fg.rgb * a_inv, fg.a);
            textureStore(output, vec2<i32>(coords), rgba_sep);
        }
    }
}
Replacing the Rendering Pipeline with ECS
vello is a pure 2D renderer. Features like viewport-based culling, dirty checking, and spatial indexing must be implemented by the application. For example, Xilem is a GUI framework built on vello and implements a component-tree diff system.
For us it is the same: we only replace the rendering layer and keep everything else. Thanks to the ECS architecture this is straightforward: we swap the two default systems in RenderPlugin for vello-based implementations. See: Lesson 18 - Refactoring with ECS.
import {
    DefaultPlugins,
    DefaultRendererPlugin,
    RendererPlugin,
} from '@infinite-canvas-tutorial/ecs';

const VelloRendererPlugin = RendererPlugin.configure({
    setupDeviceSystemCtor: InitVello,
    rendererSystemCtor: VelloPipeline,
});
DefaultPlugins.splice(
    DefaultPlugins.indexOf(DefaultRendererPlugin),
    1,
    VelloRendererPlugin,
);
Using wasm-pack
We build with wasm-pack. Run wasm-pack build --target web to get the output under /pkg:
rust
├── Cargo.lock
├── Cargo.toml
├── pkg
│   ├── README.md
│   ├── package.json
│   ├── vello_renderer.d.ts
│   ├── vello_renderer.js
│   ├── vello_renderer_bg.wasm
│   └── vello_renderer_bg.wasm.d.ts
├── src
│   ├── lib.rs // main source file.
│   └── main.rs
Then you can use it from JS: initialize after loading WASM and load font files.
import init, {
    registerDefaultFont,
    runWithCanvas,
} from '@infinite-canvas-tutorial/vello-renderer';

export class InitVello extends System {
    async prepare() {
        await init();

        const r = await fetch('/NotoSans-Regular.ttf');
        const buf = await r.arrayBuffer();
        registerDefaultFont(buf);
    }
}
At render time, call the corresponding shape APIs and pass attribute lists as objects:
import { addEllipse } from '@infinite-canvas-tutorial/vello-renderer';

export class VelloPipeline extends System {
    private renderCamera(canvas: Entity, camera: Entity, sort = false) {
        clearShapes(canvasId); // clear screen
        getDescendants(camera) // traverse scene graph
            .filter((e) => !e.has(Culled)) // skip culled entities
            .forEach((entity) => {
                if (entity.has(Circle)) {
                    const { cx, cy, r } = entity.read(Circle);
                    const opts: Record<string, unknown> = {
                        ...baseOpts,
                        cx,
                        cy,
                        rx: r,
                        ry: r,
                    };

                    // call wrapped vello render API
                    addEllipse(canvasId, opts);
                }
            });
    }
}
wasm-bindgen handles JS–WASM interaction, for example:
- Calling JS from Rust, e.g. reading
window.devicePixelRatio:
#[cfg(target_arch = "wasm32")]
fn device_pixel_ratio() -> f64 {
    web_sys::window()
        .map(|w| w.device_pixel_ratio())
        .unwrap_or(1.0)
}- Exposing Rust functions to JS, such as
initandaddEllipse:
#[cfg(target_arch = "wasm32")]
#[wasm_bindgen(js_name = addEllipse)]
pub fn js_add_ellipse(canvas_id: u32, opts: JsValue) {
    push_shape(canvas_id, JsShape::Ellipse {
        id: o.id,
        parent_id: o.parent_id,
        z_index: o.z_index,
        cx: o.cx,
        cy: o.cy,
        rx: o.rx,
        ry: o.ry,
        fill: o.fill,
    });
}

// draw ellipse with vello
use vello::kurbo::{Ellipse};
scene.fill(Fill::NonZero, shape_transform, &brush, None, &ellipse);- Generating TypeScript type definitions
Next we look at how to implement rendering features in the Rust/vello stack, especially the parts that are more involved on the JS side.
Gradients
In Lesson 17 - Gradients and repeating patterns we showed how to create CSS-style gradients with <canvas>.
if let Some(ref grads) = fill_gradients {
    for g in grads.iter().rev() {
        let brush = vello::peniko::Brush::Gradient(build_gradient_brush(g, fill_mult));
        scene.fill(Fill::NonZero, shape_transform, &brush, None, &geom);
    }
}
In vello, gradients are converted to peniko Gradient and then rendered. The API is close to the Canvas gradient API:
fn build_gradient_brush(spec: &FillGradientSpec, fill_opacity_mult: f32) -> Gradient {
    let stops: Vec<ColorStop> = spec
        .stops
        .iter()
        .map(|(offset, color)| {
            let c = apply_opacity_to_color(*color, fill_opacity_mult, 1.0);
            ColorStop::from((*offset, Color::new(c)))
        })
        .collect();
    let gradient = match spec.kind.as_str() {
        "linear" => Gradient::new_linear((spec.x1, spec.y1), (spec.x2, spec.y2)),
        "radial" => Gradient::new_radial((spec.cx, spec.cy), spec.r as f32),
        "conic" => Gradient::new_sweep(
            (spec.cx, spec.cy),
            spec.start_angle as f32,
            spec.end_angle as f32,
        ),
        _ => Gradient::new_linear((spec.x1, spec.y1), (spec.x2, spec.y2)),
    };
    gradient.with_stops(stops.as_slice())
}
Sketch / rough style
In Lesson 13 - Drawing paths & sketch style we used rough-js to generate a set of paths for a sketchy look and then rendered them. We could pass that set of path definitions to vello. Using the Rust crate roughr avoids passing path data from JS to WASM.
JsShape::RoughRect { x, y, width, height, .. } => {
    let options = Options {
        roughness: Some(roughness),
        bowing: Some(bowing),
        ..Options::default()
    };
    let generator = Generator::default();
    let drawable = generator.rectangle(x as f32, y as f32, width as f32, height as f32, &Some(options));
    render_rough_drawable(scene, shape_transform, &drawable, fill_color, stroke_color);
}
Text
In Lesson 15 - Drawing text we used SDF / MSDF for text rendering and spent effort on shaping and layout. That can be done with parley. The flow is:
Layout (Parley) ← Shaping with HarfRust/Swash
    ↓
Outline (Skrifa) ← Convert glyph to BezPath
    ↓
Vello/Scene
    ↓
Peniko (Brush/Color/Gradient/Image)- FontContext: register fonts, using font data passed from JS
- LayoutContext: build text layout, with support for:
- font family, size, letter spacing
- line wrapping, alignment
- kerning, ligatures, Bidi, and other typography features
- Output font data in the format vello expects; peniko provides the basic primitives (color, brush, font data)
- Render glyphs as paths with vello—no SDF at all
if let Some((font_data, glyphs, size)) =
    build_text_glyphs(&bytes, &content, font_size_eff as f32, letter_spacing_eff as f32)
{
    let fill_color = apply_opacity_to_color(fill, opacity, fill_opacity);
    let color = Color::new(fill_color);
    scene
        .draw_glyphs(&font_data)
        .font_size(size)
        .transform(shape_transform)
        .brush(color)
        .draw(Fill::NonZero, glyphs.into_iter());
}| Feature | SDF approach | Vello real-time vectors |
|---|---|---|
| Precompute | Needs pre-generated SDF | Computed from outlines in real time |
| Memory | Atlas for SDF textures | No atlas; outlines re-encoded per frame |
| Scale | Corners soften at large scale | Sharp at any scale |
| Variable fonts | Hard (re-bake SDF per frame) | Native; animatable weight/width |
| Small size | Hinting difficult | Hinting supported Round vertical hinting offset in Vello Classic |
| Performance | Fast GPU sampling, slow prep | GPU compute heavy, zero prep |
For CJK support you need to load CJK fonts. CJK font files are large (often 10MB+), which leads to:
- Slow font registration—processing a large file every frame
- Glyph cache blow-up—thousands of CJK glyphs use a lot of memory
We therefore need to make full use of caching and avoid running parley layout and copying large CJK font data for the entire text on every frame. Font subsetting is another option. In Lesson 10 - Image import/export we mentioned that Excalidraw also does dynamic subsetting when inlining web fonts into SVG.
Although we do not use SDF for fonts here, vello also supports non-vector glyphs:
- COLR/CPAL color fonts: rendered as images via vello’s image compositing pipeline
- Bitmap glyphs (e.g. emoji): rendered as texture quads
We can first use parley to compute layout for text containing emoji, then draw emoji via the Canvas API to obtain pixel data, and finally render it with vello:
fn get_or_create_emoji_image(emoji: &str, size: u32) -> Option<(Vec<u8>, u32, u32)> {
    let document = web_sys::window()?.document()?;
    let canvas = document
        .create_element("canvas")
        .ok()?
        .dyn_into::<web_sys::HtmlCanvasElement>()
        .ok()?;

    let ctx = canvas
        .get_context("2d")
        .ok()??
        .dyn_into::<web_sys::CanvasRenderingContext2d>()
        .ok()?;

    ctx.fill_text(emoji, (size / 2) as f64, (size / 2) as f64).ok()?;

    // Read back pixel data
    let image_data = ctx
        .get_image_data(0.0, 0.0, size as f64, size as f64)
        .ok()?;
    let data = image_data.data();
    let rgba: Vec<u8> = data.to_vec();
    Some((rgba, size, size))
}
Image post-processing
We can implement some post-processing effects, similar to Lesson 30 - Post-processing and render passes.
Blur
vello provides a helper draw_blurred_rounded_rect, which is suitable only for rounded rectangles and does not apply to arbitrary shapes.
scene.draw_blurred_rounded_rect(
    shape_transform,
    base_rect,
    Color::new(fill_color),
    r,
    blur_std_dev,
);
Dropshadow
Dropshadows can be built using vello’s layer functionality:
- Draw the shape into an off-screen layer
- Apply a blur
- Offset the result and draw it back into the main scene
Other features implemented in Rust
Compute bounds
We can use parley to handle BiDi, clusters and other text metric features. For Polyline and Path with stroke, linecap, and linejoin, we previously used approximate bounds; we can now use kurbo’s BezPath::bounding_box() for more precise results:
/// Precise bounds: use BezPath::bounding_box() for fill; for stroke use Kurbo's stroke
/// expansion to a path then take bbox; union both. See Graphite's approach: turning
/// stroke geometry into fill outline then taking bounding_box is the closest to "exact".
fn path_render_bounds(d: &str, stroke: Option<&StrokeParams>) -> Option<Rect> {
    let bez = BezPath::from_svg(d).ok()?;
    let fill_rect = bez.bounding_box();
    let mut result = fill_rect;

    if let Some(s) = stroke {
        if s.width > 0.0 {
            let kurbo_stroke = s.to_kurbo_stroke();
            let opts = StrokeOpts::default();
            const TOLERANCE: f64 = 0.1;
            let stroke_path = vello::kurbo::stroke(bez.iter(), &kurbo_stroke, &opts, TOLERANCE);
            let stroke_rect = stroke_path.bounding_box();
            result = result.union(stroke_rect);
        }
    }

    Some(result)
}
Then at vello init time we plug it in:
import {
    Path,
    createGeometryBoundsProviderFromComputePathBounds,
} from '@infinite-canvas-tutorial/ecs';
import { computePathBounds } from '@infinite-canvas-tutorial/vello-renderer';

Path.geometryBoundsProvider =
    createGeometryBoundsProviderFromComputePathBounds(computePathBounds);
Picking
Besides rendering, picking can be done in WASM. For example in Graphite:
// node-graph/gcore/src/vector/click_target.rs
struct ClickTarget {
    bounds: [DVec2; 2],           // bounding box [min, max]
    path: Option<BezPath>,       // exact path (optional)
    stroke_width: f64,
}

impl ClickTarget {
    // screen-space pick test
    fn intersects(&self, point: DVec2, layer_transform: DAffine2) -> bool {
        // 1. transform to local space
        let local_point = layer_transform.inverse() * point;

        // 2. AABB quick reject
        let target_bounds = [
            self.bounds[0] - DVec2::splat(self.stroke_width / 2.0),
            self.bounds[1] + DVec2::splat(self.stroke_width / 2.0),
        ];

        if !aabb_intersect(target_bounds, [local_point, local_point]) {
            return false;
        }

        // 3. exact path test (winding)
        if let Some(path) = &self.path {
            path.winding(local_point) != 0
        } else {
            true
        }
    }
}
Previously we tested whether a point was inside a path using the Canvas API isPointInStroke and isPointInPath:
const ctx = DOMAdapter.get().createCanvas(100, 100).getContext('2d');
const { d } = entity.read(Path);
const path = new Path2D(d);
if (hasStroke) {
    ctx.strokeStyle = stroke.color;
    ctx.lineWidth = stroke.width;
    ctx.lineCap = stroke.linecap;
    ctx.lineJoin = stroke.linejoin;
    ctx.miterLimit = stroke.miterlimit;
    ctx.stroke(path);
    isIntersected = ctx.isPointInStroke(path, x, y);
}
We can also use kurbo: flatten the path into subpaths within a tolerance and run intersection tests:
fn is_point_in_path_fill(d: &str, x: f64, y: f64, fill_rule: &str) -> bool {
    let Ok(bez) = BezPath::from_svg(d) else { return false; };
    let subs = flatten_bez_path(&bez, 0.25);
    let p = Point::new(x, y);

    // nonzero: for each closed contour accumulate winding (here we approximate with
    // per-contour test; for complex self-intersecting paths this is still approximate,
    // but closer to Canvas2D than a simple bbox). A more precise approach would
    // accumulate winding over all edges; the current implementation is enough for
    // selection/picking.
    for sp in subs.iter() {
        if sp.closed && sp.points.len() >= 3 && point_in_polygon_nonzero(p, &sp.points) {
            return true;
        }
    }
    false
}
Layout engine
In Lesson 33 - Layout engine we used Yoga compiled to WASM. taffy is a Rust layout engine that supports Flexbox and Grid.